Table of Contents:
- Draw 3D Shapes Using Perspective
- Use a Photo for Reference
- Create an outline
- Work with perspective
- Draw and color
- Put the pieces together
Draw 3D Shapes Using Perspective
Knowing the laws of perspective is essential if you want to learn how to draw 3D shapes. The technique of perspective is creating an illusion that an object has three sides or dimensions within a flat surface. It’s what makes a cup in a painting look real enough to carry away. It is also what creates the sense that one object is closer to the viewer than another. When a painting shows a view looking down a street and the buildings closer to you look large and the mountains in the far distance look small, the artist is using the laws of perspective.
You’ll understand how to draw 3D shapes better as you watch the artist in the video draw a 3D hand across three standing panels. He’ll show how perspective adds shape and form. To make the drawing pop off the paper, he uses Arteza Professional Watercolor Pencils for their intense, saturated pigments and excellent blending capabilities. For this 3D step-by-step process, we recommend reading these steps and watching the entire video first before beginning this project.
Supply List
- Arteza Professional Watercolor Pencils - Set of 72
- 3 Pieces of 400 gsm or Cover Stock paper for the drawing
- 2 pcs. 13 ½ “x9” (34cmx23cm)
- 1 pc. 9”x9” (23cmx23cm)
- 3 Pieces 2mm-thick layout cardboard. (in same sizes as drawing paper)
- Resin glue
- Masking tape
Steps to Draw 3D Pictures: Zombie Hand
You’ll be drawing a hand in 3D and then dividing the hand into sections, with each section drawn on a separate piece of paper. Once the drawings are complete, you’ll put them together to form a 3D display for the perfect decoration for Halloween or your next zombie-themed party.
Step 1. Use a Photo for Reference

To draw 3D hands and make them look realistic, it’s important to make an outline first. The artist does this by taking a photo of his hand. Taking photos is an easy way to envision a hand in 3D and then be able to draw all the different angles and lighting of the wrist, palm, and fingers.
Step 2. Create an outline

Next, he prints the photo and draws directly on it where he wants the details (torn skin, stitches, scars, etc.) to go. Now he has an image he will use to create the drawing and use as a reference later on.
Step 3. Work with perspective

Looking closely at the photo, notice the shape or contour of the entire hand and wrist. Study the fingers’ shapes as they curl in and almost disappear. This is called foreshortening. Think about how to divide the hand and wrist into three sections and how each section will intersect once the paper is put together to form the display. Once foreshortening is determined, you will know where the exact point in which the planes intersect. Use that to divide the drawing into three parts—one for each side of the display. Now draw each hand section separately.
To get the perspective correct, the artist uses image-editing software. He adds the zombie hand photo with the extra details into the graphics editor program. He applies a preliminary square grid over it (3x3 cm in this case) to help aid with the perspective.
Each part of the hand is prepared individually. Since it’s important to make sure the scale of the scene matches the scale of the drawing before you put the drawing into the scene. You need to adjust its height so it equals the height of the base in which it will be put. After that, you can place the resulting images into the scene as a second layer.
Now the artist applies the effect of perspective to it. By connecting the endpoints of the two layers he is able to achieve the desired effect. To make sure all connections and proportions are done correctly, print out the resulting variant and combine all the scene’s parts to make sure all the hand sections match up.
When all sections are correctly placed, you can transfer each section onto your drawing paper with pencil lines that are very light.
Step 4. Draw and color

Having a photo for reference also helps when you get to the colorwork. Using it as a basis, you can scrupulously work out the elements, which will make the scene more realistic and expressive.
Don’t be afraid to use every single pencil in the set! When working with colored pencils make sure you work in layers and gradually work up to the color you want. Be consistent with your pencil strokes and carry colors from one side to the next to give a uniform appearance.
The artist begins by coloring in the main color spots as well as the small details by applying thin, almost transparent layers with light strokes of the color pencil. He uses a separate sheet of paper to cover the areas he has not colored yet in order to keep from erasing the pencil lines with his arm.
The artist blends one color over another to get rid of unneeded texture and strokes as well as to make the drawing brighter.
Each side is drawn and colored individually. It is important to leave 5-7 mm of blank space on the sides that will connect to each other.
Step 5. Put the pieces together
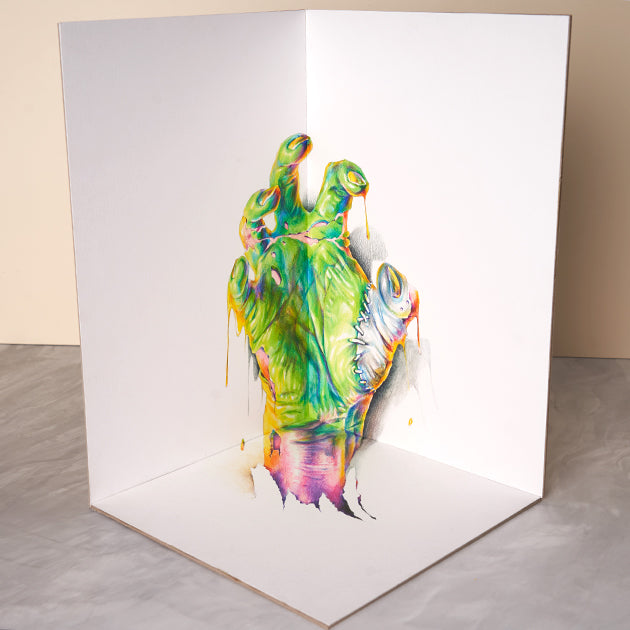
When the drawings are complete, the artist uses the resin glue to adhere each drawing to the layout cardboard. This will make the final display good and sturdy. Once the glue is completely dry, he then connects each panel with masking tape and stands the entire drawing up for an incredible 3D rendering of the zombie’s hand!
Watch the following video for a closer look at the artist’s process for a better understanding of how to create your own 3D zombie hand.
You’ve done it! You’ve learned how to add 3D objects to your list of artistic skills. Congratulations, you’ve created a spooky-fun zombie hand to use as a centerpiece for your Halloween table or your next Walking Dead party that all your friends will be green with envy over!


