
Table of Contents:
- Nothing says “I Love You” Like Handmade Valentine’s Cards
- List of Supplies
- Step-By-Step Heart Card
- Recommendations
Nothing says “I Love You” Like Handmade Valentine’s Cards
Sending and receiving Valentine’s Day cards has been a tradition since 1415. From the beginning, Valentine’s cards were a big hit and it’s easy to understand why—who doesn’t like getting a card saying how much you’re loved? But, as much fun as they are to buy and send, a great way to show how much you love someone is by making handmade Valentine’s Day cards.
Creating a card to wish your sweetie a Happy Valentine’s Day is a labor of love that’s a simple way to show how much they mean to you. Plus, homemade cards make special keepsakes, too. That’s why we asked one of our artists to put together this video. Now, you can make cards for all the people you love without having to be a professional designer or a highly skilled cardmaker. And, you won’t need a lot of supplies—just some paper, felt, scissors or craft knife, hot glue, and Arteza TwiMarkers.
List of Supplies
- Arteza Watercolor Pad, 32 Sheets, 9x12"
- Professional Drawing Pencils - Pack of 12
- Arteza Stiff Felt Fabric, Red Tones or Pink Tones
- Scissors or Craft Knife
- Self Healing Rotary Cutting Mat, 18x24"
- Ruler
- Arteza TwiMarker in A103 (Rose Red) or any other red marker you have
- Hot Glue
- Straight Pins
- Ribbon
Step-By-Step Heart Card
Before you begin, here are a few suggestions. First, it’s important to create your card on heavyweight paper, especially for this particular project. Since a lot of little rolls of felt will be glued to the front of this card, the paper needs to be strong enough to hold their weight. For this reason, the artist in the video is using 140lb (300 gsm) watercolor paper, which is a grade of paper known as “cardstock.”
The second suggestion is to read through the steps and then watch the video before making the card. By doing this, you’ll be better prepared for each new step.
Step 1. Prepare the card

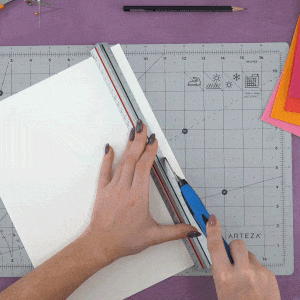
Cut ½” off one side of your paper. Make sure the paper is horizontal in front of you and use the ruler to find the center. Next, cut a small notch at this center point. Use the back of the craft knife or tip of the scissors to lightly score a line from the notch down the center of the paper. This is the fold line and will make it much easier to get a nice, even fold. Fold the card and press it flat.
Lightly sketch a big heart on the front of your card.
Step 2. Make the ribbon

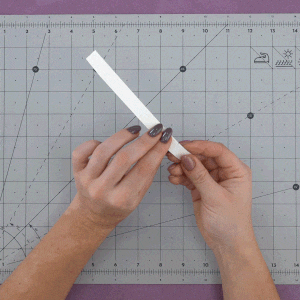
Take the ½” wide strip you cut off the side and cut it in half at the center for a 6” long strip. Then, fold in each edge, so that once placed across the base of your heart, it will stand up.
Place it aside for now; you’ll be using it at the end.
Step 3. Create the felt rolls

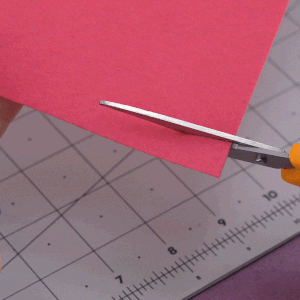
From each sheet of felt material, cut diagonal strips 3–6 inches long. Try to make each strip about 0.5–0.7 inches at the top and about 0.2-0.3 inches on the bottom. For this card, the artist cut nearly 100 strips.
TIP: The longer the strip, the wider your roll will be. Keeping this in mind, vary the lengths so you’ll have several different size rolls.
Now, starting at the strip’s widest end, roll it up to form a tiny spiral roll. Roll it in such a way to make one side flat and the other raised up a bit. (They will resemble tiny cinnamon rolls.) To hold it closed, hot glue the end to the roll and put a straight pin through it. Let dry for about five minutes. After completely dry, remove the pin.
HINT: Using a straight pin will also help keep your fingers from getting burned by the hot glue.
Step 4. Assemble the card

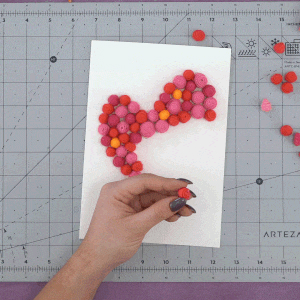
Once you have all your little spirals made, hot glue each one inside your heart sketch. This is when you can get really creative! As you can see in the video, the artist didn’t just line them up. She randomly placed varying sizes and colors in the heart. She then filled in the empty spaces with the appropriate size spiral.
Step 5. Finish the card

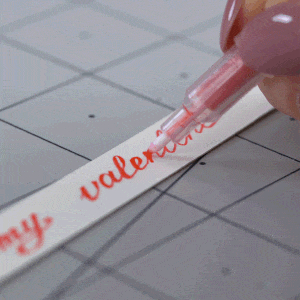
After you’ve completely filled in the heart, it’s time to bring back the paper ribbon you created earlier. Write a message in between the folded edges. The artist wrote “Be My Valentine,” but you can put any message you want. By using the TwiMarker you can make your lines as thick or thin as you like..
TIP: If you don’t like your handwriting, download a free font from the internet or trace words created on your computer.
Next, cut little v’s on the ends to make it look like a ribbon banner. Put the ribbon over the bottom of your heart and glue it in place.
Write a special message inside and you’re finished!
Recommendations
- Sketch your heart using a very faint line. Once the felt is attached, you won’t be able to erase any of the lines.
- An easy way to stay within the lines of your sketch (as well as hide them) is to first apply the spirals to the line you drew, following the contour of the heart. Then fill in the rest.
- If you’re going to make a lot of cards in the future, we highly recommend you get a bone folder. This tool is specially made to score and flatten a card’s fold for a crisp and clean end result.
- When gluing the spirals along the edges of the heart, attach them with the glued side facing towards the middle of the heart so you can’t see the ends showing.
You’ve done it! You’ve made a very special Valentine’s Day card for your sweetie! You can follow how our artist did it or create your own, with your loved one’s personality in mind. You can use all one color of felt or try spelling a word using differently colored spirals. There are so many ways to have fun making Valentine’s cards! We hope you enjoyed watching this tutorial as much as we enjoyed making it for you! Don't forget to check out our entire Valentines Day Collection for limitless creativity!
Just follow along with the video and you’ll create a card you’ll love!


