Table of Contents:
Drawing a Person Is Easier Than You Think
How to draw people? If you’ve struggled in the past trying to learn how to draw a person, don’t feel bad, you’re not alone. Even professional artists find drawing a person one of their most challenging activities. That’s why for years, artists have created handy tricks on how to draw a man’s or a woman’s body. As you learn them and understand the importance of proportion as it pertains to a person, drawing one will become simpler and you’ll be able to start depicting friends and family and adding more people into your artwork.
Steps to Drawing a Man or a Woman’s Body
I created the drawings that accompany this article using Arteza Professional Pencils. I think you’ll enjoy using them as well for this project as they come in a variety of hardnesses, from 4H to 6B, for drawing light lines and making dark shading. These pre-sharpened, strong pencils are ready when you are to create and are pencils that last a long time. I also suggest using quality paper for this project.
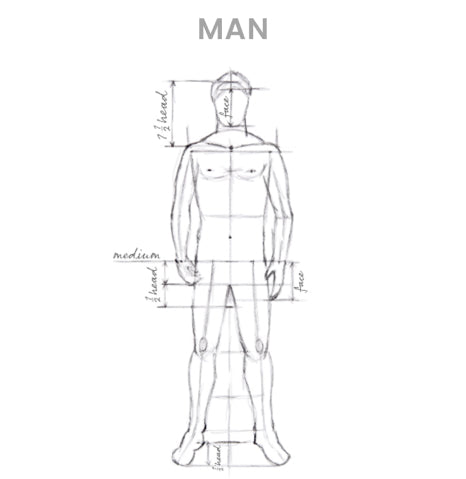
Step 1. Separate the body’s height into eight sections


I start with a line straight down my paper’s center, leaving about 2-inches of margin. This acts as an axis line for how tall the man or woman is, starting at the crown of the head down to the base of the feet. This axis will keep your body symmetrical.
Next, intersect eight equally spaced parallel lines crossing the axis line. Why eight? Because I learned from other artists who had figured out a long time ago that they could get a person’s dimensions right by using their head’s height (HH) as a unit for measuring. I found out that an average human body’s height is equal to eight times their head’s height (measuring from top of the skull to base of the chin). By dividing the person into eight sections, I could accurately add the head, arms, legs and other components in the appropriate places.
TIP: For an accurate height, hairstyle doesn’t count. The correct way to measure is from the skull under the hair.
Step 2. Sketch head, torso, and limbs
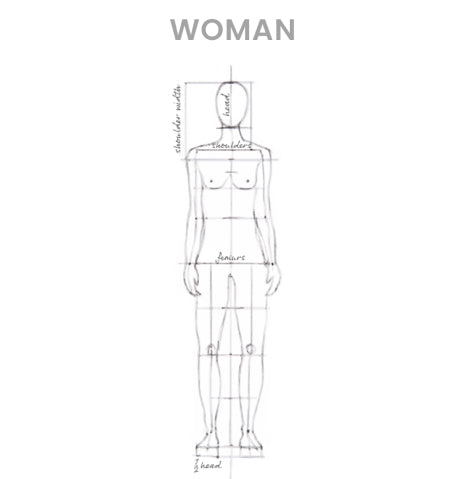

Sketch the head as an oval shape in the first segment in the middle of the first and second lines.
The neck and shoulder slopes go a half a HH in the second block. Next, from the center axis, go out a full HH and place a mark. This indicates shoulder placement.
TIP: An average width for male shoulders is two head heights or sometimes a bit less. Women’s shoulders are usually one-half the head’s height, although they can be wider or narrower.
The waist and elbows are three head heights from the crest of the head. Make marks here.
I also place some marks to indicate the body’s midsection at the hips, four head heights from the top. This is also where to put marks to indicate the location of the wrists. The palm’s length is about three-fourths a HH below the wrist mark.
TIP: A man’s hips are one and a half head heights, while a woman’s tend to be wider — about 2 head heights, although it varies with each person.
I put a mark for the knees either a bit higher than the 6th line or at this exact level. Once again it varies with each individual.
Now I place another mark for the feet at the 8th line with the foot width about half of a head height.
Step 3. Define the torso

After the vertical axis is marked, it’s time to define the body’s parts with very light lines. I begin with an outline of the shoulder. This is situated from the top line going down one and a half HH. The collarbones along with the jugular cavity are in the center and slightly below the neck at the same height as the shoulder.
Next outline the width of the hips.
Now it’s time to define the arms and legs. As my marks indicate, wrists are at the same level as the hips and are a little less than half an HH when the hand is hanging relaxed beside the body.
Add the legs and knees.
Step 4. Add joints and muscles
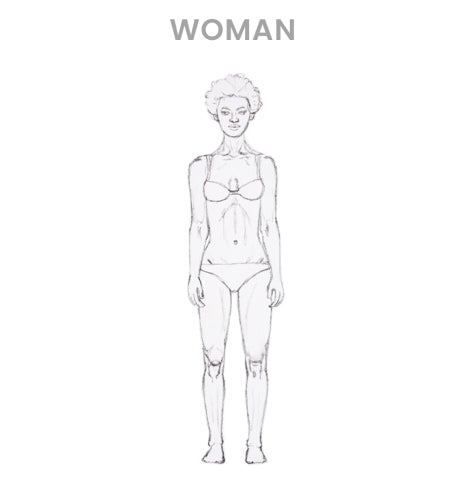
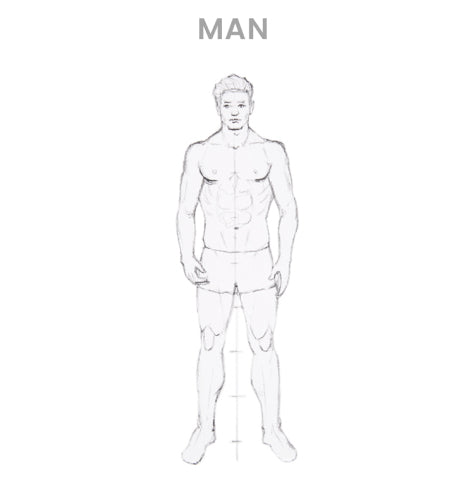
I use a slightly darker pencil to begin adding in some details of the body. When I draw the shoulders, I include those areas from the shoulder to the elbow. Then I add the forearm, which is the part from the elbow to the hand.
The leg begins with the thigh, which starts at the hips and ends at the knee joint. Next, I place the knee, shin, and foot.
TIP: Be cautious that the arms and legs are neither too thick nor too narrow at this stage.
Once I’ve drawn the body and its joints, it’s time to turn to more specifics. I add the characteristics of the face before adding details to each separate body part — shoulder girdle (shoulder joints, collarbones, and jugular cavity), rib cage, stomach, arms, and legs. I take great care to capture the specifics of the knees and feet.
At this stage, I begin outlining the muscles to make them look more defined.
This is when I add clothing.
Step 5. Add shadows and more detail to the body


Adding shadows is how to give your body substance and depth. After all, the body is not a flat surface and when the light falls on it, shadows are created in the dips and curves. The shadows are created by a technique called hatching.
Hatching is using straight, thin lines placed close together. Hatching can be done vertically, horizontally, or diagonally. The closer you place the lines together, the darker an area will appear. To get the darkest tone possible, use intersecting lines in a technique known as cross-hatching.
Use hatching to create a light gray tone to add definition to the shadows slightly on and under the face, neck, collarbones, jugular cavity, and shoulders. Apply hatching to add more contrast on the muscles of the arms, stomach, and legs.
Step 6. Build up shadows and details


To add even more differentiation to shadows, I use an eraser to lift away the hatching to create my lightest areas and use cross-hatching over the existing hatching to further darken my darkest areas.
To give an appearance of smooth skin, lightly hatch across the entire body with a 3H or 4H pencil. These pencils have hard graphite cores that allow the creation of very faint lines. This hatching helps blend everything for one consistent tone. Leave some areas very light — tops and front of shoulders, knees, hands, upper part of hips, chest, and stomach’s upper part, as these are parts where light shines brightest.
Recommendations
-
Remember that the first task when drawing people is to get their proportions correct.
-
Also, remember that general proportions only help to depict people more accurately, but there are differences between each person’s proportions. So if you are sketching a specific person, you have to learn the structure and dimensions of their body.
-
Your unit of measurement is always head height, but you should realize that there may be a difference from that unit of measurement from one person you are depicting to the next, even if there is only a slight difference.
-
Follow the “general to specific” rule for every stage of this exercise. That means to start with large general areas first before working on smaller or more specific details.
-
While working with shading and creating shadows, remember: the more tonal gradation you reach, the more realistic your person will be. Try making your transitions softer and your hatching more precise so that your body doesn’t look like it’s made of wood or plastic.
There you go! Now you have some techniques and tips that will help you with learning how to draw a man or woman. I recommend you just take it slow and follow the steps while referring to these pictures and you’ll be well on your way to add people to your paintings, sketching people at your favorite coffee shop, or amazing your friends and family with sketches of them!


2 comments
Typically, an average human body’s height is equal to eight times their head’s height, so as long as the eight sections match these proportions, you should be fine. :)
Great teaching! I should try this .Just wondering 8 section that u divide does it need an exact measurement ? or Its up to us?
Thank you.