
Table of Contents:
- Getting It Right
- Why Is Perspective Drawing Important
- What Are the Types of Perspective Drawing
- Perspective Made Easy
- Recommendations
Getting It Right
Depicting a three-dimensional subject on a flat piece of paper is a challenge every artist faces. If you’ve ever wondered why your drawings don’t appear quite right, it might be because of the drawing’s perspective. That is because when you are facing the front of your subject you get a flat view while shifting to one of the sides or viewing from the top or bottom suddenly presents diverse angles that if not captured correctly can throw off your entire scene. It’s all about your view (or the perspective) of your subject.
We’ve written this article to help you understand it better. You’ll get an overview, an explanation of three types of perspective and an example you can practice at home.
Why Is Perspective Drawing Important?
Perspective drawing lets you realistically portray objects retreating into the distance. The best way to think about it is to imagine yourself in the center of a city street with buildings on both sides. As you look ahead, you see the buildings becoming smaller the farther away they get, meeting at a point in the center of the horizon, or “vanishing” at this point. This phenomenon is called a one-point perspective and is fundamental for creating realistic distance on a two-dimensional plane, such as a flat sheet of paper or canvas.
Being able to get this aspect correct is essential not just for landscape drawings and paintings, but for interior design, figure drawing and still lifes. Whether you’re trying to capture the look of a room full of architectural details, a person relaxing on a bench or a grouping of objects, perspective aids in helping the viewer realize the spatial relationship of what they are viewing.
What Are the Types of Perspective Drawing?
It’s important to remember that the perspective is the actual view your eyes see as if looking out a window. Just think of your surface as that window and it becomes easier to establish the perspective of your drawing.
There are many types of perspective in drawing. As well as linear perspective, which focuses on lines to achieve angles, there is also aerial and curvilinear. Linear perspective creates the angles with lines merging into one vanishing point. Aerial perspective uses atmospheric quality to create distance by making objects that appear farther away lighter and not as visible to the eye as those that are nearer to the viewer. Curvilinear uses curved lines to give a convex or concave shape to a drawing’s subject.
In this article, we’ll look at the three common linear perspectives.
One-Point Perspective
In one-point perspective, everything in the picture converges to one vanishing point on the horizon line, as our buildings in the opening paragraph of this article did. It is often used when portraying roads, railroad tracks, hallways and cityscapes. The artist draws this way as if he is standing in the front and center of a window and his eyes are at the same level as the horizon. He uses lines that are parallel to his line of sight or perpendicular (whether seen or unseen) that merge at the vanishing point, placing his subjects along these lines.
Two-Point Perspective
Simply put, if the drawing has two vanishing points, it is drawn using a two-point perspective. A good example of this is when you draw a cube from the view of its corner. This view allows you to see both sides of the cube, thus both sides will contain parallel lines that if extended past the cube would recede and eventually vanish at two separate points.
Three-Point Perspective
In this instance, there are three vanishing points. Think of it this way: you can view a building from a bird’s eye view (from above) or a worm’s eye view (from below). Either way, not only would you be able to see the two sides, but it would also be like looking down or up at it. To draw all these sides with the correct angles you would place parallel lines with vanishing points on the two sides (as we did in the previous example), as well as place parallel lines that recede and meet at another vanishing point, either above or below. When placed above, it will appear as though you’re looking down at the building, while putting the vanishing point below it appears as if you’re looking up at it.
Perspective Made Easy
The best way to learn how to draw perspective is by doing it. We’ve put together these easy-to-follow steps to give you practice drawing a two-point perspective of a cube. We chose this because once you get the hang of it, it will be easy to adjust for a one- or three-point perspective drawing.

Step 1. Establish your horizon line
Draw a straight horizontal line on your paper.
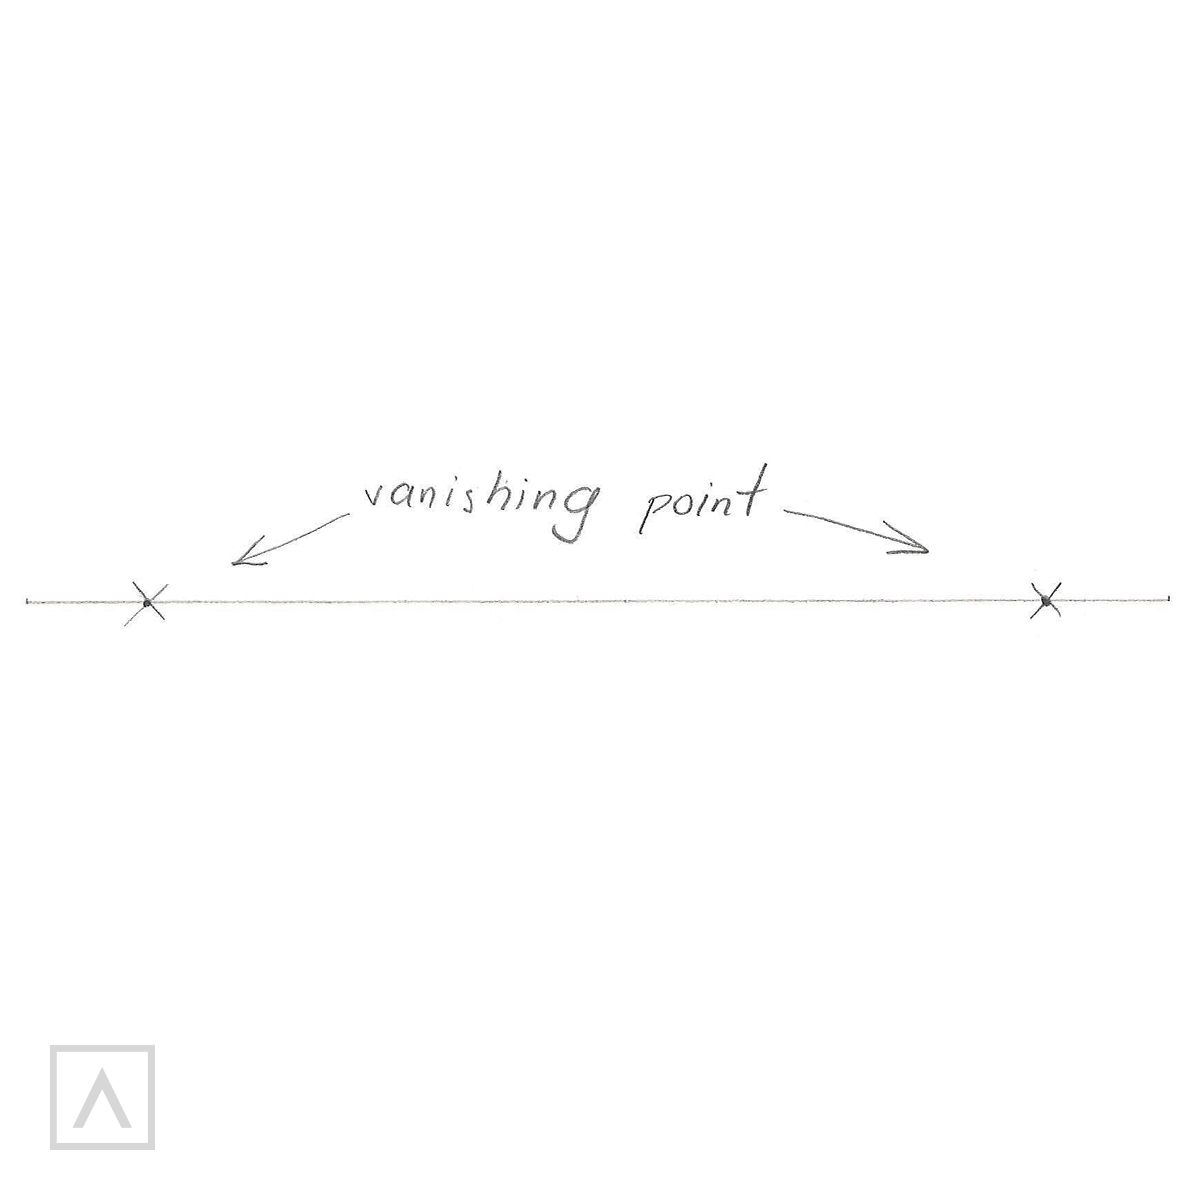
Step 2. Define two vanishing points
Place two points on the line. The closer the points are to each other, the sharper the effect will be. But, don’t put them too close together or your drawing will become distorted.
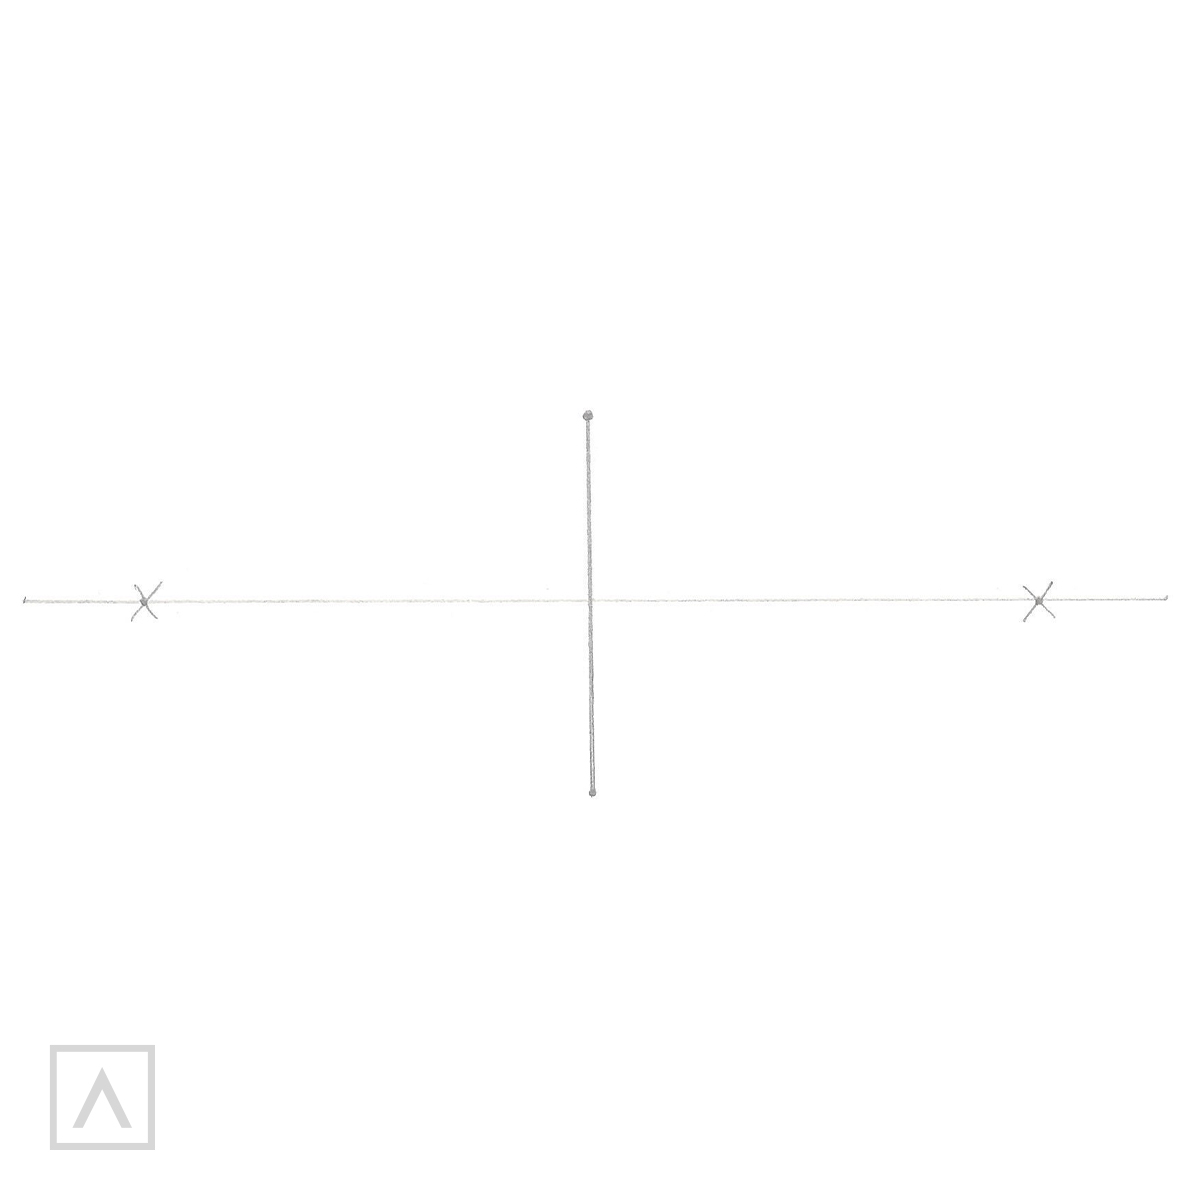
Step 3. Determine the location of the corner of the cube
Place a vertical line in the middle of your vanishing points. This is the corner of the cube. With more practice, you’ll see how the location of this line on the horizon will determine how it will ultimately look.
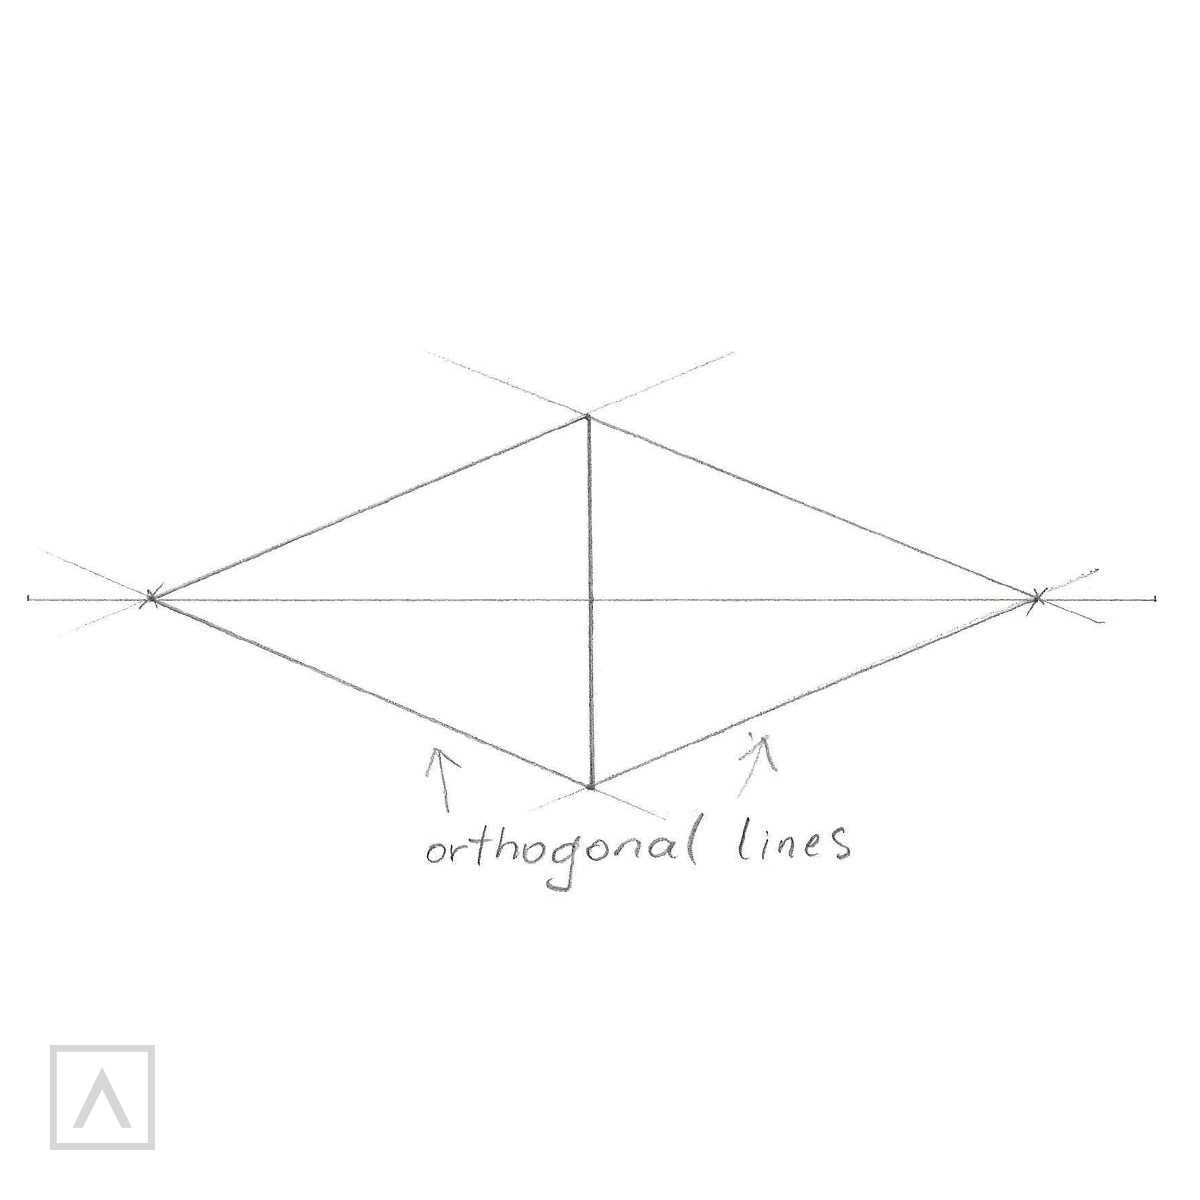
Step 4. Connect the cube’s corner to the vanishing points
Draw straight lines from the top and bottom of the vertical line to the vanishing points on either side. It should be a diamond shape.
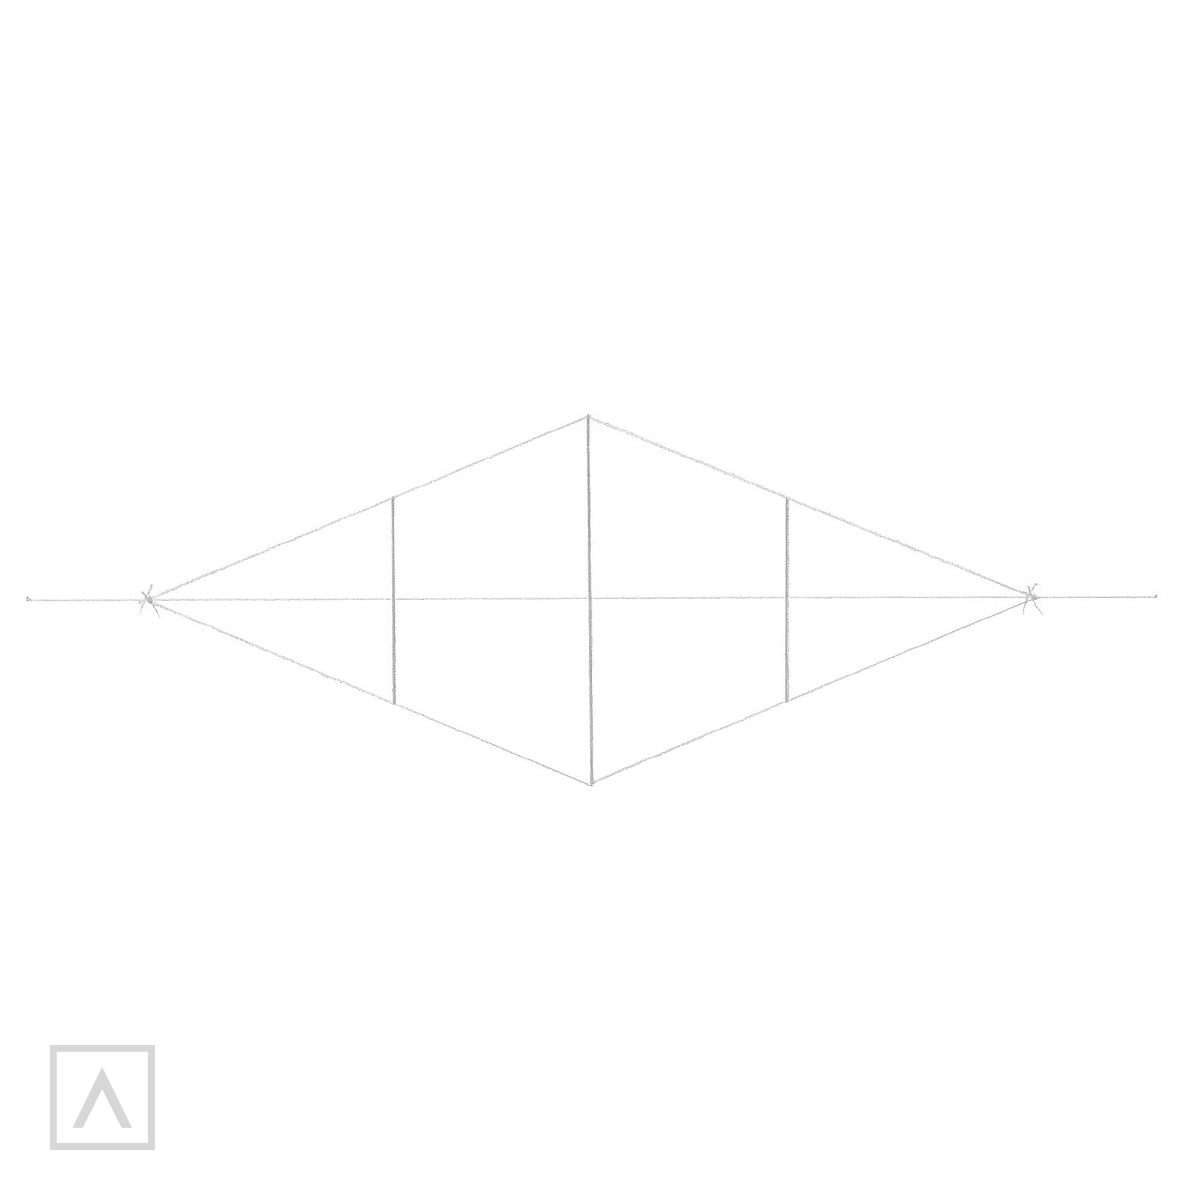
Step 5. Define the sides of the cube
Go about halfway between the corner and the vanishing point and connect the top line to the bottom one with a vertical line. Do this on both sides of the vertical line.
Can you see the cube you’ve created?
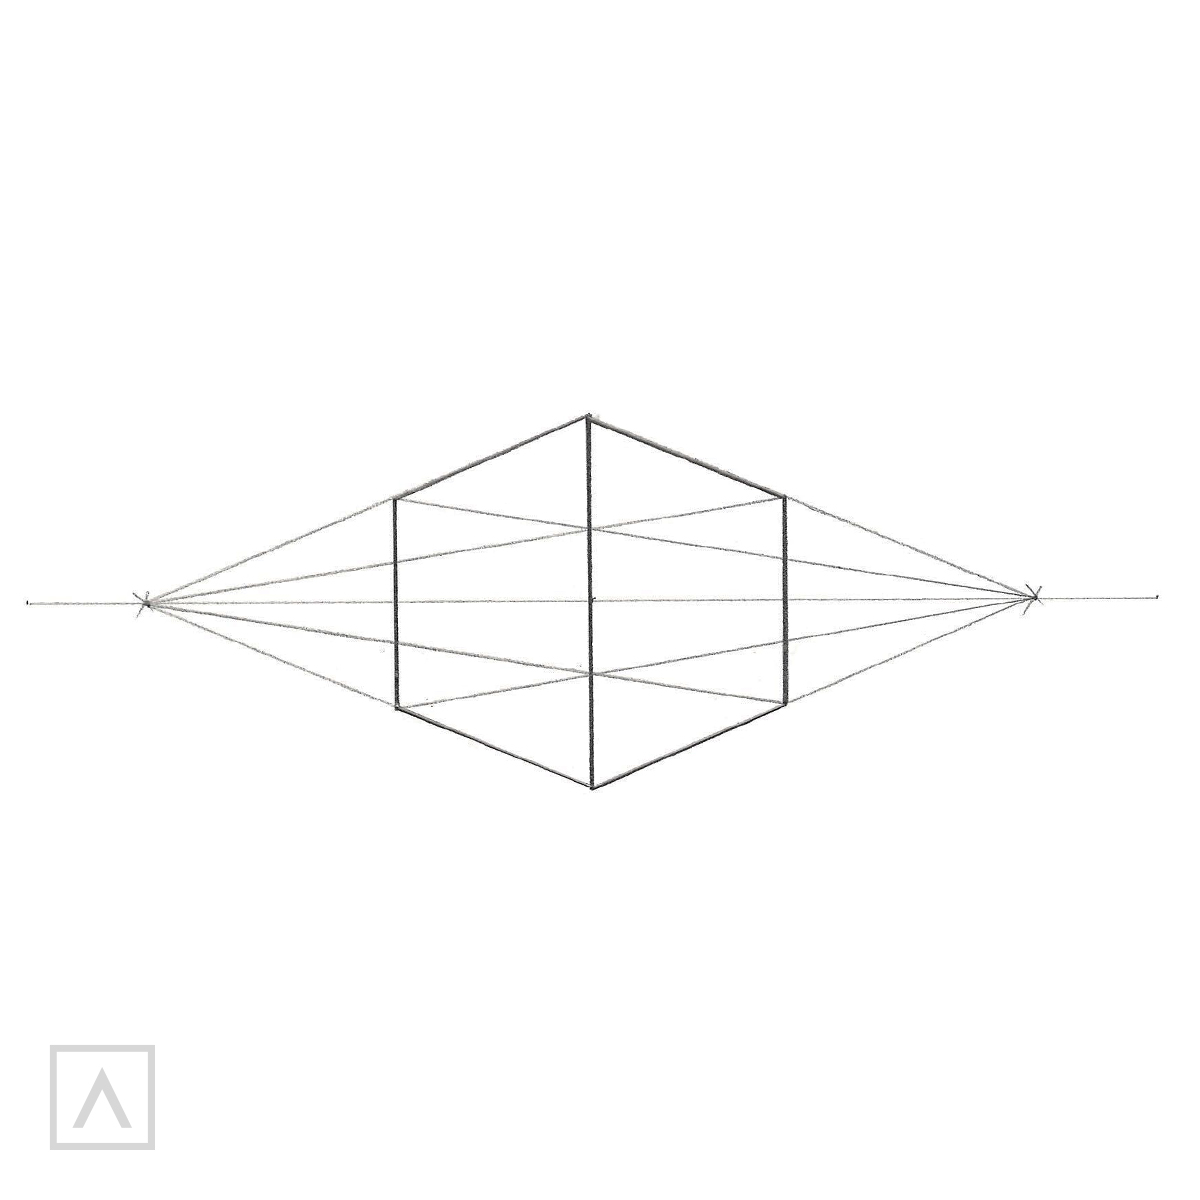
Step 6. Connect all the cube faces to the vanishing points
You can connect all the points on the right side to the vanishing point on the left and all the points on the left side to the vanishing point on the right to help you verify that the construction is correct.
Once you know your angles are right, you can have fun adding elements to your cube, using all these lines as your guide. Next, we’ll show you how to add a checkerboard pattern.
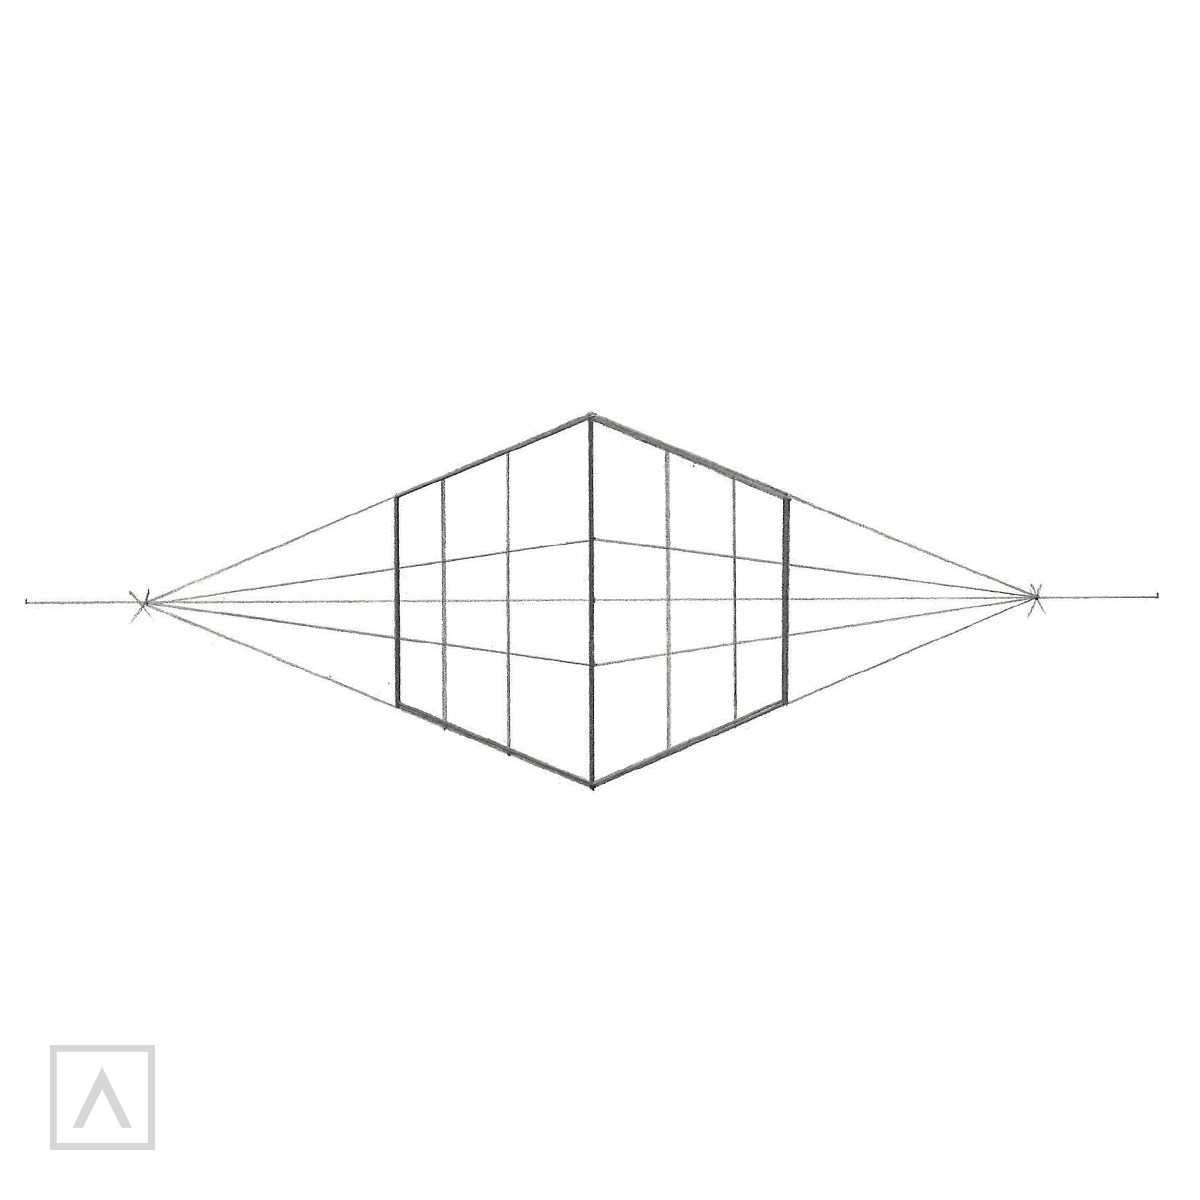
Step 7. Construct a 3x3 check pattern
This decorative element serves as a visual reinforcement for how perspective works. It also highlights the volume created through the shortening of all the lines.
Start by drawing two vertical lines, parallel to the sides of the cube, and two horizontal lines parallel to the top and bottom of the cube.
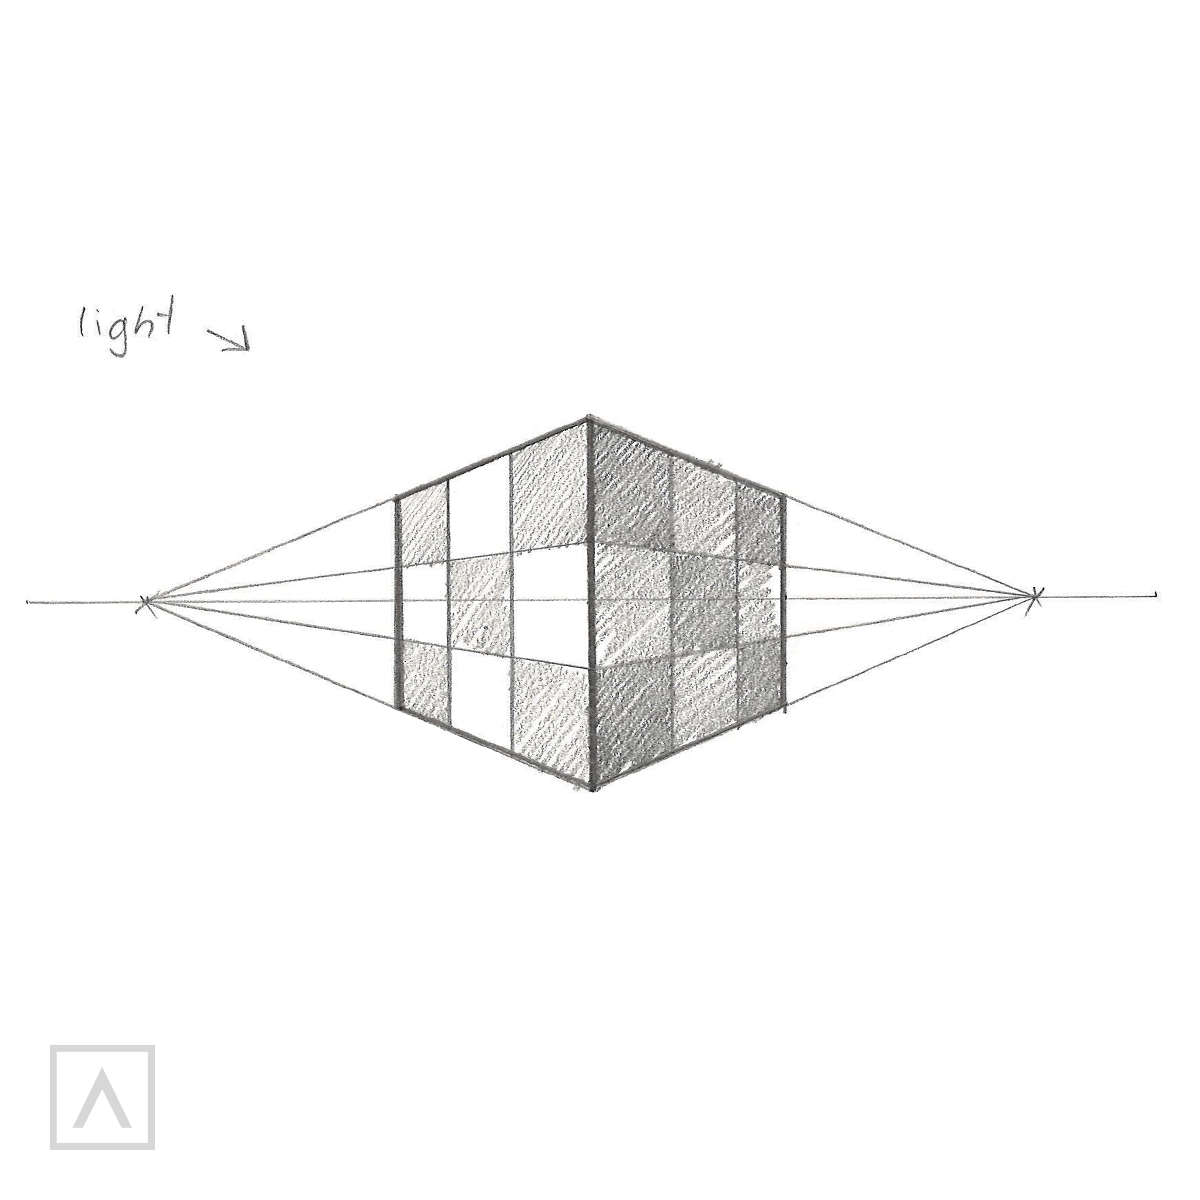
Step 8. Define the direction of the light
In this example, the source of light is shining on the left side of our cube. Therefore, as we color in the checks, the ones on the left side will be lighter than those on the right.
Color every other check, making the ones on the right side darker.
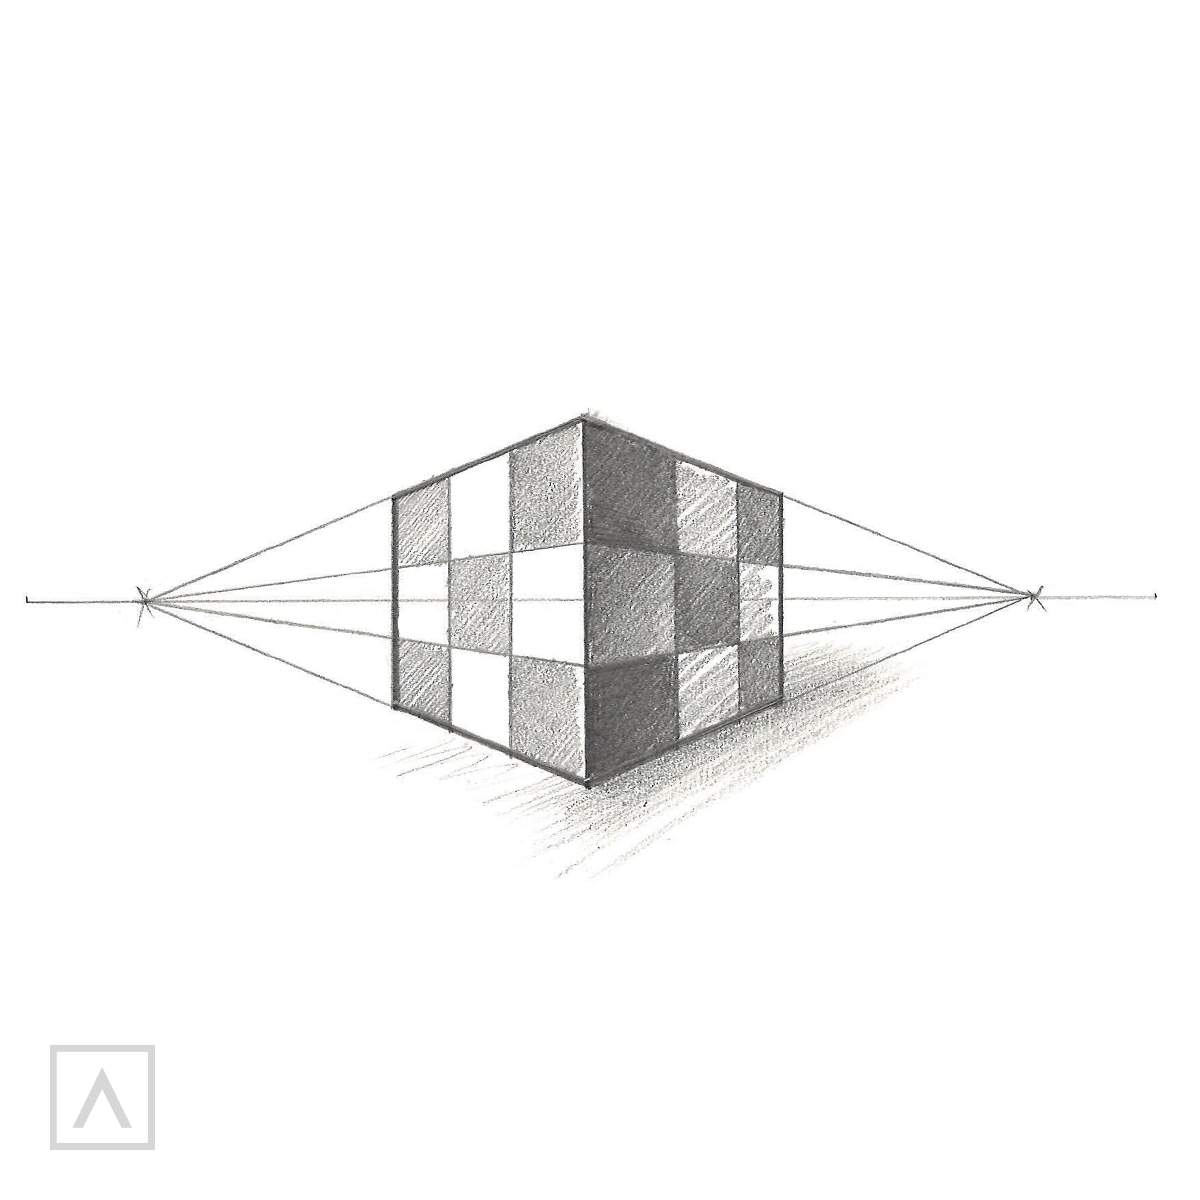
Step 9. Add shadows
To strengthen the contrast, make the first row of checks on the right side of the corner the darkest. To make the cube look like a solid object, place some shadowing along the bottom edge along the right side.
There you have it! You’ve just created a cube in a two-point perspective!
Recommendations
- Although understanding perspective is an important part of your ability to draw accurately, it should never be rigid or mechanical. Use it to enhance your subject for a natural and realistic look.
- A good way to remember how to draw perspectives is to think of it as an inseparable connection between your eyesight and the horizon. Whatever you’re looking at, your perspective is always at your eye level.
- By changing the angle of your view of your subject, you will cause one vanishing point to move closer to the object and the other to move farther away from it.
Once you learn the rules of perspective, you’ll notice a big difference in the accuracy of your drawings. You’ll feel as though you’re seeing your subjects as they really are for the first time! We encourage you to try all three types and have fun adding more and more objects, patterns and details. Let us know how it’s going by leaving your comments in the section below.


