
Want more great inspiration? Check out our other art camp tutorials!
- Art Camp Day 1 - How to Draw a Toucan in 7 Steps
- Art Camp Day 2 - Create a House Drawing & Paint with Gouache
- Art Camp Day 3 - Dive Into Acrylic Art with an Adorable Pool Painting
- Art Camp Day 4 - Seashell Drawing Using Arteza Drawing Pencil Set
- Art Camp Day 5 - How to Draw Ice Cream with Colored Pencils
- Art Camp Day 6 - Learn to Make Polymer Clay Jewelry
- Art Camp Day 7 - The Key to Making Art with Alcohol Based Markers
Table of Contents:
- Step-By-Step Drawing Ideas for Kids
- How to Paint a Tree with Watercolor
- How to Paint a Frog in Gouache
- Step-By-Step Ocean Painting
- How to Draw a Monkey
- How to Draw a Lion Using Colored Pencils
- How to Draw a Bunny In Colored Pencils
- How to Draw a Fish Using EverBlend Art Markers
Step-By-Step Drawing Ideas for Kids
During this week of Arteza Art Camp, we’re posting some fun and easy art ideas every day. Today, we’re putting some of these ideas together here. Kids of all ages enjoy making art. And, if you have children at home right now, I’ve got some fun and easy drawings they’re sure to love! Each simple project comes with step-by-step instructions that even the youngest reader can follow. There’s something for every age and although none of them are very difficult, some of these will still be challenging to older children. And, if you’re like me, you’re not going to let the kids have all the fun. Make it a family time activity and give them a try yourself!
How to Paint a Tree with Watercolor
List of Supplies:
- Arteza Watercolor Paint in A114, A158, A226, A108
- Watercolor Paper
- Paintbrush
- Pencil
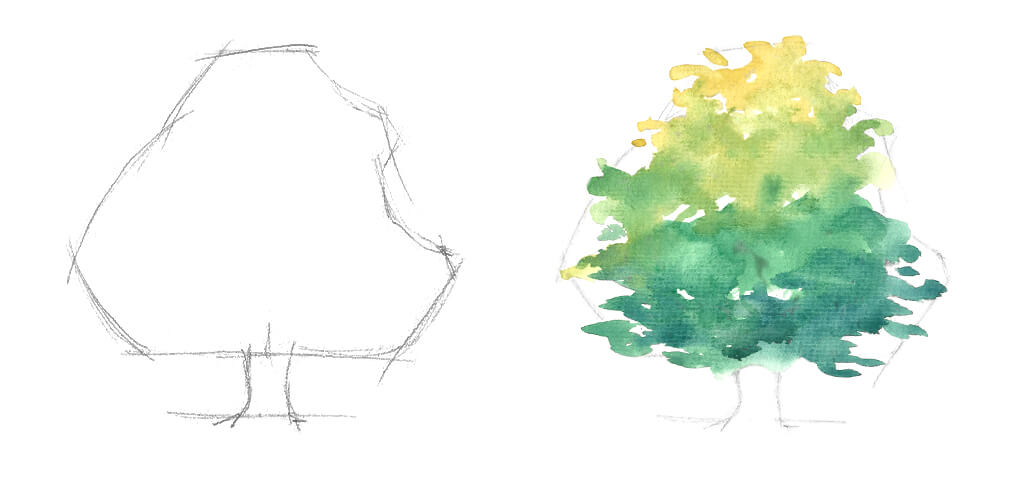
1. Decide the shape you want your tree to be and make a light sketch of it.
2. Use A114, A158 and A226 to create various colors of the leaves. Use darker colors at the bottom, working up to mid-tones and placing the lightest at the top.
TIP: To learn more about creating gradients, check out our blog on watercolor techniques.
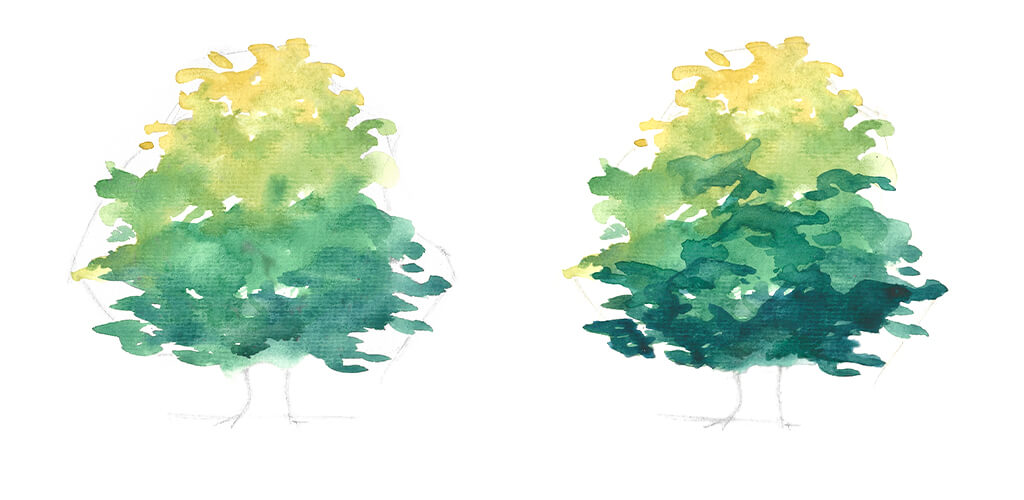
3. Using A158 and A226, apply a layer of cool-toned shades for the shadows.
4. Paint the trunk and branches with A108.
How to Paint a Frog in Gouache
List of Supplies:
- Arteza Gouache in A164, A189, A101, A102, A171, A127
- Paintbrush
- Pencil
- Paper
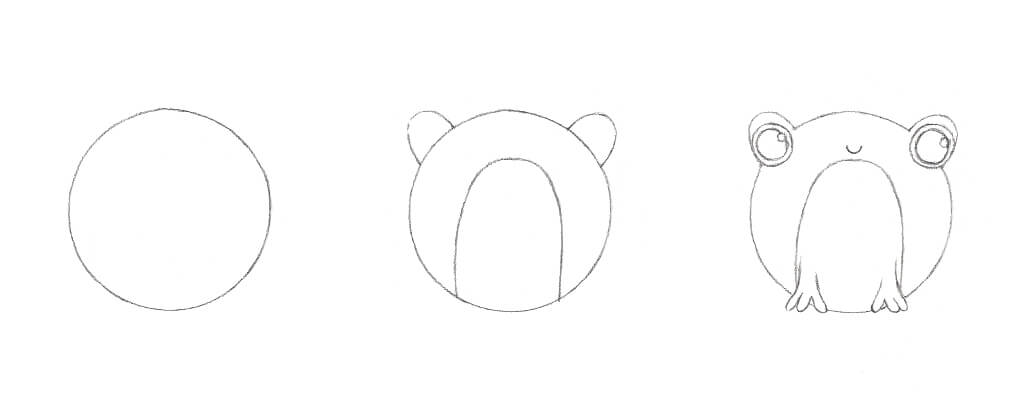
1. Draw a circle.
2. Sketch where the eyes and tummy will go.
3. Add round eyes, pupils, a mouth, the front legs and feet.
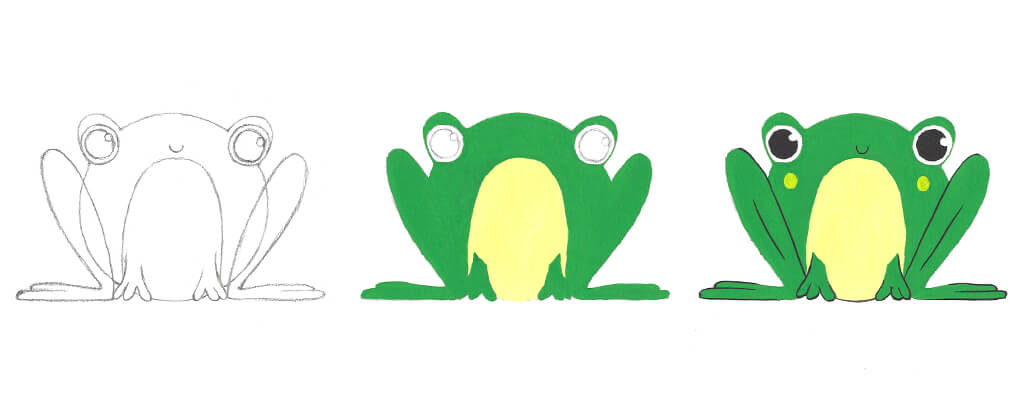
4. Draw the hind legs and feet.
5. Paint the body green except for the tummy. Don’t be scared to mix colors to get the right shade. I used А164, А189 and А101. For the tummy, I mixed А102 and А101.
6. Paint the eyes and outline the front and hind legs in А171. Finish by adding the frog’s cheeks in А127.
Step-By-Step Ocean Painting in Acrylic
List of Supplies:
- Arteza Acrylic Paint in A101, A154, A120, A116, A111
- Paintbrush
- Watercolor Paper or Canvas
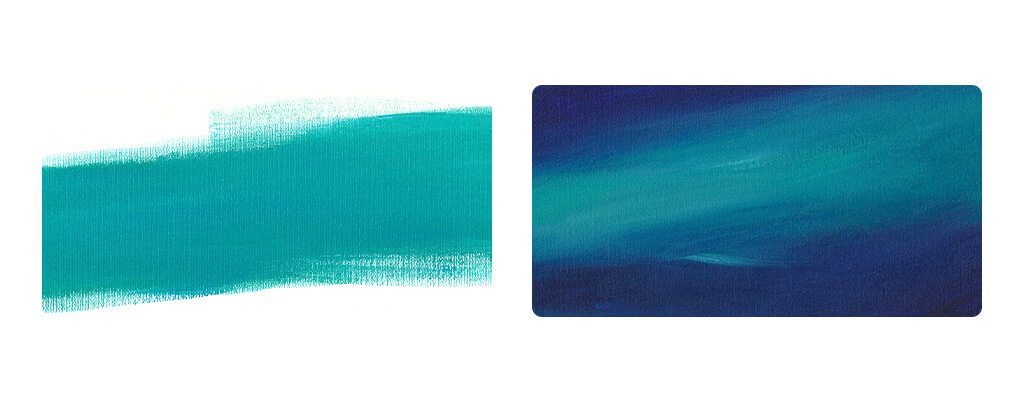
1. Apply masking tape to the edges of your surface. Mix А101, А154 and А120. Use a flat brush to paint a diagonal area through the center.
2. Mix some dark blue shades, А116 and А111, to paint the corners. Create a gradient from dark to light using А116, А120 and А154. You can do this by taking some A120 and blend it from the greenish line to the dark blue one, gradually mixing the colors together.
TIP: Read our blog on acrylic techniques to learn more.
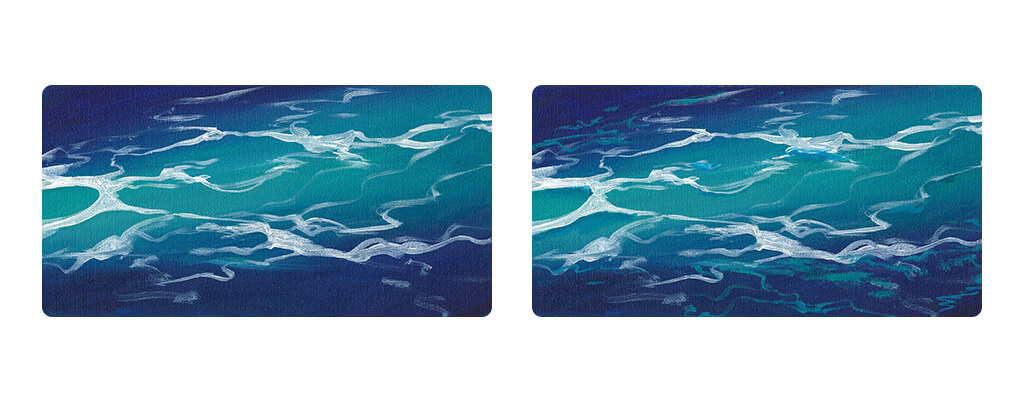
3. Use А101 to add the sea-foam by making diverse, irregular lines of different thicknesses.
4. Mix А154 and А120 and make the sea-foam darker in certain areas.
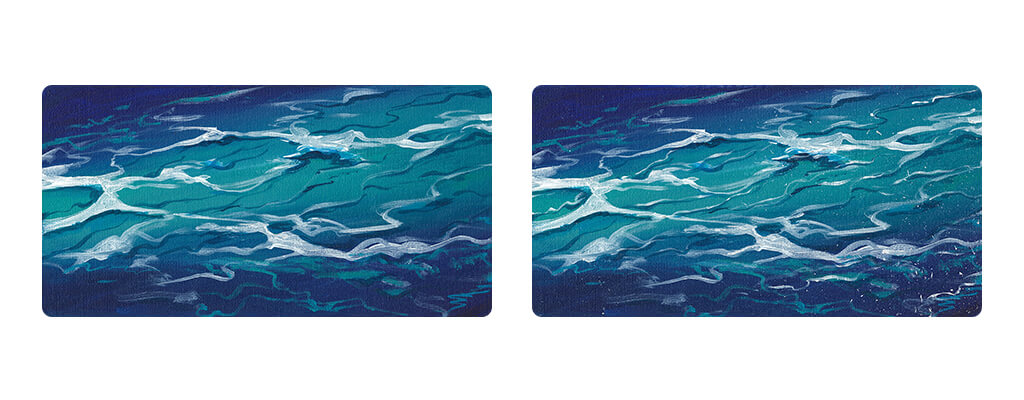
5. Add shadows under the white sea-foam with А116 and А111.
6. Paint thin lines of foam in the center and add splashes with А101. Remove the tape and you’ve got a nice, clean border.
How to Draw a Monkey
List of Supplies:
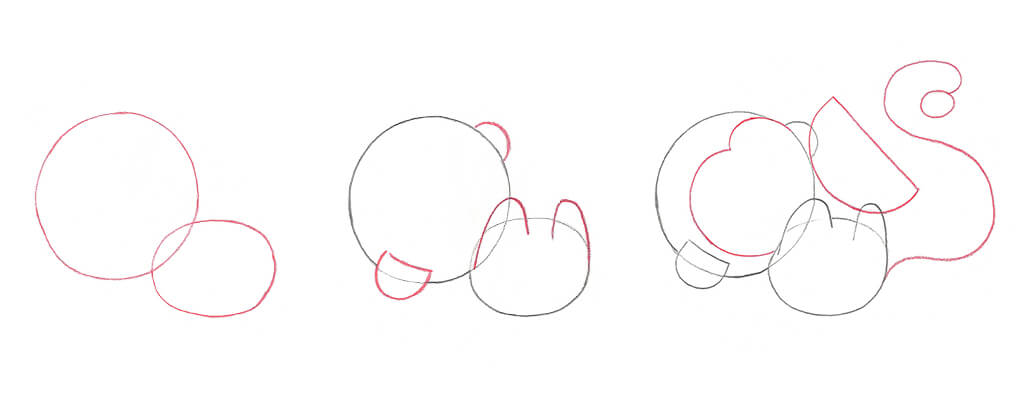
1. Draw a circle. Draw a small oval on the right side.
2. Add the paws and ears.
3. Draw the general shape of the tail and face and add a semicircle to the monkey’s paws.
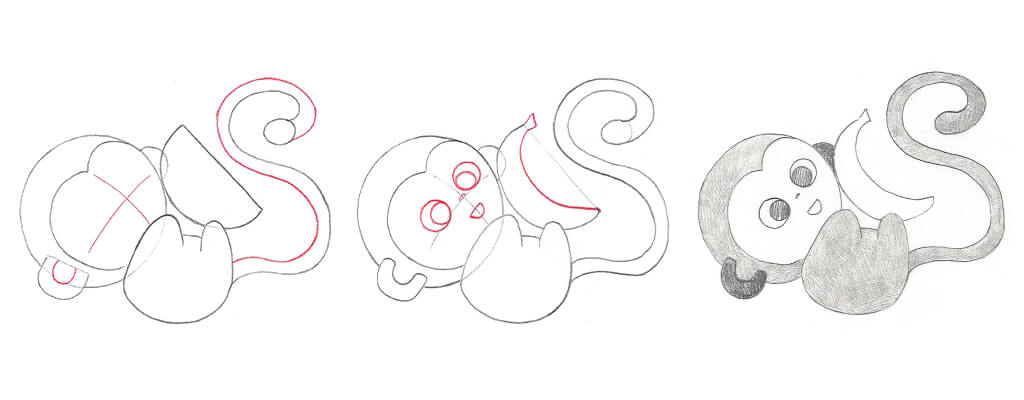
4. Define the tail and identify the lines where the face of the monkey will be. It’s important to give the monkey the correct perspective.
TIP: To learn about perspective, read our blog on the subject.
5. Create the banana from the semicircle (erase top line). Draw the full shape of the tail.
6. Finish the facial features. Fill in the body, eyes and ears.
How to Draw a Lion Using Colored Pencils
List of Supplies:
- Arteza Colored Pencils in Yellow Ochre, Orange, Blush, Peony Pink, Cacao Brown
- Paper
- Pencil
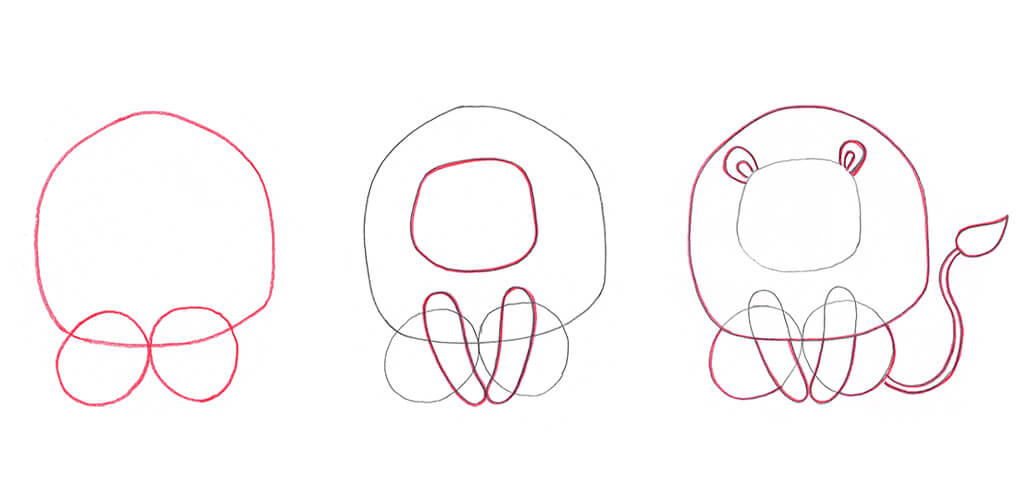
1. Draw a large circle and two small ones at the bottom.
2. Draw another circle inside the large one for the lion’s face and add the front paws.
3. Add the ears and tail. Go over the main outline and erase construction lines.
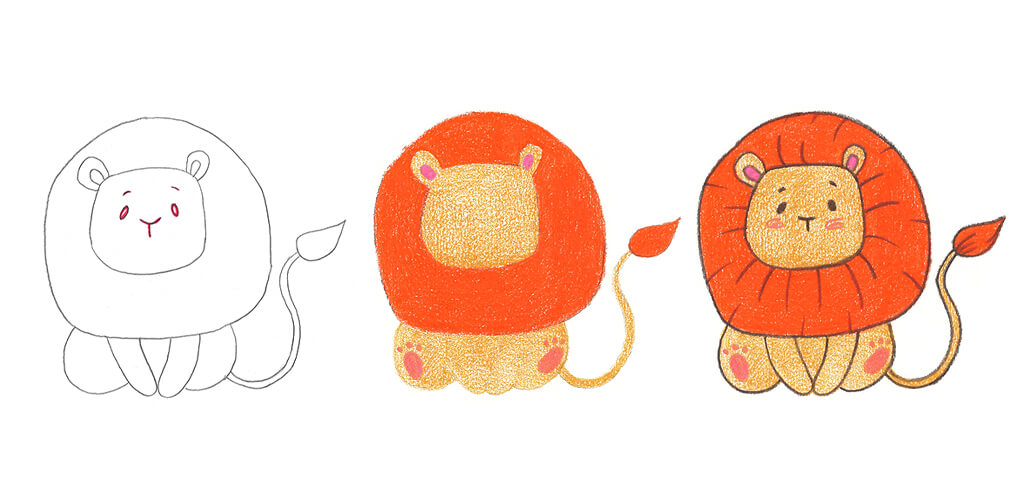
4. Draw the facial features. Isn’t he cute?
5. Color the body with Yellow Ochre, and the mane and tail tip in Orange. Then detail the interior of the ears in Blush and the paw prints with Peony Pink.
6. Use Cacao Brown to outline the lion and its facial features. Finish by adding some lines to the mane.
How to Draw a Bunny with Colored Pencils
List of Supplies:
- Arteza Colored Pencils in Flamingo Pink, Periwinkle Blue and Black
- Paper
- Pencil

1. Draw a large, loose circle and an oval on top of it.
2. Add elongated ovals for the ears and small ovals for the paws.
3. Outline the bunny and erase the construction lines.
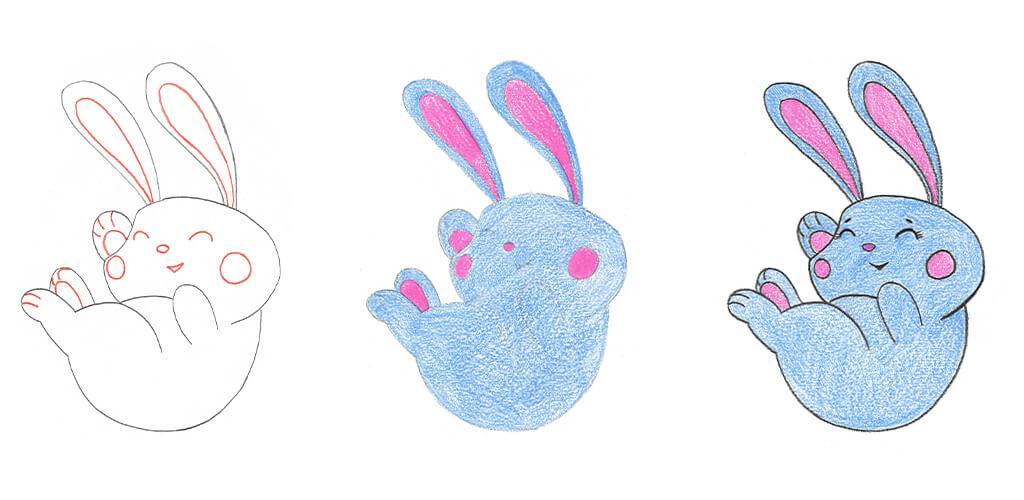
4. Add details to the paws, the face’s features and inside the ears.
5. Color the inner part of the ears, paw pads, cheeks and nose with Flamingo Pink. Color the rest of the body Periwinkle Blue.
6. Add the finishing details—eyes with eyelashes, mouth and the fingers on its paws. Outline the bunny in Black.
How to Draw a Fish Using EverBlend Markers
List of Supplies:
- Arteza EverBlend Art Markers in Dark Yellow, Light Yellow, Blue, Gray, Green
- White Gel Pen
- Paper
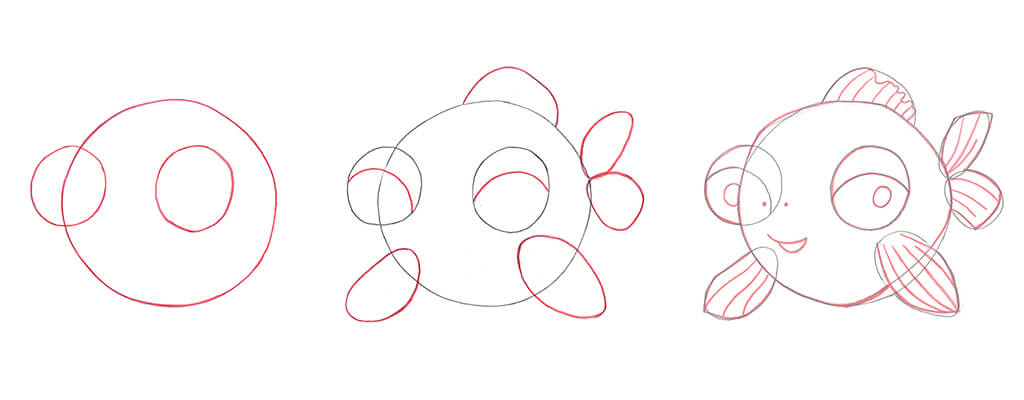
1. Draw a large circle and two small ones for the eyes.
2. Draw arched lines on the small circles for the fish’s eyelids. Add two small ovals for the front fins and the tail.
3. Add details like the stripes on the fins, pupils, nostrils and mouth.
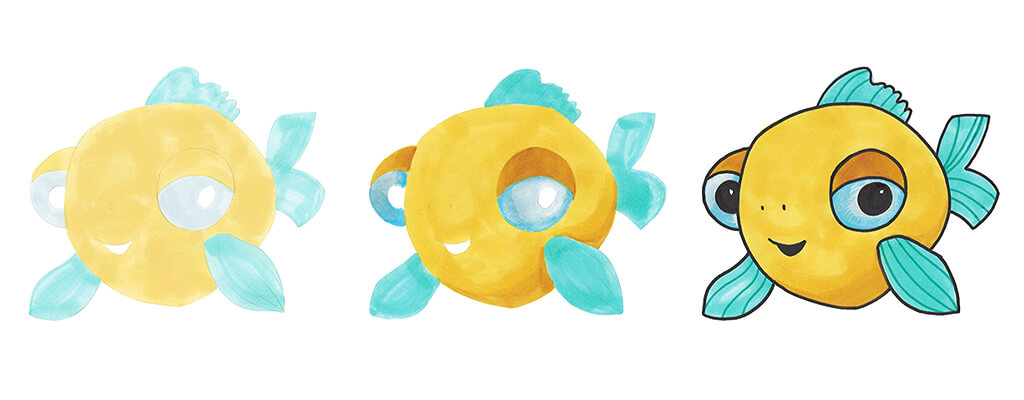
4. Color the fins with Blue, the body and eyelids in Light Yellow, and make the eyes Gray except for the pupil.
5. Using Dark Yellow, color the eyelids and add shadows to the lower part of the body. Use Light Yellow to blend. Use Blue to add shadows to the eyes, then blend the borders using Gray.
6. Color the stripes on the fins Green. Use Black to color the mouth, then outline your entire drawing. Use it to fill in the pupils, leaving a small bit of paper showing through. Add a highlight on the pupil by covering the blank spot with a white gel pen.
There you go! Now you have some projects that are a cinch for your kids to do! Learning to draw and paint is great for a child’s hand-eye coordination and for encouraging them to use their imagination. For adults, drawing and painting can be a good way to relax and the perfect stress-reliever. We hope this will motivate them and you to keep making art. I think there’s no better way to spend time.


2 comments
It’s always a pleasure to share these with our fellow artists and we’re so happy you’re enjoying them!
I m a kid at heart ;) I have enjoyed this camp and these cute illustrations, I am new to drawing and these have been a refreshing approach to dive into drawing, thanks for sharing !