
Table of Contents:
- Expand Your Creativity with Paint Pouring & Wood Slices
- List of Supplies
- 7 Fun & Easy Techniques
- Recommendations
Expand Your Creativity with Paint Pouring & Wood Slices
One of the most popular trends in arts and crafts today is acrylic paint pouring. No other painting technique gives you the interesting and abstract designs you get with this painting method. Plus, it’s fun and easy to do and since acrylic pouring paints are highly saturated and dry quickly, beautiful creations can be made in a matter of minutes.In this guide, instead of using a canvas, we’ve used wood slices. The artist in the video is using Arteza Pouring Acrylic Paint, a premixed, high-flow paint that is ready to pour. It comes in a wide range of colors, including metallics, neons, and pastels. She pours the paint on Arteza Wood Slices made from natural pine wood with a smooth, sanded surface, which means there’s no preparation involved, just take them out of the box and they’re ready to use.
List of Supplies
- Arteza Pouring Acrylic Paint, 60ml Bottles - Set of 32: A701, A101, A503, A502,A804, A901, A602, A605, A402, A301, A805, A402, A901, A202, A802, A502
- Arteza Premium Wood Slices - Set of 45
- Arteza Glitter (We chose silver and gold, but you can add any color you like!)
- Arteza Sculpting Tools (Optional)
7 Fun & Easy Techniques
You shouldn’t be afraid to try pouring — it’s easy! One of the things that makes it so great is that you don’t need to have any artistic training or skills to do it. The most important part of the pouring technique is choosing the colors and color combinations you will use. You don’t have to overthink this, though. No matter which colors you choose, you’re sure to end up with an interesting design. Just choose your colors and take your time. In fact, you might even find yourself in a meditative state as you begin pouring the paint and watching as the colors swirl around each other.
Here are seven different designs the artist achieved using a variety of acrylic paints and acrylic pour techniques. Some of the designs even use glitter! We featured color recommendations for each step, but feel free to use any color you desire! After you watch the video and see how it’s done, don’t be afraid to experiment and use your favorite colors. There’s no wrong way to do this.
Hint: Since wood is porous, it will absorb the paint, so you might want to prime the wood slices first. You can do this by using a thin coat of regular acrylic paint and letting it dry before starting the pouring process. If you like the look of the wood grain showing through, don’t prime the slices; instead, pour the paint directly onto them.

Design 1. The Drop Technique
To create this abstract design, the artist in the video pours each color onto the slice, making small drops here and there. These drops will spread out and mix together. She then adds a different color to these drops. You can experiment with combinations.
Next, rotate the wood slice and watch how the paints move around each other and blend together in a beautiful way. The artist uses a sculpting utensil to create a design by dragging the tool through the paint to create lines going in different directions. If you don't have a sculpting tool, you can use a toothpick, or any item you don't mind temporarily getting paint on that will create a line By starting each line from the same spot, she achieves a nice pattern as a result.
TIP: It is best to add black in small amounts to keep the paint from turning “muddy.”

Design 2. Start with Stripes
This time the artist pours the paint onto the wood in stripes using A101, A503, A502, A804, A901, and a drop of A701. Then she rotates the slice the same way she did in Design 1. Finally, she adds glitter into the wet paint to ensure it adheres and won’t flake off after drying.
Design 3. Use Smaller Drops
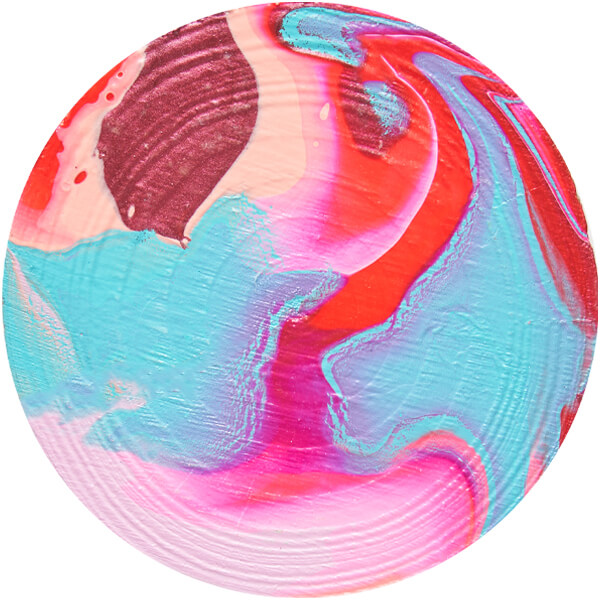
The third design is similar to the first, only much smaller drops are used. In this design, the artist uses similar colors A602 Carnation Pink and A605 Coral and then adds a complementary color, A402 Sea Green. Once again, she rotates the wood until she achieves the design she is most happy with.
TIP: Use a paper towel to blot the back of the wood slice after you have finished pouring and have gotten the results you want. This way the slice won’t stick to the surface of the table after the paint has dried.

Design 4. Pour in Circles
For the fourth design, the artist pours the paint onto the wood in circles, alternating between the colors — A301 Phthalo Blue, A805 Neon Blue, A402 Sea Green, A901 Gold, and A101 Titanium White. After that, she adds gold glitter and makes a motif in the paint with the pottery tool.
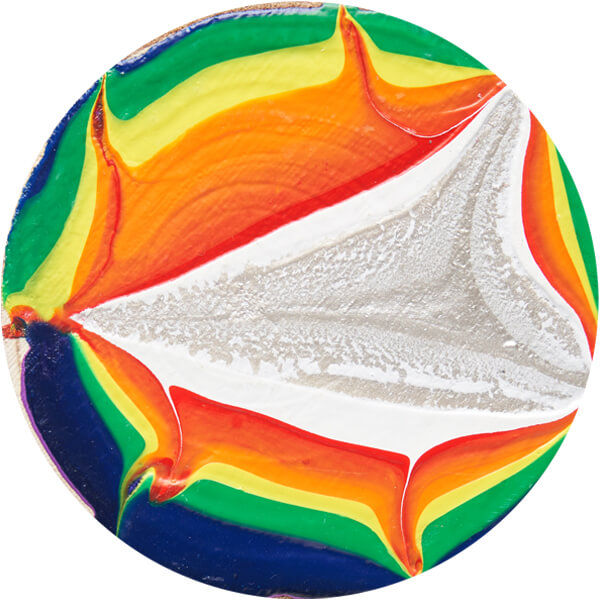
Design 5. Make a Rainbow
The fifth design is made by making a rainbow using the drop technique. The artist starts with the darker shades of purple and blues, next adding green, yellow, and orange, and gradually ending with red (A806 Neon Purple, A301 Phthalo Blue, A805 Neon Blue, A804 Neon Green, A801 Neon Yellow, A802 Neon Orange, A202 Vermilion Red). She finishes the design by creating a pattern with the pottery utensil and adding A101 Titanium White and A902 Silver.
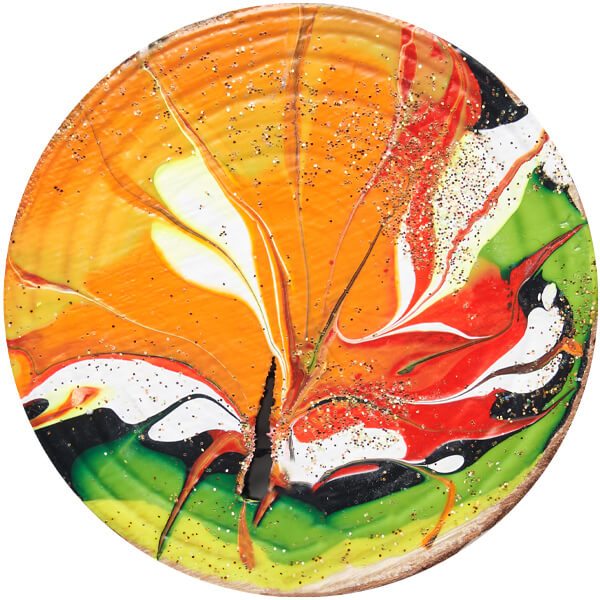
Design 6. Start with a Solid Surface
In the sixth design, the artist fills the entire surface of the slice with A701 Mars Black. Next, she adds A202 Vermilion Red, A802 Neon Orange, and A502 Lemon Yellow. She then pours A101 Titanium White in drops and, using the sculpting tool, creates a design. If you don't have a sculpting tool, you can use a toothpick, or any item you don't mind temporarily getting paint on that will create a line. She adds gold glitter as a finishing touch.

Design 7. The Dirty Pour Technique
To make the last composition, the artist lines up three wood slices. She pours the paint in layers into a glass container using A501 Mid Yellow, A402 Sea Green, A202 Vermilion Red, A806 Neon Purple, A805 Neon Blue, and A301 Phthalo Blue, and adding A101 Titanium White last. Beginning at the end of the row, she pours the paint across the slices, covering them all with equal amounts. She then rotates each slice to make sure each one is completely covered and to achieve the design she desires.
Recommendations
- Paint pouring is a messy activity. Cover your workspace with a drop cloth and wear an apron or old clothes you’re not afraid of getting paint on before you start to pour, as the paint does drip and spill from the slice.
- To help keep your work surface clean between pourings, keep wet tissues and a cloth handy for wiping up the paint.
- It is almost impossible to foresee the final result. To get the results you want, our artist recommends that you don’t pour too much paint on the wood from the start and to work slow and steady.
- You may find it awkward to work with wood slices of this size. Pouring usually means working with broad surfaces, after all. Before you start, practice pouring on one.
- It is almost impossible to recreate the same design twice. But by using the same color combinations you can make designs that complement each other and work well as a group.
There you have it! We think you’ll enjoy hours of fun and creativity using these paint pouring techniques on wood slices. You’ll see that pouring is a quick method, which means you get to make spectacular designs really fast. Plus, the colors can be combined in an almost indefinite number of ways, so you’ll get a stunning result every time.
Now that you’ve read about the different ways to use acrylic pouring paint on wood slices, watch the video to see the artist in action.


