
Table of Contents:
1 Video, 2 Brushes, 8 Landscapes
If you’ve ever wanted to use watercolors to create landscapes but just couldn’t get the hang of it, here’s your chance to learn the ins and outs to become better. Watercolors might be a challenge at first, but once they are mastered, you’ll be on your way. That’s why we’re giving you eight landscapes to paint that include several of the same basic methods to give you plenty of practice. We suggest you read through each short step-by-step guide first. That way you have your paints ready and your mindset on what is expected to complete the project.
We also think one of the best ways to learn is by watching someone else, so we’ve created a special video that shows our artist doing eight separate landscapes. Take a minute to watch it, after reading the steps. When you do, you’ll see how she uses various methods for creating stunning gradients and atmospheres. She’ll demonstrate how with just two brushes and a limited number of hues you can paint watercolor landscapes which will have you gasping at how truly beautiful they are.
For this tutorial, we’ve used Arteza Watercolor Premium Artist Paint and the 9”x12” Expert Watercolor Pad. This paint is especially vibrant, quick-drying, plus easy to mix, on or off the palette. The pad is a 140lb/300gsm weight, which is ideal as it won’t buckle or warp once it’s wet. To make these paintings, you’ll also need a large and small brush, a container with water, and a palette.
To get a nice crisp border, we suggest you use easy-to-remove masking tape along the edges of the paper, as our artist has done. We encourage you to read through the instructions step by step. This will help you visualize what’s to be done. Don’t be afraid to use lots of water and paint—have fun with it!
Easy Watercolor Painting Tutorials
1. COOL NIGHT SKY PAINTING
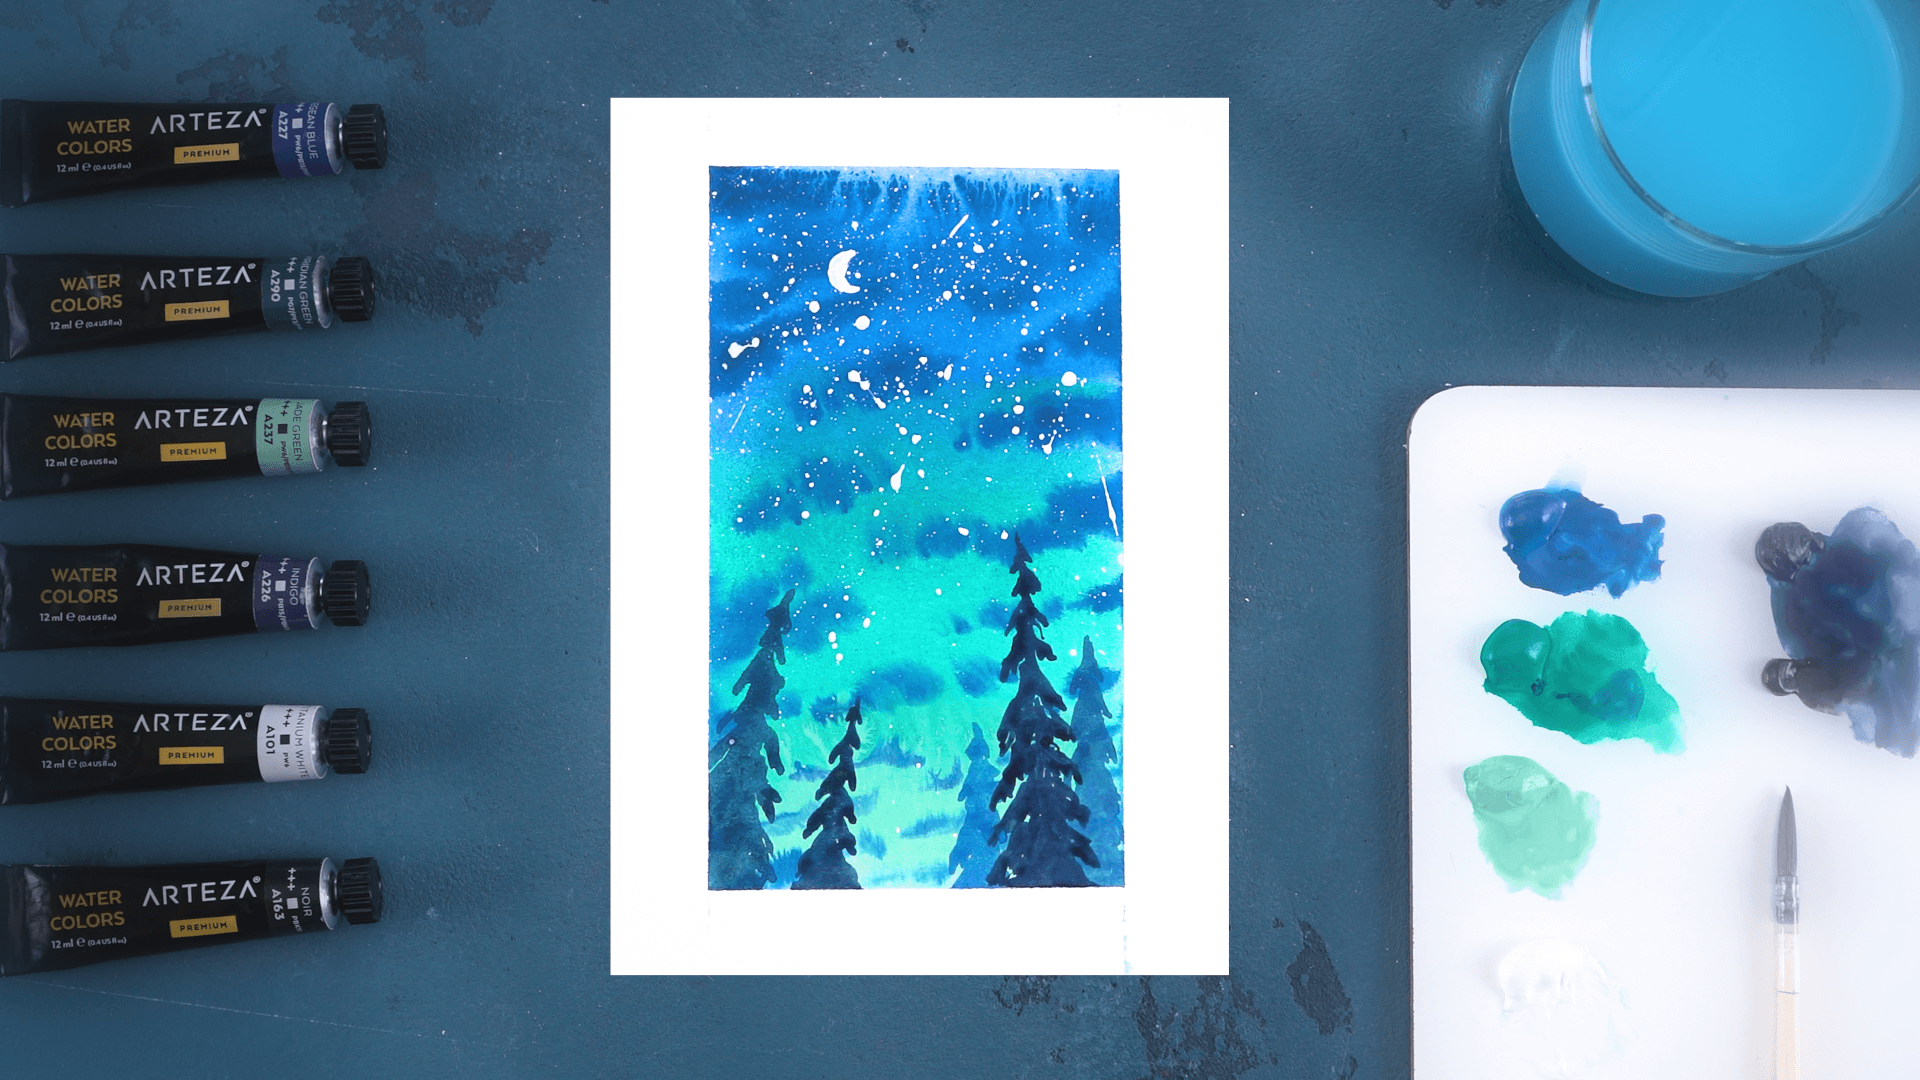
Aegean Blue A227, Viridian Green A290, Jade Green A237, Titanium White A101, Indigo A226
1. Squeeze Aegean Blue, Viridian Green, and Jade Green onto the palette.
2. Dip the big brush in clean water and moisten the entire sheet.
3. Continue with this brush and load it with Aegean Blue. Using a continuous horizontal stroke, place a wash of pigment starting at the page’s top and down about a third. Utilize only what’s loaded onto your brush, don’t go back for more. As you travel down the damp sheet, your color will become more and more translucent as it mixes with the moisture already there. This method is known as wet-on-wet and will be employed on all following projects.
4. Next, apply Viridian Green by making a few horizontal strokes to fill the next third. Where the two colors meet will begin to create a gradient.
5. Now, paint with the Jade Green the same until you reach the bottom.
6. Take the small paintbrush and load it with Aegean Blue. Our artist begins on the top and dabs the still-damp sheet, forming clouds. As the pigment hits the moist areas, it disperses softly to give the illusion of puffy clouds. Notice how the dabs get smaller as she gets to the bottom.
7. Mix a generous amount of water with the Titanium White. Dip the brush in it and holding it perpendicular to the page, brush it lightly over your fingernail, causing a splatter. This adds even more atmosphere.
8. It’s time to add some trees to complete this landscape. Dip the smaller brush’s end into Indigo and use short downward strokes to create the trees. Vary the heights. Place darker trees at the front and lighter ones behind those. With Titanium White, paint a tiny crescent moon.
9. Remove the tape.
2. MORNING
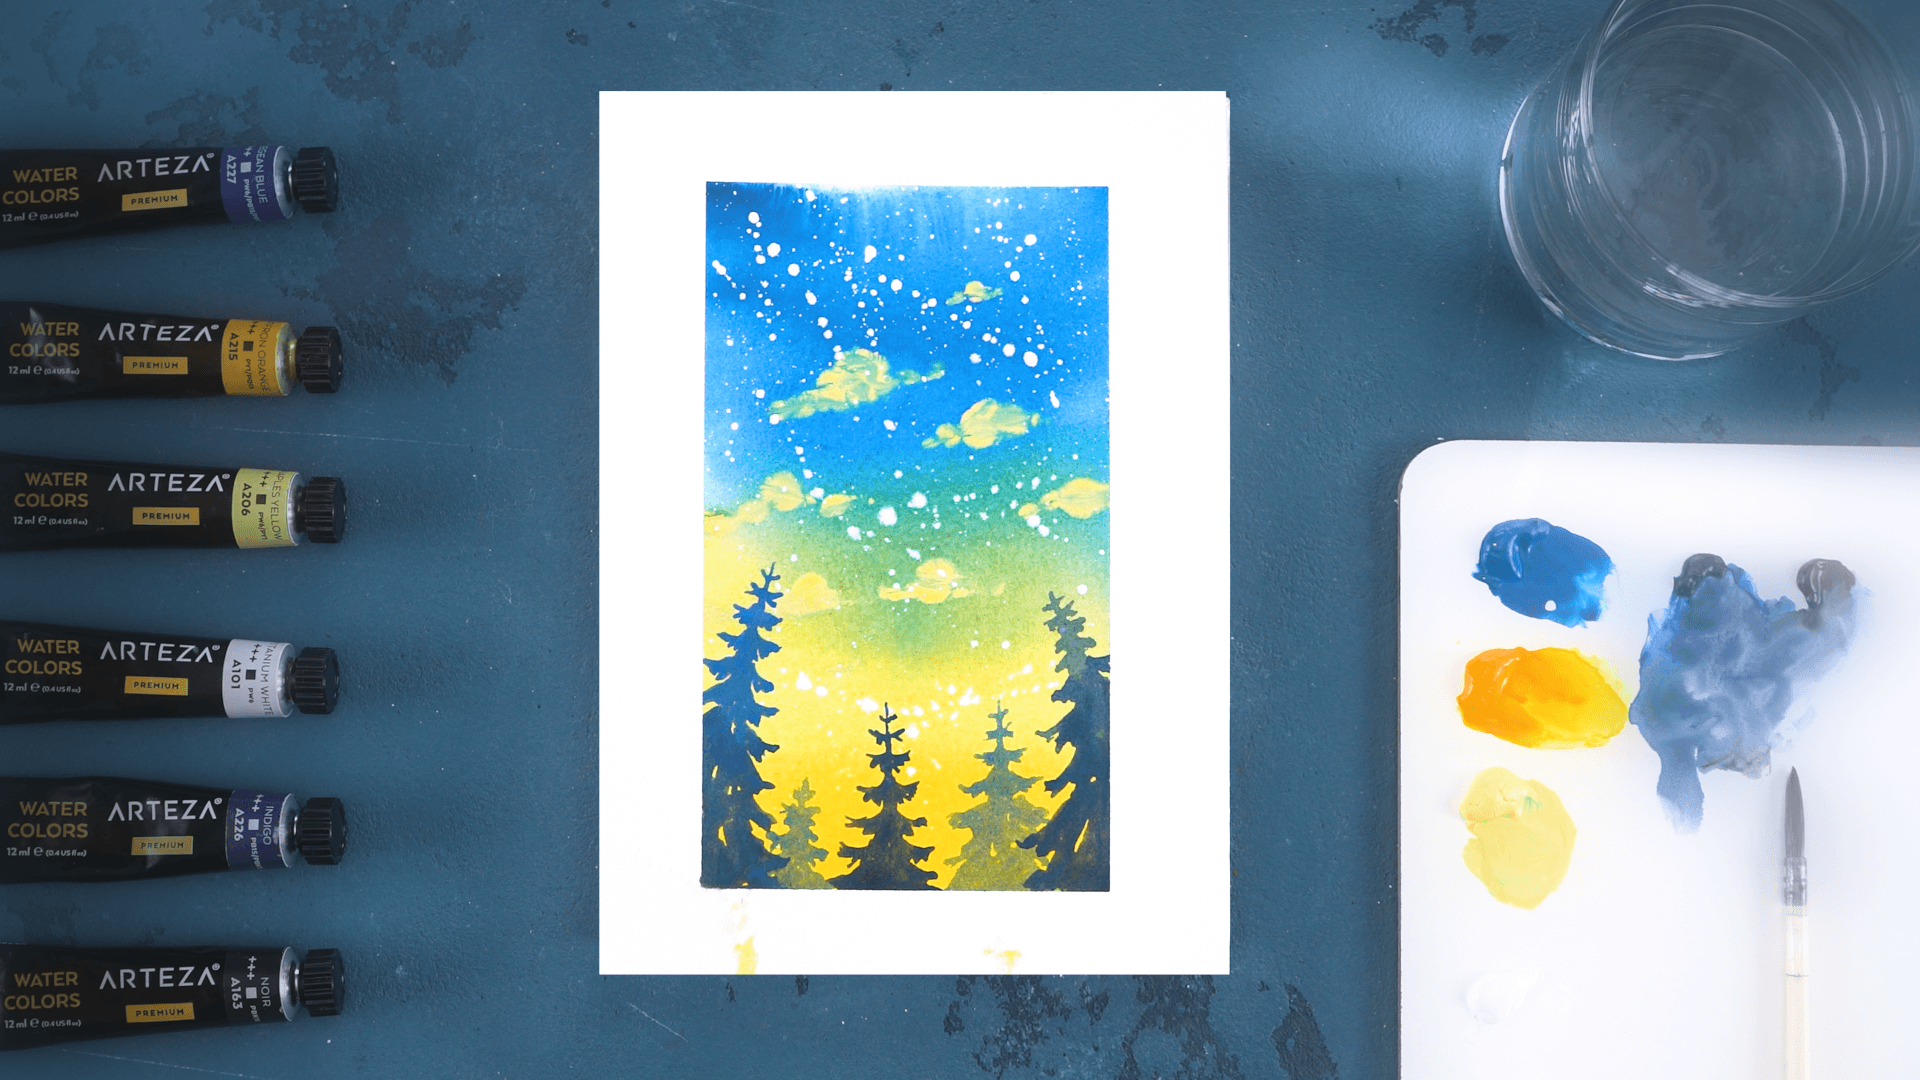
Aegean Blue A227, Saffron Orange A215, Naples Yellow A206, Titanium White A101, Indigo A226, Noir A163
1. Arrange Aegean Blue, Saffron Orange, and Naples Yellow on a palette.
2. Take the larger paintbrush and dampen the page.
3. Now dip that brush into Aegean Blue. Make horizontal strokes from the top to a third downward, using only what’s on the brush. Once it mixes with the water and as you proceed down the page, the blue will become increasingly translucent.
4. Next place Saffron Orange with a few horizontal strokes, starting at the bottom and moving gradually upward to create a gradient of orange to green to blue.
5. With a small brush and Naples Yellow, compose the clouds. By adjusting your pressure or the paintbrush’s angle, you can achieve puffy clouds. See how our artist only paints these on the blue and green areas, including a tiny bit going into the orange area?
6. For the splatter add water to Titanium White, dip the brush’s tip in it, then rake over your nail. It will splash all over the place.
7. For trees, our painter used Indigo with a little Noir to darken it. She then began adding fine lines, building them up as she worked down while giving a familiar “A” shape to each evergreen.
8. Carefully take the tape off.
2. PINK SUNSET WATERCOLOR
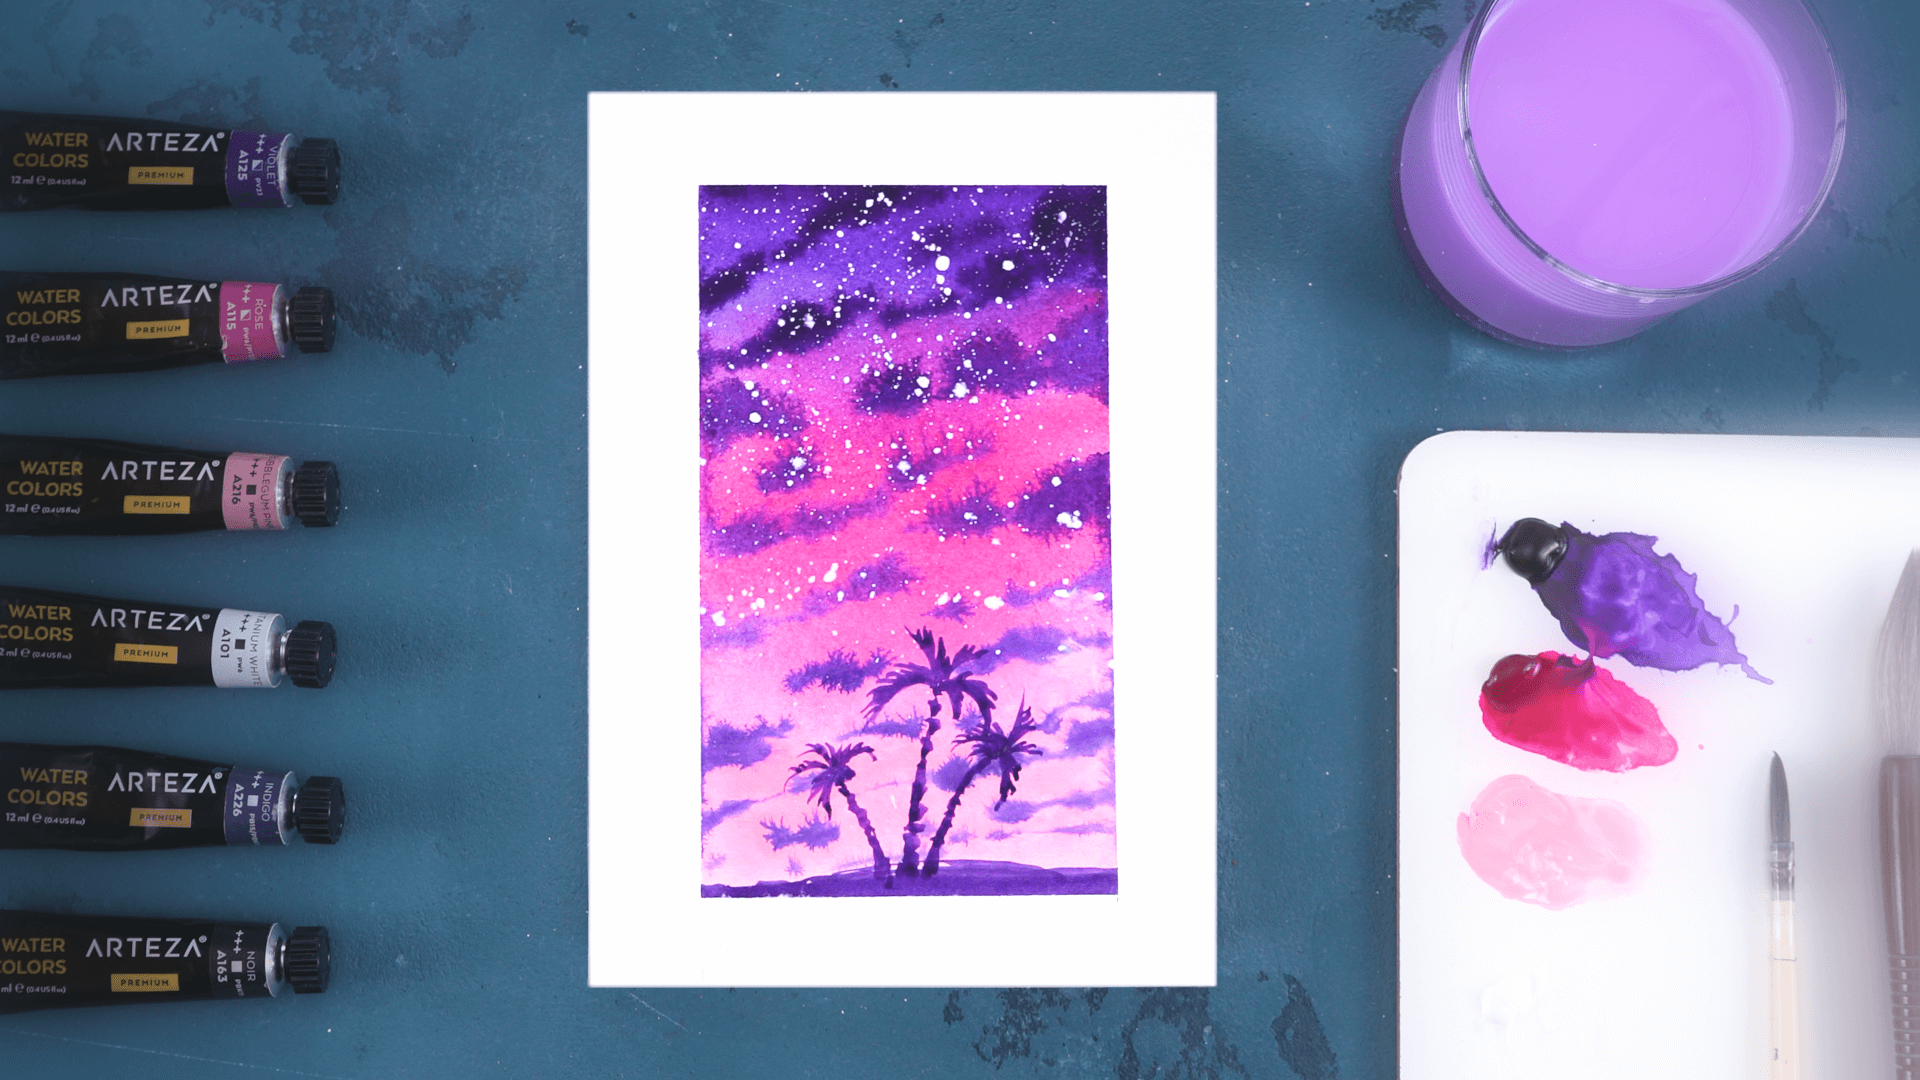
Violet A125, Rose A115, Bubblegum Pink A216, Titanium White A101
1. Place Violet, Rose, and Bubblegum Pink on the palette.
2. Wash the surface with clean water using the biggest brush.
3. Load the brush with plenty of Violet. Begin at the top and apply a continuous horizontal stroke originating at the top, down a third. Since the paper is already wet, this will cause the Violet to become semi-transparent.
4. Then use Rose and add a few more horizontal strokes. Start filling in the middle to create a gradient.
5. With Pink, apply similar horizontal brushstrokes until you come to the end.
6. Dip your small brush into Violet and touch it to the piece to create the clouds. Adjust your pressure and the brush’s angle to achieve varying shapes while decreasing the size of the clouds as you get to the bottom.
7. After combining Titanium White and water, dip your paintbrush in it and then go across the top of your fingernail to make splatters appear.
8. Create a horizon by using the small brush and Violet paint. Add three palm trees at that line in the same color.
9. Remove tape.
4. SUMMER MORNING
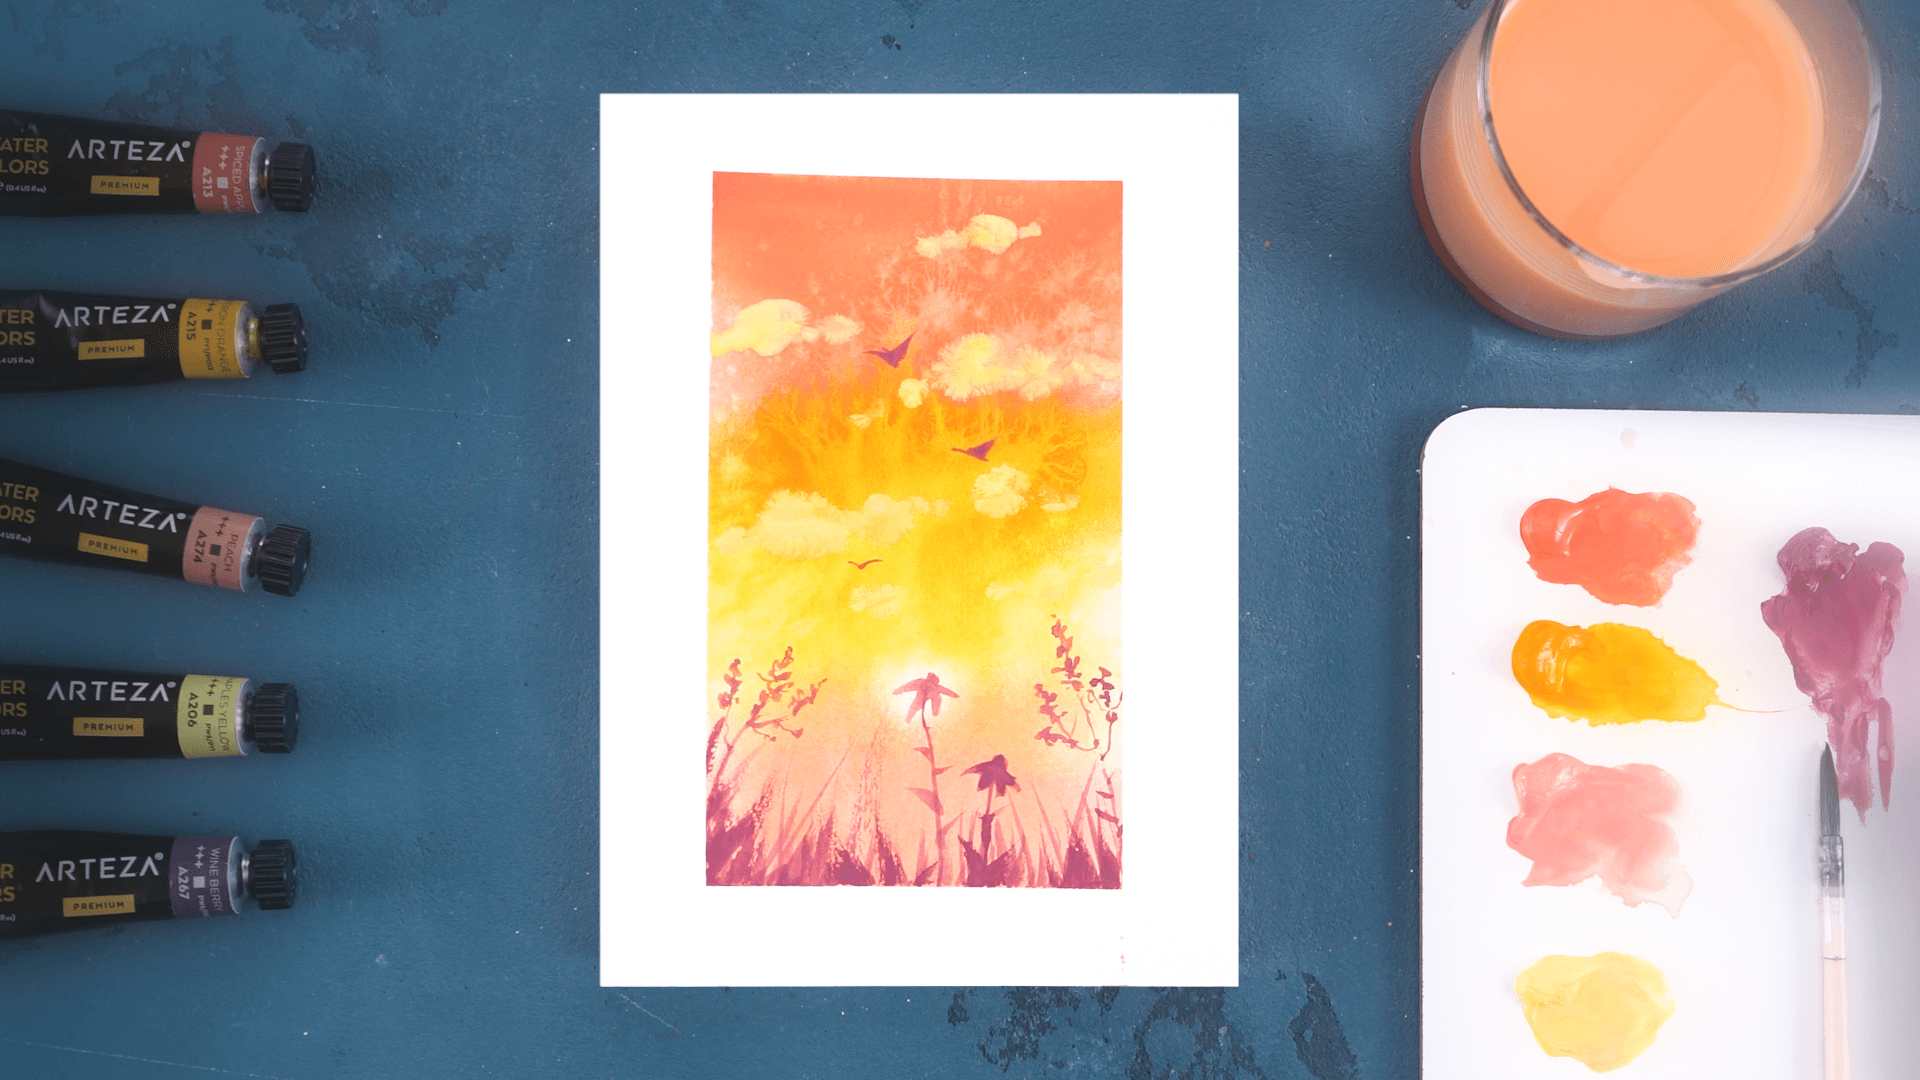
Spiced Apple A213, Wine Berry A267, Saffron Orange A215, Peach A274, Naples Yellow A206
1. Put Spiced Apple, Saffron Orange, and Peach onto your palette.
2. Saturate the entire sheet with clean water and the larger brush.
3. Load that brush with Spiced Apple. Draw continuous horizontal strokes starting at the upper part and going down a third. As the color mixes with the water and you work your way down, it starts to look translucent.
4. Use Saffron Orange to paint a few more horizontal strokes. Keep your strokes loose and juicy, and where it meets the Spiced Apple a gradient will begin to form in the middle.
5. Do the same with the Peach until reaching the edge.
6. Splash the page with some clean water. As the droplets hit the painted surface, they will form tiny starlets, adding a hazy appearance.
7. While the paint is still wet, lift some paint to create a whitish circle at the bottom of the page. This is the sun on the horizon.
8. Next paint in some clouds using Naples Yellow.
9. Now, dip the small brush into Wine Berry to paint the grass, flowers, and birds. For the grass, the artist makes light upward strokes that cause the base of the stroke to be wider than the tip, just like a blade of grass would appear. For the flowers, she makes squiggly, loose lines to imitate petals. She paints little “v’s” to resemble birds in flight.
10. Take off the tape.
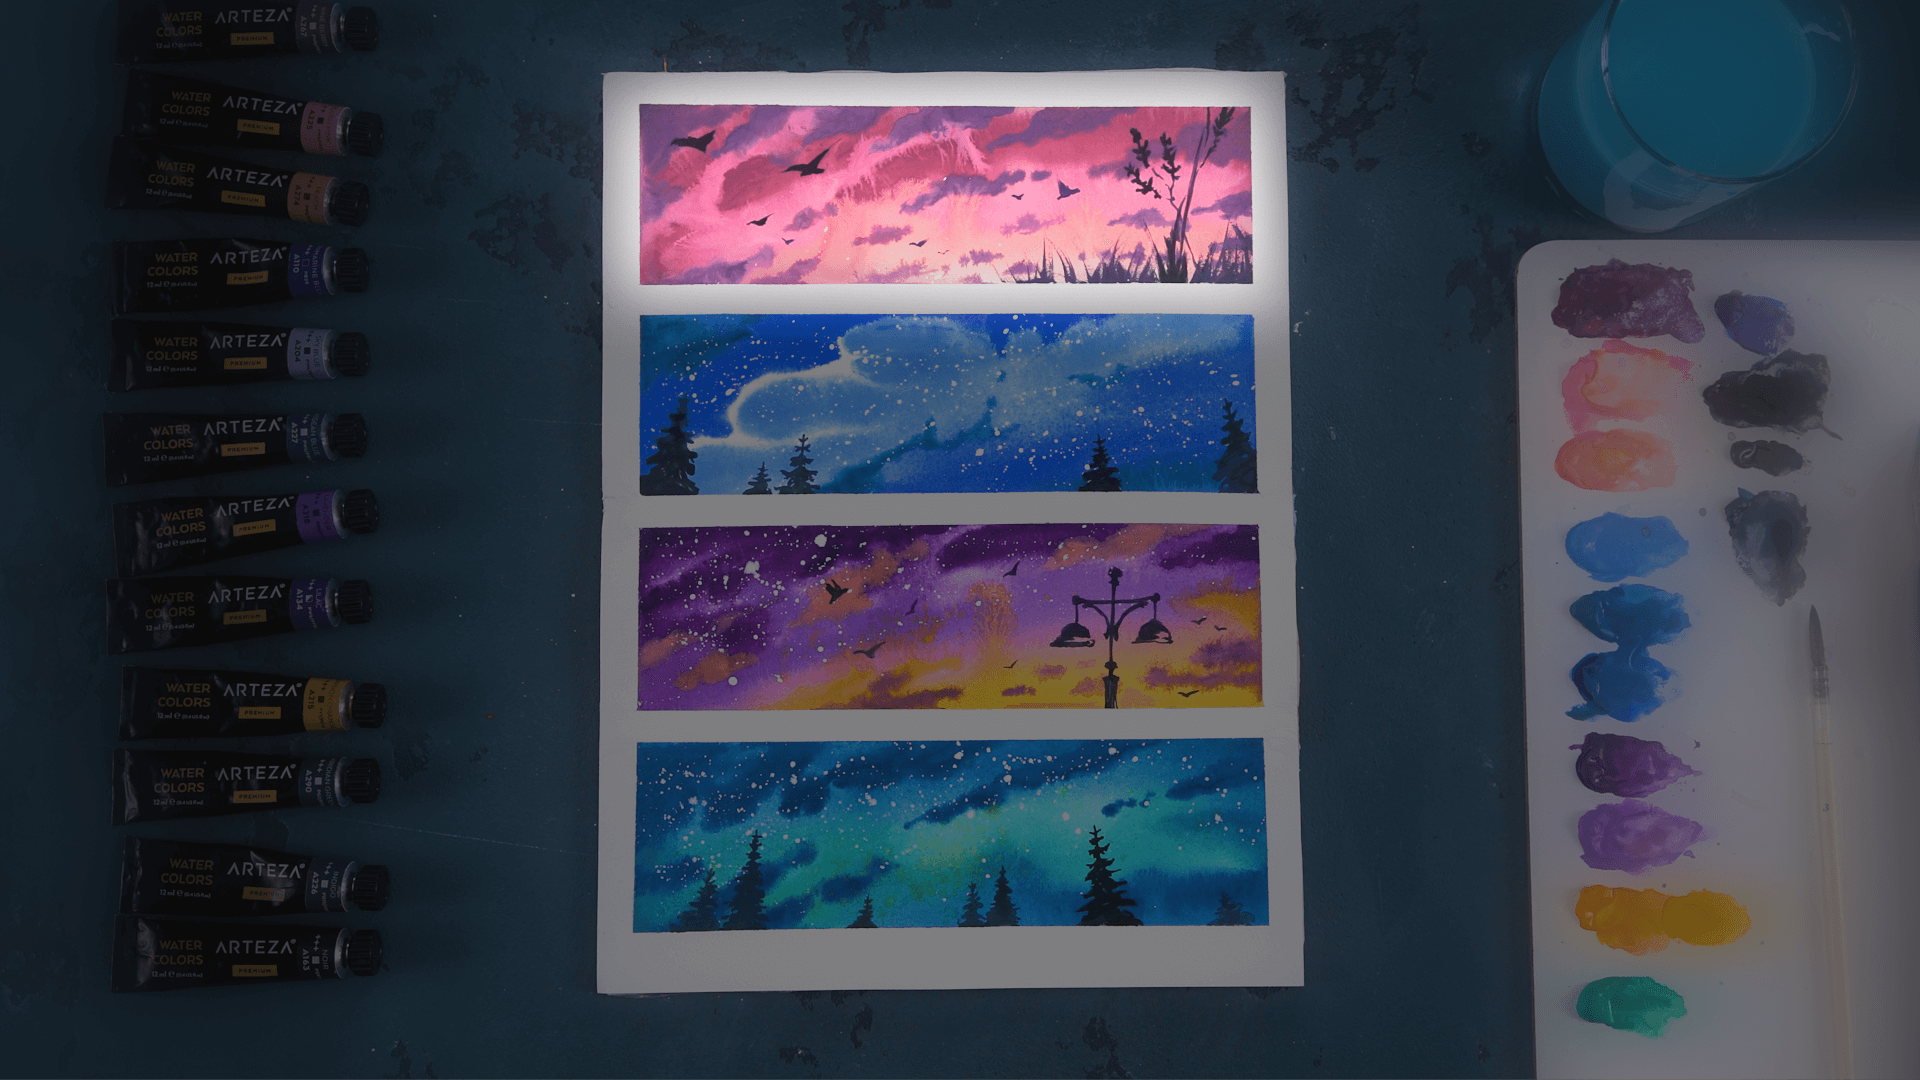
The next four paintings are done on one sheet. To prepare, measure four equal sections on the page and use masking tape to separate and create borders around them.
5. SKY AT SUNSET (Top Section)
Wine Berry A267, Blush Pink A225, Peach A274, Indigo A226, Ultramarine Blue A110, Noir A163
1. Squeeze Wine Berry, Blush Pink, and Peach onto the palette.
2. Add a layer of water to the paper using the big-size brush.
3. Start at the upper right corner and paint with Wine Berry. Apply a few diagonal and horizontal strokes.
4. Next, use Blush Pink to paint a few horizontal strokes filling the middle of the section. This will create a gradient. Let the water on the paper help spread the paint for interesting shades.
5. Use Peach to paint a few loose horizontal daubs at the bottom of the paper.
6. Mix Wine Berry and Ultramarine Blue to paint the clouds using a small brush. You can get different cloud shapes by adjusting the angle of your brush.
7. Use Indigo, Wine Berry, Ultramarine Blue, and Noir to paint the grass and twigs of flowers in the lower-left corner, as well as several birds in the sky.
6. NIGHT SKY (2nd Section)
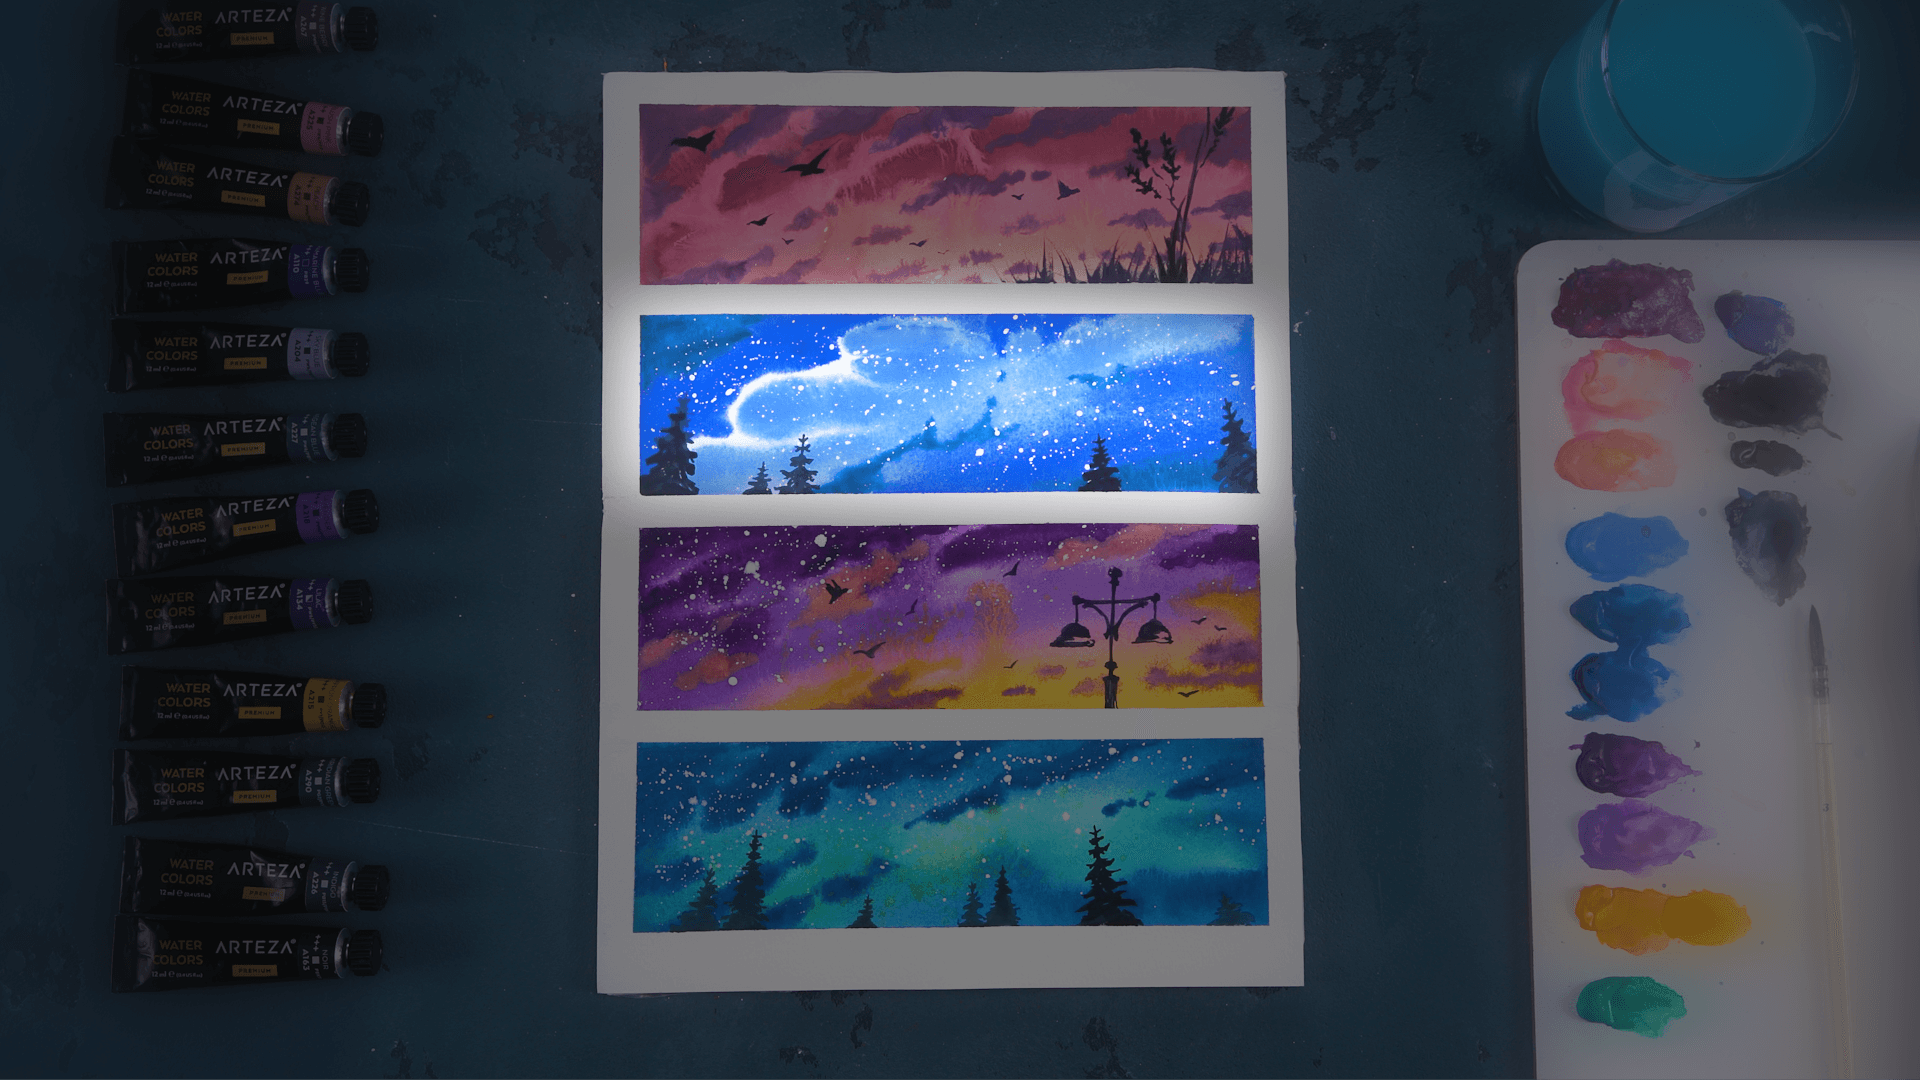
Sky Blue A204, Aegean Blue A227, Ultramarine Blue A110, Violet A125, Titanium White A101
1. Add Sky Blue, Aegean Blue, and Ultramarine Blue to the palette for your sky colors.
2. Moisten the next taped off section with clean water.
3. Starting from the lower-left side, use Sky Blue applied diagonally across the section.
4. Use Ultramarine Blue and add a few horizontal strokes. Start filling in a third of the section to create a gradient.
5. Use Aegean Blue to paint a few additional horizontal strokes to the top and bottom of the section.
6. Dip a small brush into Violet to paint the clouds. Adjust the pressure and angle of the brush to achieve the desired shape of the highlighted spot.
7. Splatter some paint on the page using Titanium White mixed with water.
8. With a small brush dipped into Violet, begin at the horizon line and paint the trees, varying their heights to suggest some in the background and the foreground.
7. LAVENDER CLOUDS (3rd Section)
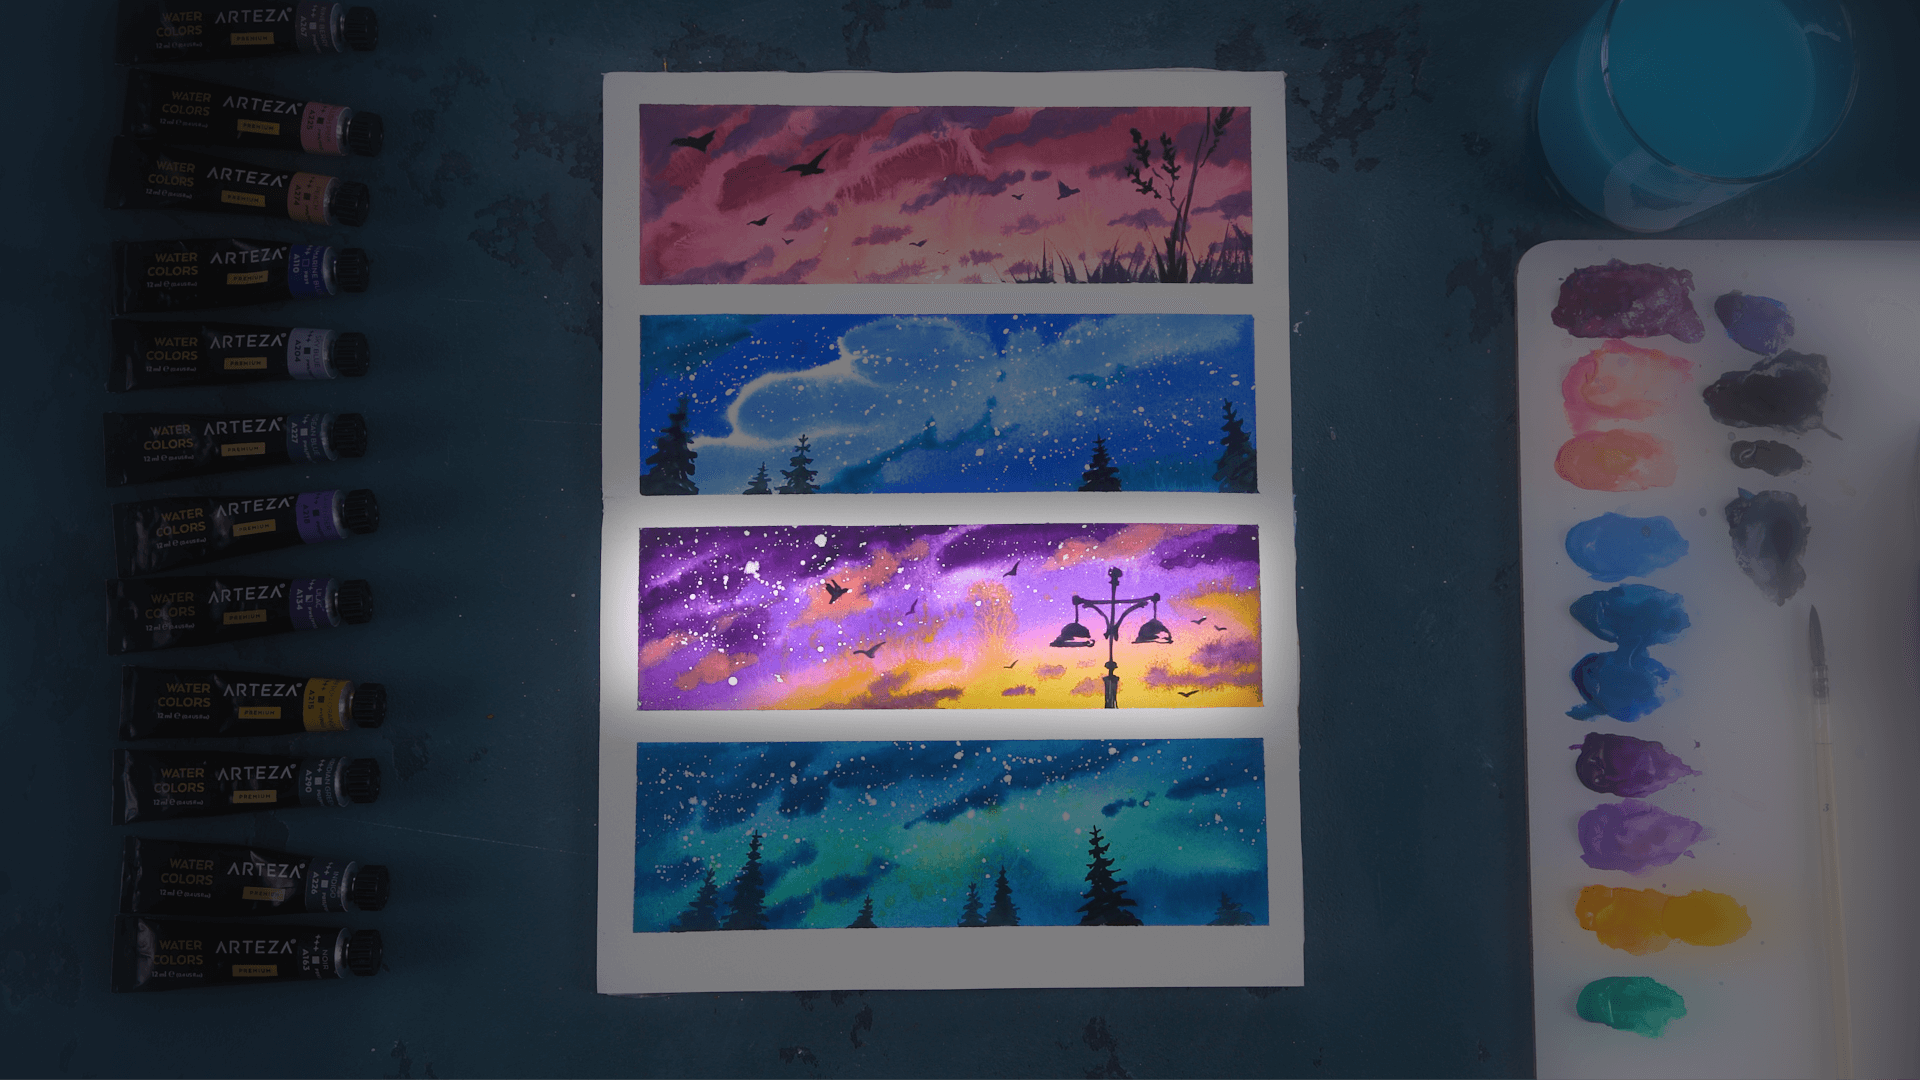
Lilac A134, Lavender A218, Blush Pink A225, Saffron Orange A215, Titanium White A101, Violet A125
1. Use Lilac, Lavender, Blush Pink, and Saffron Orange on the palette to create a colorful and dramatic sky.
2. Begin by wetting the next section with fresh water.
3. Starting with Lilac in the upper right corner, apply a few thick horizontal and diagonal strokes.
4. Underneath this, lay down strokes of Lavender to fill the section while also creating a gradient of the two shades.
5. Next, use Blush Pink at the bottom of the paper, with a small portion left clear. To that area, Saffron Orange is then applied.
6. Add an atmospheric quality by splattering the Saffron Orange with a small brush raked across your fingernail, as well as using plain water on the brush and touching it on the paper. This causes the paint to spread and turn into semi-transparent forms.
7. The clouds are painted with a small brush loaded with Lilac.
8. A splatter of paint on the page is achieved by using Titanium White mixed with water.
9. To complete the scene, dip a small brush into Violet and paint the lantern and some birds in the sky.
8. NORTHERN LIGHTS (Bottom Section)
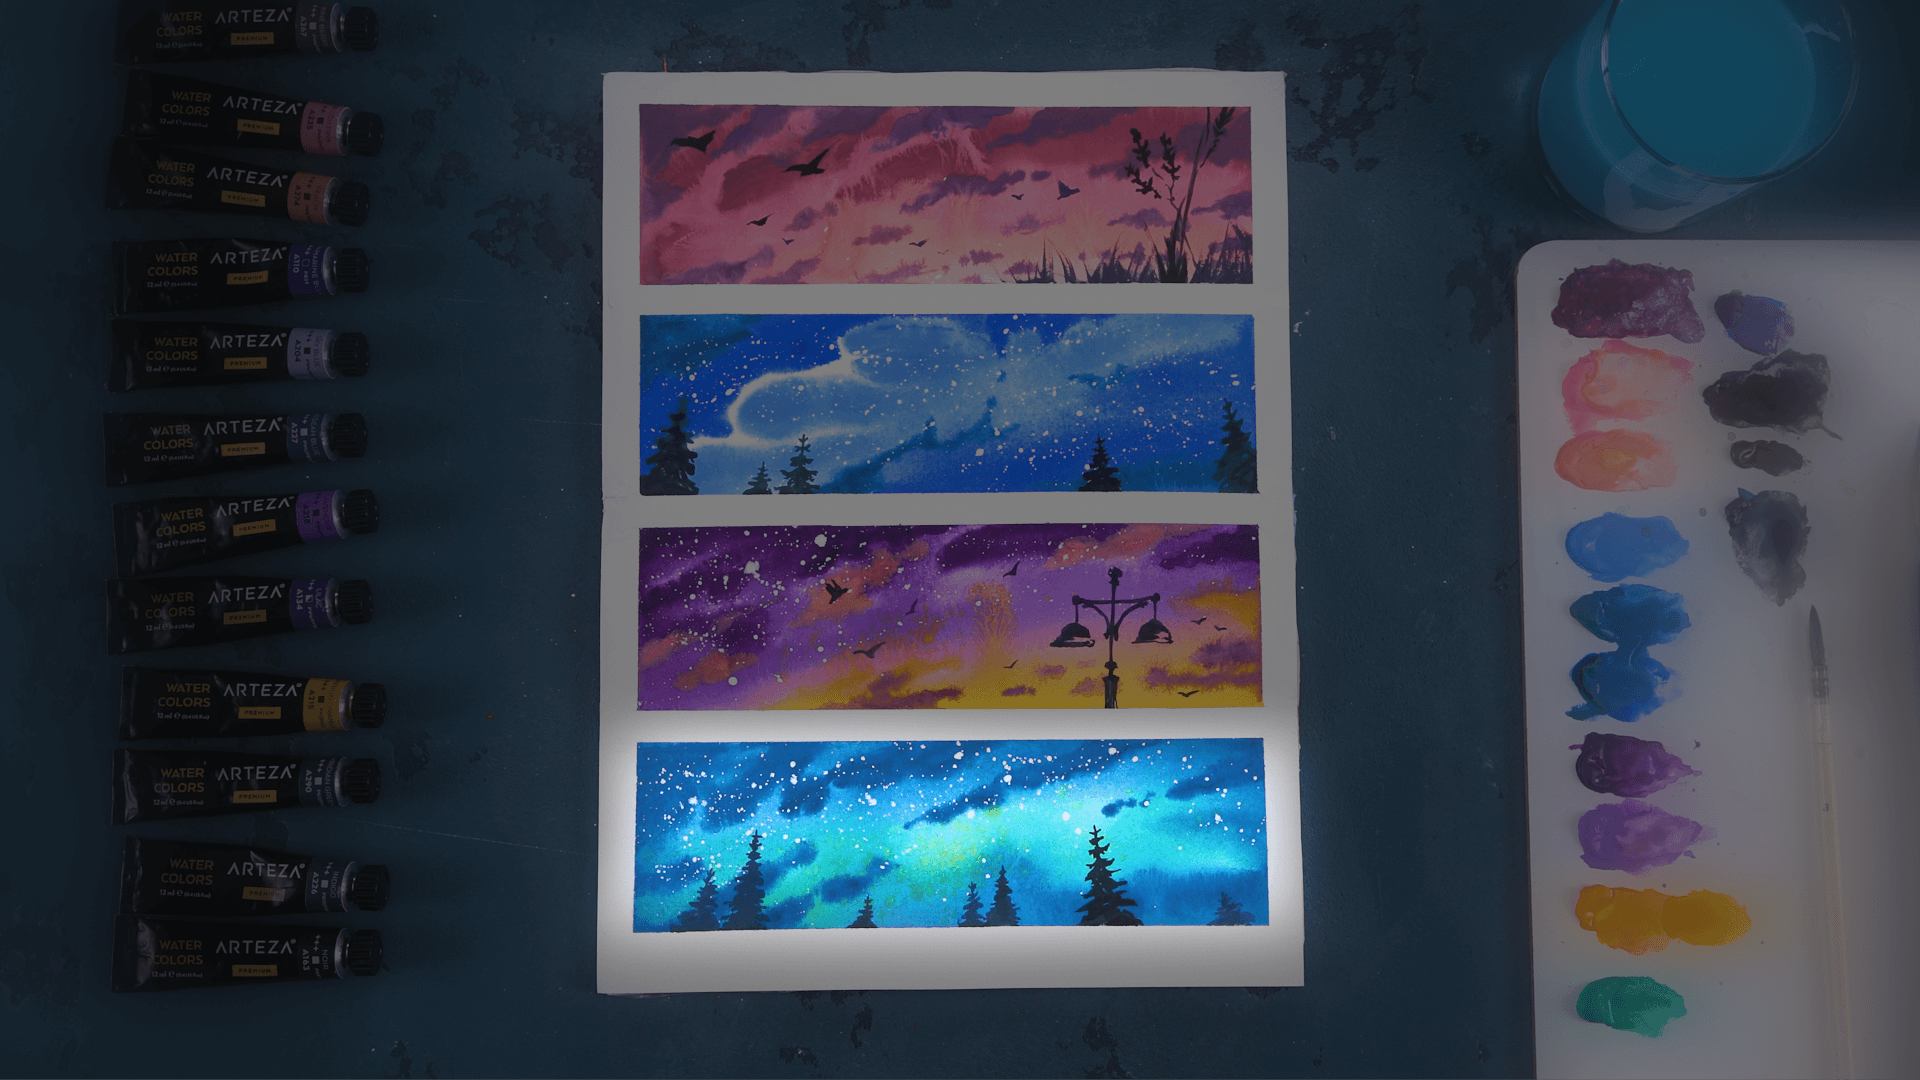
Aegean Blue A227, Viridian Green A290, Violet A125, Titanium White A101, Indigo A226, Noir A163, Saffron Orange A215
1. Place Aegean Blue, Viridian Green, Bubblegum Pink onto your palette.
2. Wet the paper using the wider brush.
3. Load the brush with Aegean Blue. Start with horizontal strokes and begin filling in the top third of the section. As you progress down the section, fill most of the left-hand side, curving up diagonally across to the other side. The moist paper will cause the color to become translucent.
4. Now, use Viridian Green to add strokes underneath the blue, filling in the middle third of the section and making a gradient of these colors.
5. Still using the largest brush, dip it into a mixture of Aegean Blue and a small amount of Indigo to paint the clouds. Use the tip and sides of the brush to achieve different cloud forms.
6. Splatter paint the page using Saffron Orange mixed with water. Then splatter with it combined with water.
7. Dip a small brush into Indigo and Noir to paint small, medium, and large trees.
8. Carefully remove the tape from all the sections and along all sides.
If you thought you couldn’t paint a breathtaking watercolor landscape before, these eight examples should have changed your mind. With a nice selection of paint, a couple of brushes, and a few sheets of quality watercolor paper, you can spend hours dreaming up and painting one amazing landscape after another. You can frame these meaningful paintings to hang in your home or office or give as gifts to friends and family members. The important thing is to keep exploring, experimenting, and painting!
Here’s the full video with all eight landscape paintings:


4 comments
While we don’t have an exact name for the company that creates these, we recommend using watercolor brushes for these piece as they will help your creations appear more fluid in their design.
What kind of paint brushes are being used during the video?
Exactly! We can’t wait to see what you create with this technique.
This looks so easy to do yet is super effective