Table of Contents:
- So You Want to Try Painting Watercolors
- Get Ready to Start
- Sketching Your Subject
- Finding the Right Water/Paint Ratio
- Color Mixing
- Going from Light to Dark
- More Watercolor Painting Techniques to Try
So You Want to Try Painting Watercolors
You may be a little intimidated by the thought of using watercolors. You may have heard that there are as many watercolor techniques as there are artists trying to master them. But, if you’ve ever stood in a museum and been inspired by the works of such noted watercolorists as J.M.W. Turner, Winslow Homer, or Jamie Wyeth, then as a budding watercolorist yourself, it’s worth the effort.
It’s not unusual to feel hesitant – a lot of artists who excel at other media feel the same way when they begin. Why does it have this reputation? Because, unlike other media, such as acrylic and oil, these paints react differently and, at first, can seem hard to manipulate. But, you shouldn’t let whatever you’ve heard about their difficulty — or even your past experiences — deter you. Once practiced some watercolor painting techniques, you’ll realize how wonderful it is!
Painting with pigments mixed with water is an ancient art form. Throughout the years, those who have mastered it have shared watercolor techniques. And, whether you’ve never picked a brush up before or have already given it a try, we’re here to offer these tried-and-true methods to inspire the creation of your own original pieces.
Watercolorists worldwide enjoy this versatile medium for a variety of reasons. It’s one of the most portable media, making it a popular media for those who love to get out of the studio or for adding vibrancy through color to a sketchbook. Just throw a tin of half-pans along with a pencil, paper or sketchbook, and water brushes in a bag or backpack and you’re ready to paint practically anywhere and anything — urban scenes, nature, animals, or quick portraits. It doesn't need any smelly or toxic solvents for thinning or cleaning. And, speaking of cleaning, all you need is a mild soap.
Get Ready to Start
A pencil, paper, brushes, paint, palette, and water are all that’s required. We recommend starting with these basics to make sure it’s right for you. You’ll find it’s less messy, cleans up quickly, and is portable!
Sketching Your Subject


As a beginner, pick your subject carefully. You don’t want to choose anything too complicated or with tremendous amounts of details. Once you know what you want, sketch it from life or from a photograph. Some beginning painters prefer tracing an outline from a photo or use grid lines to ensure accuracy in their drawing.
Whatever you decide, we recommend doing a practice drawing on a separate sketch pad before making the final drawing. If you’re confident in your skills, draw on the surface you’ll be using. When sketching, draw with a light hand. This decreases the chances of making any pesky indentations, the paint could pool in and ruin your piece. Keep in mind that it’s important to sketch in all the details.
Finding the Right Water/Paint Ratio


A popular way for putting paint on the palette is by starting with very small portions. It might look like there’s not enough paint, but you really don’t need to use very much because it is extremely concentrated. When determining the amount of watercolor, one technique many artists adopt is to use an amount about the size of a pea.
The right amount of water to paint depends on how thin and translucent your want your paint to be. For quick washes that are used to create a foundation for an area, you will want to use a very thin mix with a high water/paint ratio. In this case, you would add a touch of paint to a large puddle of water and apply it evenly with wide strokes. As it dries, it darkens slightly, so make sure your wash is just a bit lighter than you want for the finished look. On the other hand, if you have an area that calls for it to be darker, the water/paint ratio would be lower. You would use more pigment with just a little bit of water. This will result in a thicker application and can be used for dark areas or fine-line details.
Color Mixing


Now, that you have the consistency you want, it’s time to mix two colors to create additional hues. Do this by moving a tiny amount of the first color and mixing it with a small amount of the second. Beware — it doesn’t take much to change the value, so start by adding together a little at a time until you get the desired color. Now, you’ll be able to generate all the colors for your painting.
Going From Light to Dark

How do you decide what color to start with? One of the most basic watercolor techniques is to put the lightest colors of the subject first. Unlike oil or acrylic painting, where you are probably going to work from dark to light, with this, it’s important to apply the lightest first due to the transparency of the paint. Each consecutive application over that area will cause it to be darker and darker. In this instance, it is difficult to lighten darker colors once they are applied. The better practice is to apply the lightest shades first and build up darker areas by using layers of the same or different colors. For this reason, it takes some planning to ensure your light colors remain where you want them.
Work in this way across the entire piece, until all areas are covered. Finish off the painting by putting in all the fine details with a small brush that has not been slightly diluted.
More Watercolor Painting Techniques to Try
Here are some of the most common watercolor artmaking techniques. Take a piece of thick paper and have fun with these.
The Wet on Wet Technique


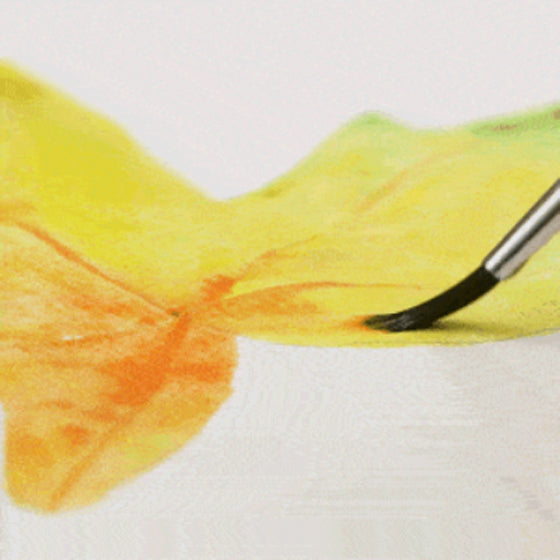
By wetting the paper first, you can achieve many unique looks. Using the “wet wet” technique can give your work a mood all its own, creating atmosphere and character. This method takes advantage of the fact that wet pigment tends to merge and spread when it comes into contact with moisture.
Here’s how it’s done. First, take a brush dipped in pure water and make strokes over dry paper. Get the it moist, not soaking wet. Then, dip your brush in paint and make strokes across the moist surface. Observe how the pigment quickly runs through the water, spreading more as the water wicks it into the moist surface. This approach is especially useful for adding large swaths of color at a time.
It is fun to play with this procedure. To make “blooms,” dabb just the point of the wet brush onto the wet paper and watch them appear. These shapes make interesting background affects and can also add interest and the look of texture.
You can also add household salt to the wet surface, which once dry can be brushed off, leaving spots of lighter shades where it has absorbed the water.
The Wet on Dry Technique

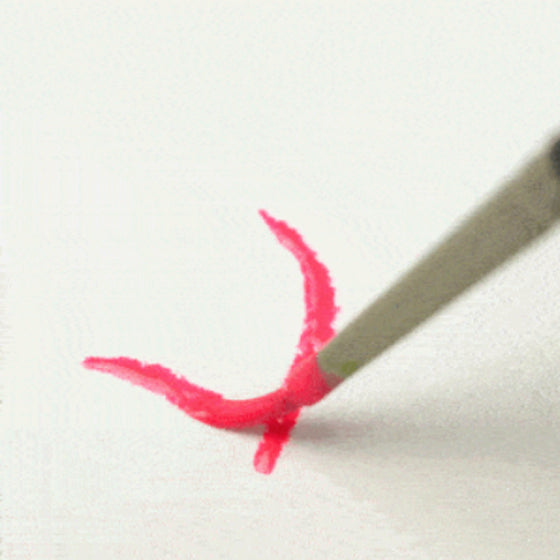
When most people think of painting, this is what they think of—wet paint on a dry surface. This is the more traditional approach to painting. This method gives more control to the artist than working with wet paint and paper, because unless you move the paint with your brush, it doesn’t move, but stays right where the brush put
You can use this technique alone for the entire painting or for specific areas of a work in progress. If you want to maintain sharp, clear edges of the subject while painting in a background color, this is the technique to use.
Combine it with the wet method by applying the wet paint to moist paper first and then letting it dry completely before adding more paint. This gives you a lovely base shade in which to add more defined lines and details.
For a quick and easy reference guide, use the wet/dry technique to create a page of swatches. Simply draw rows of blocks on dry paper. Paint each block with the colors you use and label each block with the color’s name. Now you have a handy guide when searching for the perfect hue to use.
Mixing Colors on the Paper


Pigments always follow the flow of the water. This means that watercolor paint lends itself to creating a lot of beautiful effects by simply adding water for mixing right on the paper. Even if the colors are dry, just by adding a touch of water, you can create gradients of the same color or combine and blend to create new colors.
Every time you add clear water to the dry paint on the surface of your paper, you are in effect remixing the paint. Just remember that as you add more water, it lightens the shade slightly. When you do this to two colors that are sitting side by side, you can create a completely new color. For example, if you have an area that is red and an area near it that is blue, you can use your wet brush to combine these two colors to form a purple section in between.
You can also mix new colors directly on top of each other. Say you painted a section yellow, but what you really meant was for that area to be orange. By brushing a wet brush with red paint over the yellow area, you can mix the two to form the orange you wanted.
Glazing


Its transparency is one of the best characteristics of watercolors. No other paint offers the ability to see through one layer of color to the next. To use this feature to its best effect, a technique called glazing is used. This is one of the best approaches for darkening your hues, defining specific areas, adding depth and shadowing, or adding highlights. The more you practice this technique and become proficient with it, the more you will use it to enhance your work.
Here’s how. Dip your paintbrush in very diluted paint. Apply the paint with light, yet broad strokes until you have bathed the area in color (This is referred to as a “wash”). Let it dry. Then add another wash of the same color over what was previously applied. Let that layer dry. Continue adding more and more layers, letting them dry in between, until you achieve the hue and boldness you desire.
Remember, even famous artists started out as beginners, so you’re in good company. We believe after viewing our video and reviewing these easy-to-try methods, you've discovered the secrets to painting with watercolors!
Always Use High-Quality Paint & Paper
One thing all watercolor artists agree on is that it is imperative that you always use the highest quality materials you can afford. We used high-quality paint and paper in the demonstration in this watercolor video techniques for painting. You should know that low-quality paints tend to crack after drying or have a dull, chalky after-effect that will distract from the beauty of the painting. When looking at different brands, Arteza Watercolor Paint - 60 Colors (60 x 12ml/0.4 US fl oz) is a great choice for beginners and advanced painters alike. They come in a variety of pigments in easy-to-squeeze tubes and are organized in trays for quick storage.
Just as paint of a lesser quality will negatively impact your painting, so, too, will low-quality paper. Thin papers will buckle or tear when it comes in contact with water, so high-density papers work the best for the techniques that you will be trying. The Arteza 9x12" Watercolor Pads, 32 Sheets - Pack of 2 works well since it is 140lb paper that is strong enough to hold lots of water.
For your convenience, we offer free shipping on all products shown with these watercolor making techniques. Be sure to check out the link in the description to find the right beginner set as you explore making the art you’ll love.
We hope you have enjoyed this watercolor tutorial on techniques to try! In addition to helping you get the hang of this complex, yet intriguing medium, we hope it has also inspired you. You’re starting an exciting new journey in your art adventure and we know that these tips and techniques will take you from beginner to beyond in no time at all.


3 comments
Great tutorial! Informative and visually uncomplicated. I now have ideas on how to add color to my sketches. Thank you
Thank you for this tutorial. I have done Oil & Acrylic painting for about 65 years. I always avoided watercolor in art school. But now I am ready to jump in, this has helped.
Thank you for high quality products..paint is rich, brushes hold water very nicely with perfect brush tips. Very helpful and inspiring tutorial!!