Table of Contents:
- How to Draw an Eye with Arteza Professional Colored Pencils
- Learn the Basic Parts of the Eye
- Add Color, Shading & Highlights
How to Draw an Eye with Arteza Professional Colored Pencils
No matter if it’s a self-portrait or the main character of your graphic novel, the eyes are the most significant aspect of your subject’s face. After all, they are thought to be the windows to the soul. So if you want your subject to look realistic, it’s essential to get the eyes right.
That’s why I wrote this tutorial on drawing the eye. I used Arteza Professional Colored Pencils for this project. I recommend using these pencils as they come in such a wide range of hues and I like how easy they blend.
In the initial four steps, I’ll show you the details of the eye and how to draw them. The eye has so many more parts than you think, and putting in these specific details is how to make your eye look the most realistic. Once these basics are drawn, I’ll show you how adding color, shading, and highlights are what really brings life to the eye. I suggest paying close attention to the reference pictures as you proceed to get the best result.
List of Supplies
- Mixed Media Pad, 180 Sheets, 5.5x8.5”
- Pencil
- Arteza Professional Colored Pencils: A034, A080, A050, A118, A120, A025, A017, A012, A007, A106, A052, A086, A104, A099
Learn the Basic Parts of the Eye
Step 1. The eyeball is a sphere

Keeping this simple fact in mind while you draw the eye will help add volume and dimension. Begin with a big circle to represent the entire eyeball. Add a vertical line down the exact center. Intersect that line with a horizontal one at the exact center of the circle’s side. Next, place a smaller circle within the large one to serve as the eye’s iris. Now, add a circle that’s even smaller in the iris to indicate the pupil.
Step 2. Place the upper and lower eyelids

Since eyelids lie on top of the spherical eyeball, I used curved lines that somewhat match the curve of the eyeball. Place the line for the upper eyelid through and a little lower than the top of the iris. Add another line over that one to show the eyelid’s thickness. Next, go higher above the iris and add a curved line to indicate the upper eyelid crease.
Next, place a line to represent the lower eyelid through and a little lower than the bottom of the iris. Connect it to the upper eyelid line. Place another line right above that one to indicate the lower eyelid’s thickness. Next, go below the lower eyelid and use a curved line to indicate the lower eyelid crease. Create the tear duct in the eye’s bottom right corner by shading in a small area.
TIP: Typically, the outer corners of most people’s eyes are situated higher than the inner ones, but this isn’t always the case. Pay close attention to this detail when working from real life.
Step 3. Draw the eyelashes

Eyelashes grow closely together and appear as bunches along the lower and upper eyelids. On the example, I pointed out the direction of their growth with arrows. Look closely at the way eyelashes grow, paying special attention to their curve and construction. See how the base is thicker and the lash gets thinner as it gets to the end? Also, remember eyelashes are not the same length.
Step 4. Add the eyebrow

I used three auxiliary lines extending from the eye to show the correct placement, shape, and angle of an eyebrow. The first one extends up vertically 90 degrees from the eye’s inner corner. This is where the brow begins. The second line is drawn upward from the iris’s outer edge. This is where the topmost part of the brow is situated and where it will start to curve. The third line extends up from the eye’s outer corner. Using these lines as a guide, fill in the hair using short lines that lean and curve. Alternate the hairs, going from the widest part at the inner corner of the eye, tapering them off after the curve and as you get to its outer corner.
Add Color, Shading & Highlights
Step 5. Begin the coloring process

Now that the pencil sketch is finished, I started the coloring process by working on the lightest areas first using the Arteza Colored Pencils. Using А025, outline the eye’s contours. Shade the upper and lower eyelids with A034. Use this tint on the upper eyelid crease and then add a little of A080. Next, shade the tear duct to give it some volume. Shade the upper eyelid crease with A025. Add the approximate contour of the eyebrow with A118.
Step 6. Outline the iris and pupil

Lightly outline the pupil and the iris with A086. Since this eye is wearing makeup, don’t color over the line where the eyeliner will be drawn in later. Also, leave a white spot of paper showing through on the pupil to indicate reflected light. This highlight makes all the difference when it comes to giving the most life-like appearance.
Step 7. Darken the eyelashes, iris, and pupil

The eye’s darkest parts are the eyelashes and pupil. Begin by making the eyelashes and the pupil darker and then placing dark marks on the iris. I used А120 to create the upper eyelid and its lashes’ shadow, which falls on the pupil and eyeball.
Step 8. Give the eyelid and eyebrows a natural appearance

Darken the lower eyelid with А118 to show that it overshadowed by the upper eyelid. Use А118 and А050 to add hairs to the brow so that it looks more natural.
TIP: To give the eyebrow the most natural appearance, use short, uneven strokes, varying the width and placement of the hairs.
Step 9. Add the iris color

Color the upper and lower eyelids with А034 to increase the color’s intensity. Then shade the inner and outer corners with A025. Start filling in the iris by lightly coloring the entire area with A017 and then layering on more of that same color at the edges for a brighter tint. The darkest part of the iris will be at the top and center.
Step 10. Add the eyeliner
Add A007 to emphasize the eyeliner on the upper eyelid. To increase the color saturation on the iris’s upper portion, I added layers of A106 and A104 to the edges. Place the reflections of the eyelashes on the iris with А012. To make the skin color warmer, add A052 to the upper and lower eyelids.
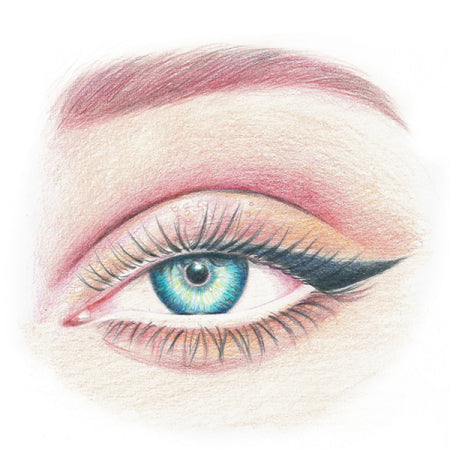
Step 11. The finished eye

Continue adding more contrast to the colors in the lashes, eyeliner, and shadows by layering more of those colors. Add A118 on the upper and lower eyelids and add A099 in the center of the iris.
You’ve done it! You’ve drawn a realistic eye. Now keep practicing and don’t be afraid to add your own details and colors, and soon your subjects will look amazingly expressive and life-like.


4 comments
Hey there! You can break each step down into manageable parts. It often takes practice and patience to get the desired results. Don’t give up. We believe in you!
This looks so complicated!
Is there anyway I can download tutorials they are great tools for directions. I would love to keep them.
That was one of the best tutorials for drawing a realistic eye. Detailed steps using colored pencils made it even better. I’m going to try it today. Thank you so much.