
Table of Contents:
- Make a Lovely Lavender Landscape Painting
- List of Supplies
- Preparation
- Paint the Sky
- Add the Forest Background
- Work on the Fields
- Take a Holistic Approach
- Finishing
- Tips for Beginners
Make a Lovely Lavender Landscape Painting
The lavender fields in Provence, France are famous for their lushness and extraordinary color. You can see the swaying stalks of purple flowers for miles and catch their heady scent on the breeze. It’s a scene that draws artists from around the world to try and capture their beauty in paint, and our artist is no exception. She uses the lavender field as her inspiration and in the guide and video below, shares the steps she takes to recreate it in her sketchbook.
Arteza Watercolor was used for this tutorial. In one set, you get wide-ranging hues of highly pigmented paint that mixes easily and goes on smoothly. It’s especially well-suited to blending and layering, which are two staple techniques used in most watercolor paintings. The artist chose to use our watercolor book with cold press pages as this paper is 110 lb (230 gsm), making it thick enough to take this watery medium without the pages curling or buckling. It’s also acid-free paper, which means the colors will stay vibrant and not fade or yellow over time.
List of Supplies
- #2HB Pencil
- Watercolor Premium Artist Paint
-
Hardcover Watercolor Book, 8.3" x 11.7", 64 Pages
- Light Apricot A207
- Gamboge A170
- Saffron Orange A215
- Yellow Ochre A113
- Lemon Yellow A102
- Bubble Pink A216
- Rose A115
- Blush Pink A225
- Scarlet Red A106
- Lavender A218
- Lilac A134
- Violet A125
- Sky Blue A204
- Paint Brushes - Small, medium and large
- Masking Tape
- Palette
- Kneaded Eraser
- Paper Towel
Preparation
Make a color chart.


As you’ll see in the video, the artist begins by making a color chart of all the hues she will use. This allows her to see how the colors will actually look on the paper she is using. In addition to the swatches, she draws a box and sketches in the location of all the elements in the painting. Then, she paints the sketch, which helps her determine what color she will use for the sky, the flowers, and the trees in the background. These preliminary preparations give her the information she needs to confidently create the painting on the opposite page.
Tape the paper’s edges.


To get ready to paint on the right side, the artist tapes the edges of the page. Once her work is complete, she’ll remove the tape and have a nice straight, clean frame around her picture.
Sketch the main details.


By using a sharp #2HB pencil, she can draw a light sketch of the lavender field and the landscape behind it. It’s important not to make these lines too dark because you don’t want them to show through.
She begins with a horizon line to help her achieve an aerial perspective, which will have the rows of flowers vanish into the distant treeline, making the viewer feel as if they are seeing a vast expanse of vegetation. She also sketches where the trees and the sun will be. Once her sketch is complete, she uses the kneaded eraser to get rid of any unnecessary lines and to lighten any she thinks are too dark.
Step 1. Paint the Sky
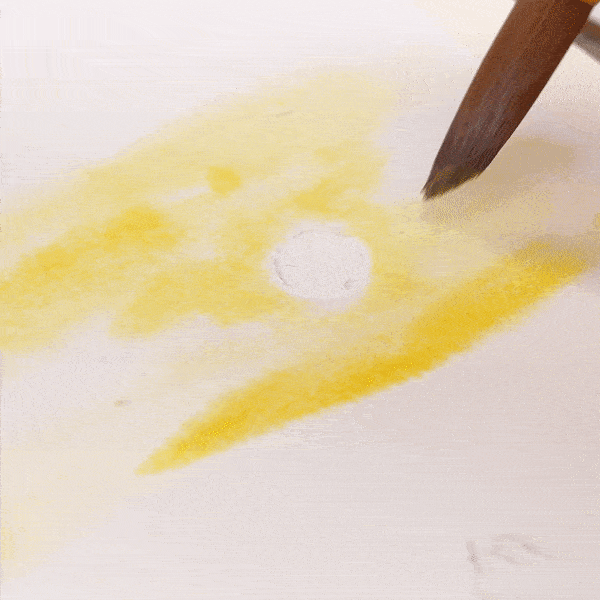

With the largest brush, she dips it into clean water and wets the area from the horizon to the top of the sky. She will be using the wet-on-wet technique by applying the paint to moist paper. This allows the paint to gently spread, giving it a soft and somewhat mottled appearance.
Using Gamboge A170, she paints the sky around the sun, then paints in some horizontal lines with Bubble Pink A216. By also mixing these two colors together she gets a peachy shade to use in the sky. Once she’s added Blush Pink A225 in the same way, the sky takes on the look of a warm sunset.
For dramatic clouds, she adds Lavender A218 to the top of the sky in stripes. To enhance the aerial perspective, she places Lemon Yellow A102 across the horizon. She works in the sky until it has dried to keep the colors bright and create more contrast.
Step 2. Add the Forest Background


Using the same Lavender A218 as on the horizon, the artist draws a slightly hazy forest in the distance. Watch carefully as she paints this with a single motion. To remove the excess paint in places where the crowns of the trees will be, she uses a clean brush.
To achieve the forest in the far distance, she mixes Seaweed A289 and Yellow Ocher A113. Then to show the light of the sunset shining on those trees, she adds Saffron Orange A215 to make a warm green shade. All the while, the artist hasn’t forgotten to continue to create contrast in the sky. She does this by additional strokes of Blush Pink A225.
Next, she wets the bottom of the sheet. She mixes Seaweed A289 and Ultramarine Blue A110 to make a dark green color and uses it to paint some more forest in the distance above the horizon.
Step 3. Work on The Fields


Stripes of Lavender A218 indicate where the beds of lavender bushes will be. Beginning with the lightest shades first, she adds Bubble Pink A216 to show the parts of the lavender bushes where the most light hits. To get a warmer shade of pink she blends together the Bubble pink A216 with Light Apricot A207, Gamboge A170, and Saffron Orange A215. This is the perfect hue for the parts of the lavender plants illuminated by the sunset.
To add depth and shadow to the plants, Lilac A134 and Violet A125 are mixed together and placed at the base of the lavender. Next, a mixture of Bubble Pink A216, Blush Pink A225, and Scarlet Red A106 is added for some warm highlights. Since dark shadows are cool places under the plant, she mixes Sky Blue A204, Ultramarine Blue A110, and Cobalt Blue A124 for these areas.
A mixture of Bubble Pink A216, Blush Pink A225, Scarlet Red A106, and Lavender A218 adds more warmth to the darkest parts on the right side of the fields. Lemon Yellow A102 is used to highlight those areas.
Watercolors work best when used to saturate the work with the shades on the palette. Notice how the artist works through the branches of lavender with constant strokes of the brush to give more and more volume. She doesn’t go into detail but works throughout the field this way.
Step 4. Take a Holistic Approach


At this stage, the artist doesn’t dwell too long in any one place on the page. Instead, she works on all areas of the painting by adding shadows under the trees with Blush Pink A225 and Scarlet Red A106, and then on the forest in the background with the cool green shade mixed earlier. All the while, she continues to also pay attention to the lavender shrubs.
To give the plants a textured and lively look, she splatters dark purple shades across the page while it is still wet.
She’s careful not to put all her focus on the fields and continues to add bright yellow accents to the sky with the help of yellow shades from the palette. She also continues working on the shady parts of the trees as well as the bushes. More deep shadows are placed under and around those shrubs in the foreground. Now, she is using all the shades on the palette to paint throughout the field and add more details to the work.
To complete this picture, the artist shields the top of the page above the horizon with a sheet of white paper to protect it as she adds splashes of dark purple shades to the lower part of the composition. These splashes add even more texture and liveliness to the work.
Step 5. Finishing
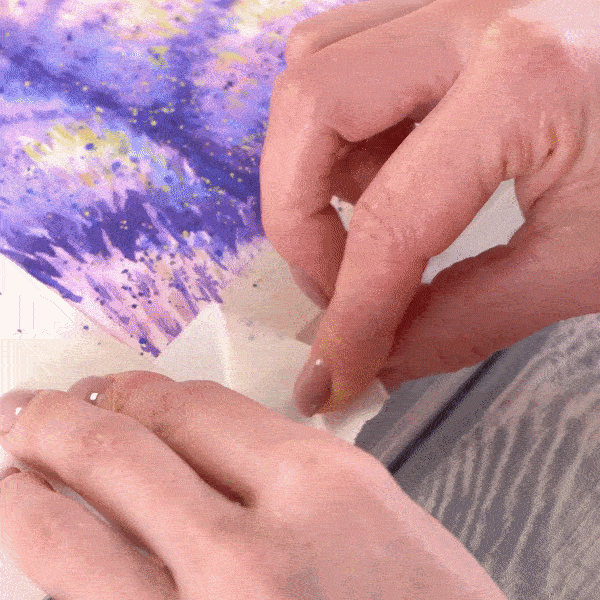
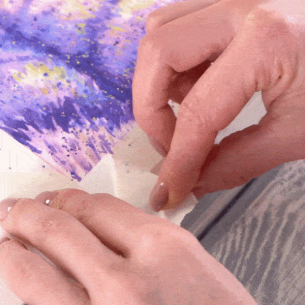
Once the surface is dry, she goes back over it with an eraser to make sure none of the pencil marks are showing through. Then she removes the masking tape. What a beautiful page for her sketchbook!
Tips for Beginners
- A little bit of water on the sketchbook’s page goes a long way. You only need to cover it with a thin layer of water to get the desired effect.
- You may be anxious to get started on your main design, but it’s well worth the time to make those initial color charts beside the space where your painting will be. Your end result will be so much better for it.
- Don’t be afraid to experiment. Watercolors don’t respond to the paintbrush or a surface the way oil or acrylic paints do. The more “happy accidents” you make, the more confidence you’ll gain.
- Watercolor paints become lighter when dry. So, don’t be afraid to go bold with your colors.
- To achieve the most successful outcome with the wet-on-wet technique, work quickly so the paint spreads over and mixes together before the page dries.
- To keep your sky feeling airy, paint it in one layer while the paper is wet and don’t go over it again. This ensures a smooth, even coat that looks and feels like transparent air.
- To get rid of excess moisture when working on the small details, blot the brush lightly on the paper towel.
There you have it! If you read these instructions and follow along with the accompanying video, then you, too, will be able to create this beautiful lavender landscape painting without even having to visit France. We hope this has given you lots of confidence to give watercolors a try and wish you would tell us all about your experience in the comments below.
Watch the lavender fields come alive in the video!


5 comments
Absolutely loved the video, I am going to watch it several more times and then attempt it myself!
We’re so happy to hear that you enjoyed the tutorial! We look forward to seeing your creation.
This was very informative! Loved it!
It’s more than a pleasure! 🖤✨
Thank you!! That was fun!!!