
Want more great inspiration? Check out our other art camp tutorials!
- Art Camp Day 1 - How to Draw a Toucan in 7 Steps
- Art Camp Day 2 - Create a House Drawing & Paint with Gouache
- Art Camp Day 3 - Dive Into Acrylic Art with an Adorable Pool Painting
- Art Camp Day 5 - How to Draw Ice Cream with Colored Pencils
- Art Camp Day 6 - Learn to Make Polymer Clay Jewelry
- Art Camp Day 7 - The Key to Making Art with Alcohol Based Markers
- Art Camp Bonus Day - 7 Easy to Draw Pictures Kids Will Love!
Table of Contents:
- Draw Like the Pros with the Right Pencils
- The Difference in Pencils
- Draw Seashells Step-By-Step
- Recommendations
Draw Like the Pros with the Right Pencils
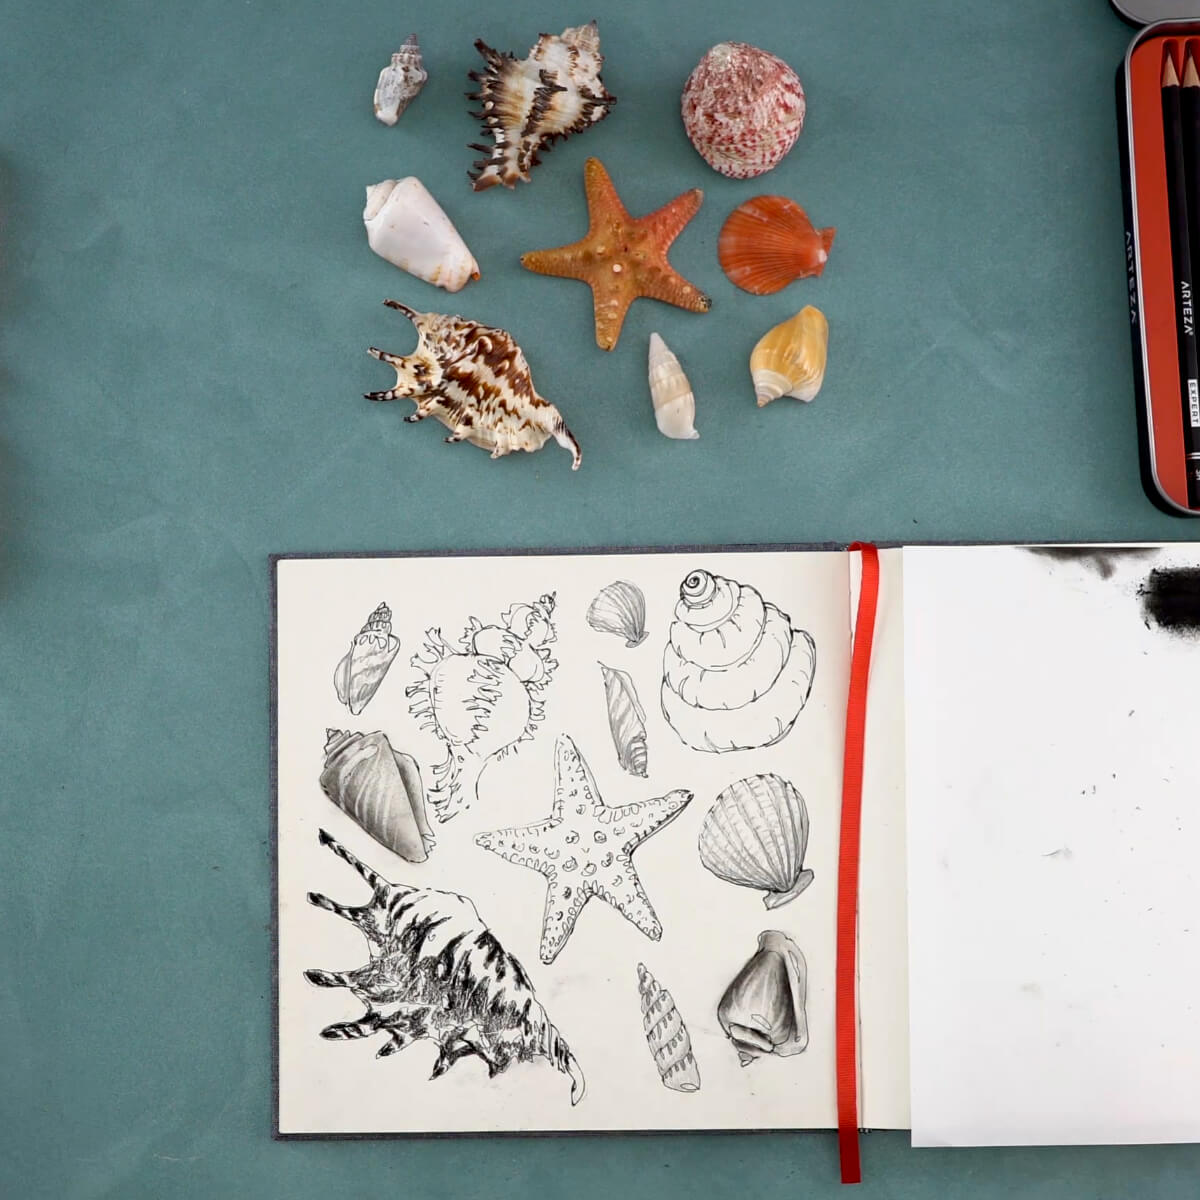
Welcome to Day 4 of art camp! Summer is the time for long walks on the beach and picking up seashells. If you’re like me, then you probably have a collection of shells at home. These little ocean treasures make really cool drawings and are one of my favorite things to draw in my sketchbook. They come in so many different shapes with lots of character.
I think shells look great as pencil drawings. These black and white sketches are fun and a great way to practice value studies, because I can create contrast by varying the type of pencil I use or the amount of pressure I apply. Plus, it doesn’t require any real setup. All I need is a sketchbook, pencils and an eraser.
We’ve created a video to go along with this guide. I suggest you read these instructions and view the video before progressing with your own drawing.
The Difference In Pencils
You can draw with any pencil, but if you want to be able to create variations in your shades, it’s best to use drawing pencils. Drawing pencils come in different lead hardnesses, which is essential to capturing the subtle variations in light and dark areas. These leads are categorized as either being an “H” or a “B.” H pencils have harder leads than B pencils. The harder the lead, the lighter the line it makes. To help you decide which one to choose within the H category, each pencil is numbered. The higher the number, the harder the lead. So a 4H pencil is going to make a lighter line than a 2H one. The B pencils have softer leads. The softer the lead, the darker the line. They, too, are numbered. Here, the higher the number, the softer the lead. The 8B will be much darker than the 2B. With that in mind, you can go directly to the pencil that will give you the shade you want, which is why having them all together in a set is so handy.
My drawing set of choice is the Arteza Professional Drawing Pencil Set with 33 pieces. In it, I get a range of leads, but also get charcoal, erasers and blending stumps. Having this set lets me make the most professional-looking drawings I can.
Draw Seashells Step-By-Step
I like to set up my composition first. Here I’ve used several shells in varying sizes and shapes. If you don’t have enough shells, you can use the same shells over again in one drawing by varying their angle or making them a slightly different size. Once I’m pleased with my arrangement, I’m ready to start.
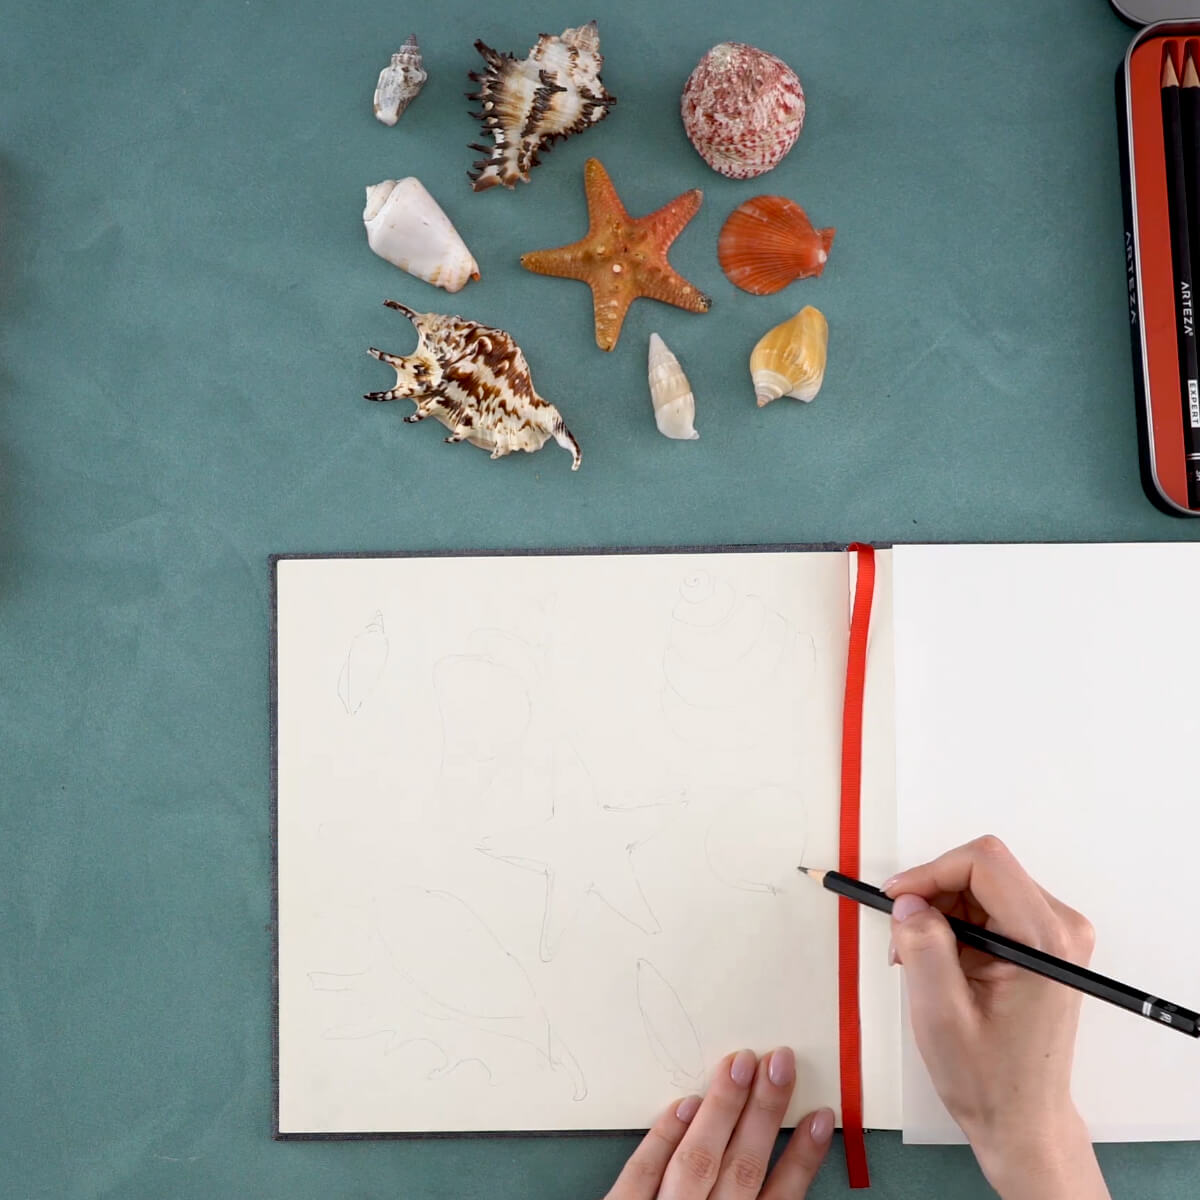
Step 1. Make Initial Sketches
I like to begin with a 2B pencil to sketch the overall shape of the shells and their location on the page. This way I have a really light line that’s easy to erase if I want to change something. After I have my shells sketched, I erase any lines I don’t need.
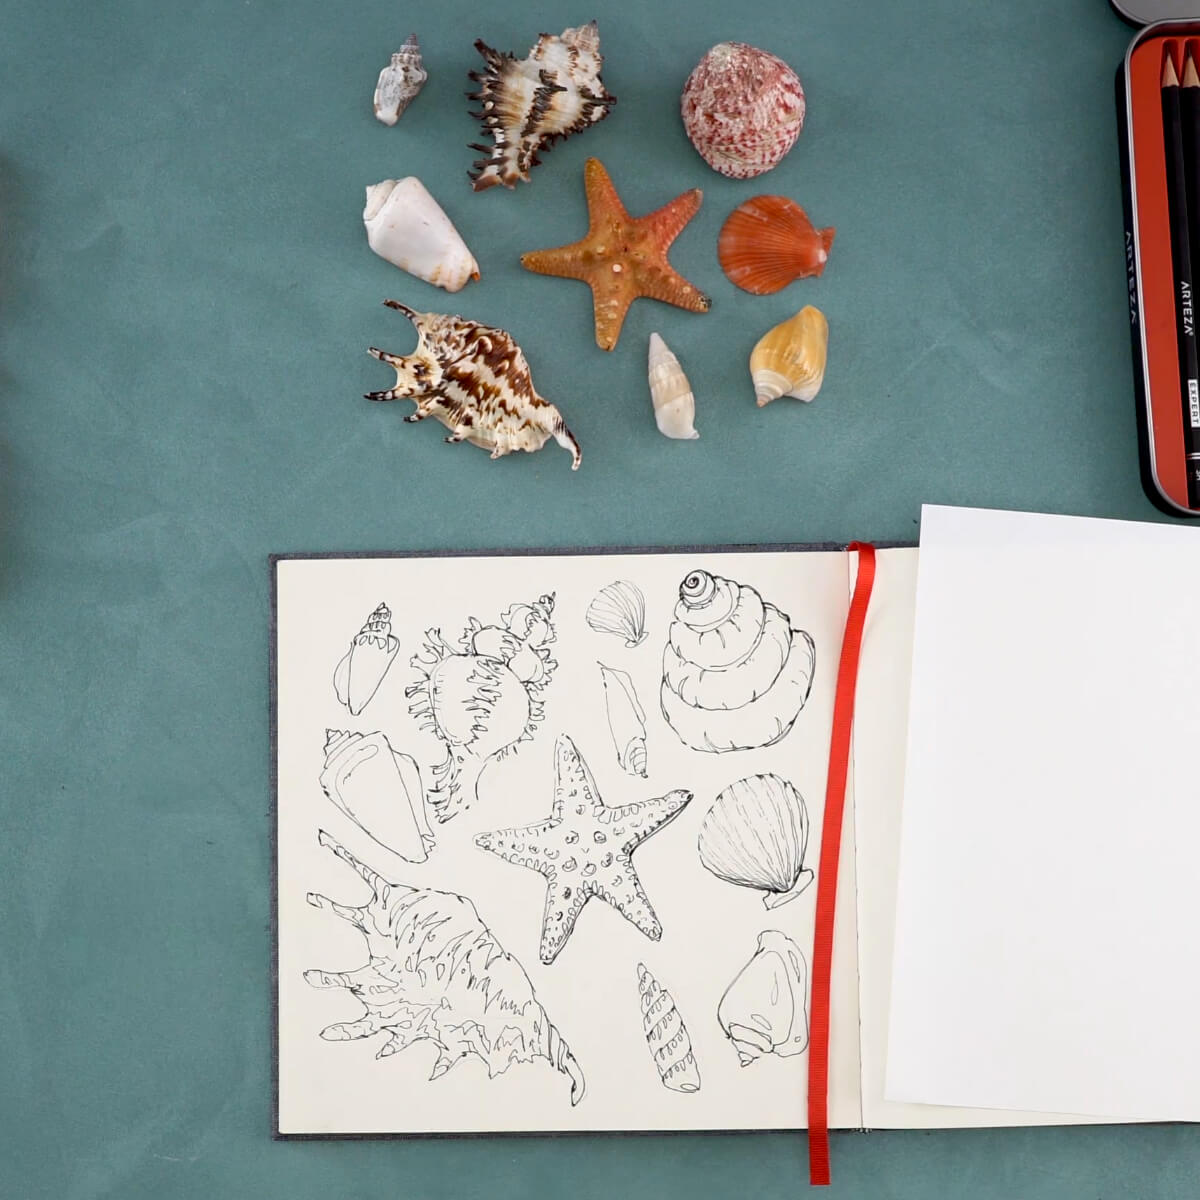
Step 2. Outline with a Fineliner
This is the only time I will use an ink pen in this drawing. I use it to give each object a dark outline to really distinguish its edges. It’s also a good way to add fine details I may not be able to get with a pencil.
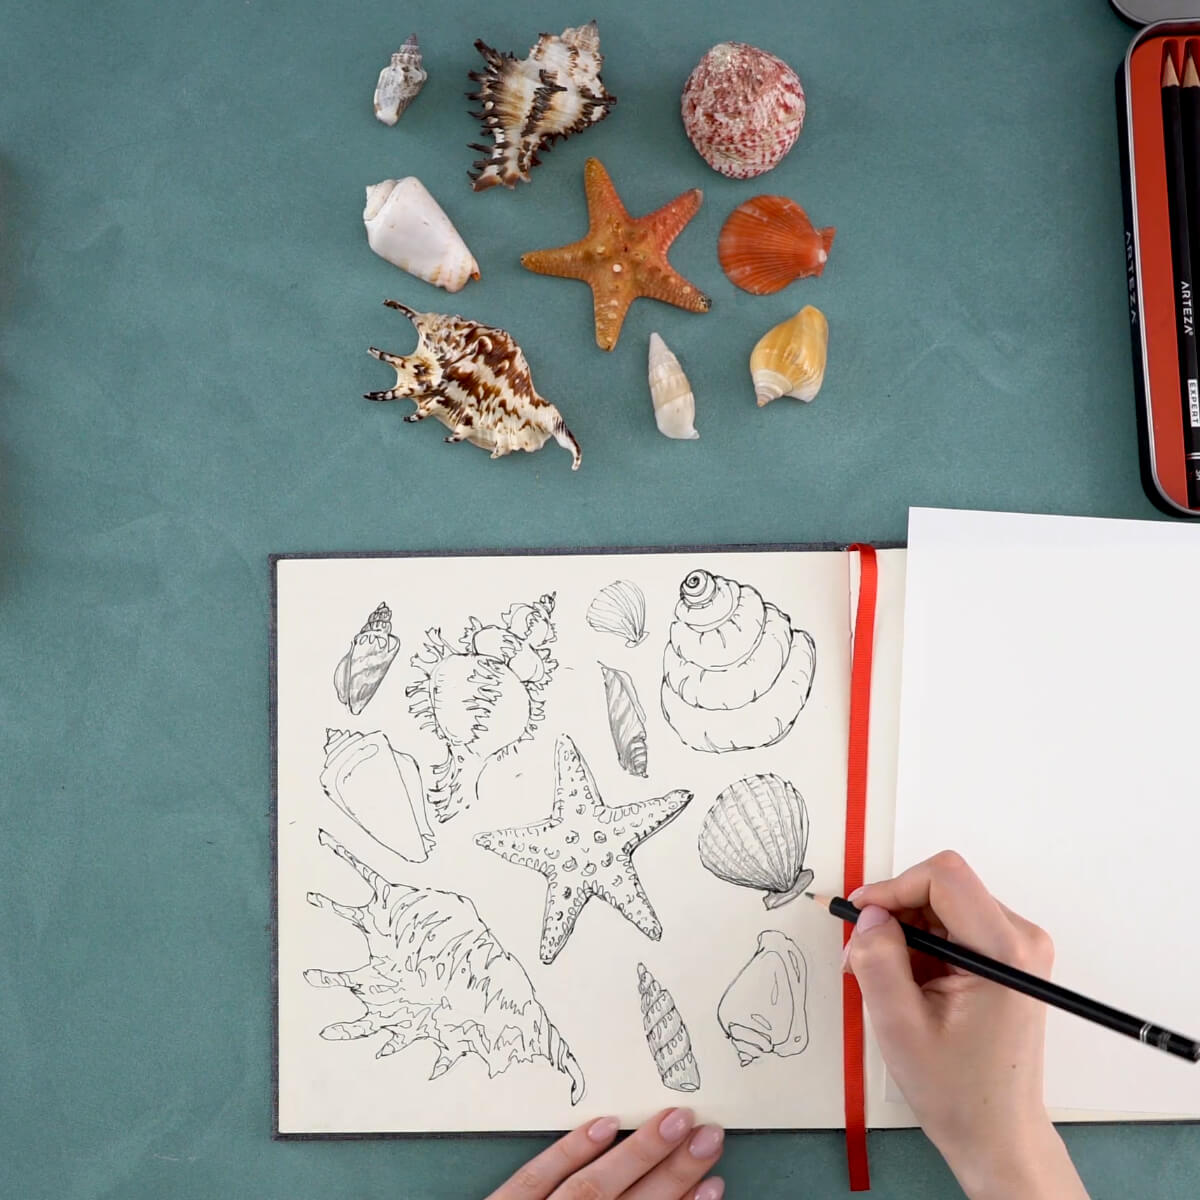
Step 3. Draw Shadows & Texture
Now, I go around every shell and add shadows and texture to the lightest shells using my 2B pencil.
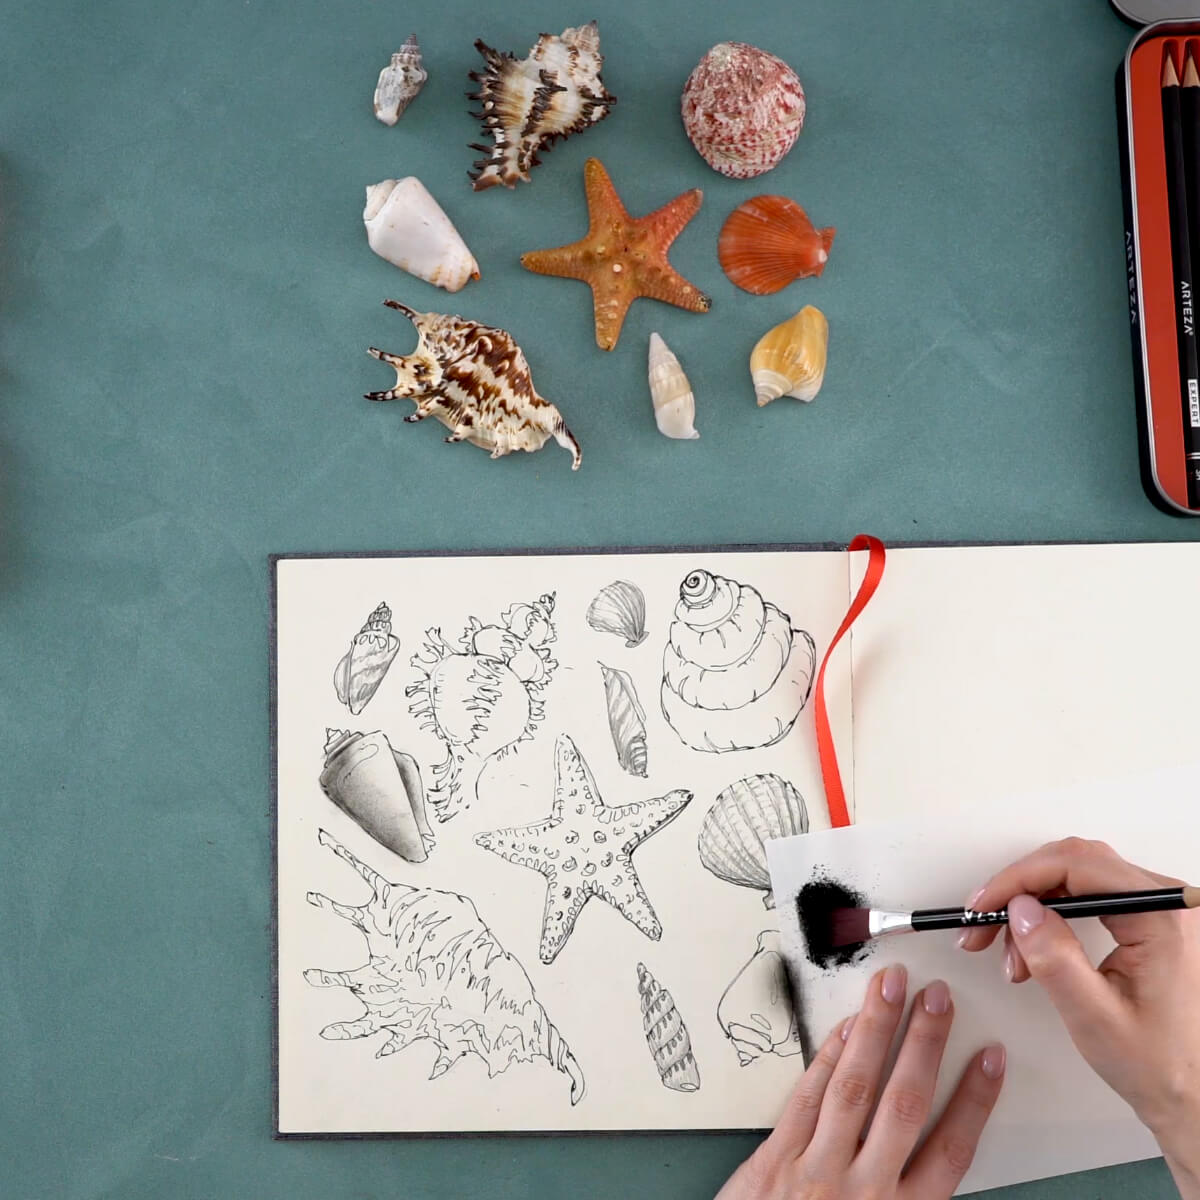
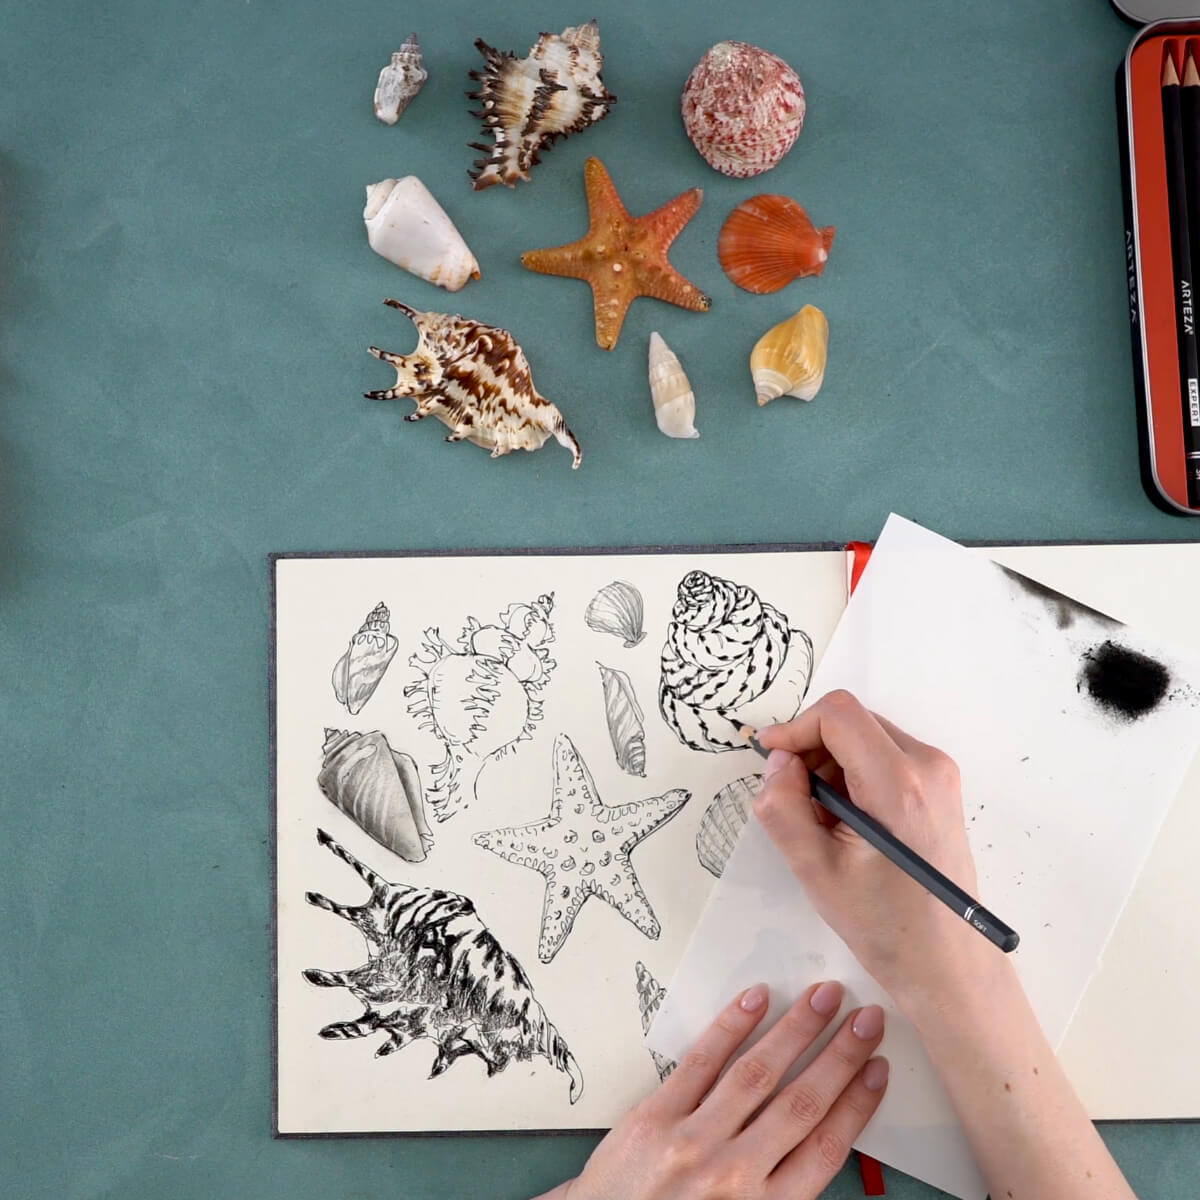
Step 4. Create Softer Shadowing
Here’s a fun way to add soft shadowing for a realistic look. I take my charcoal pencil and on a separate sheet of paper, I apply multiple strokes in one direction. I lay the paper along the edge of one of the shells and with a flat paintbrush, I pick up some of the charcoal from the paper and brush it along that edge. I also use the brush to spread the dark line of charcoal over the shell so that I get a gradient from black to gray. This really adds dimension!
To smooth it out and give it some highlights, I erase a bit from the tops of the shells.
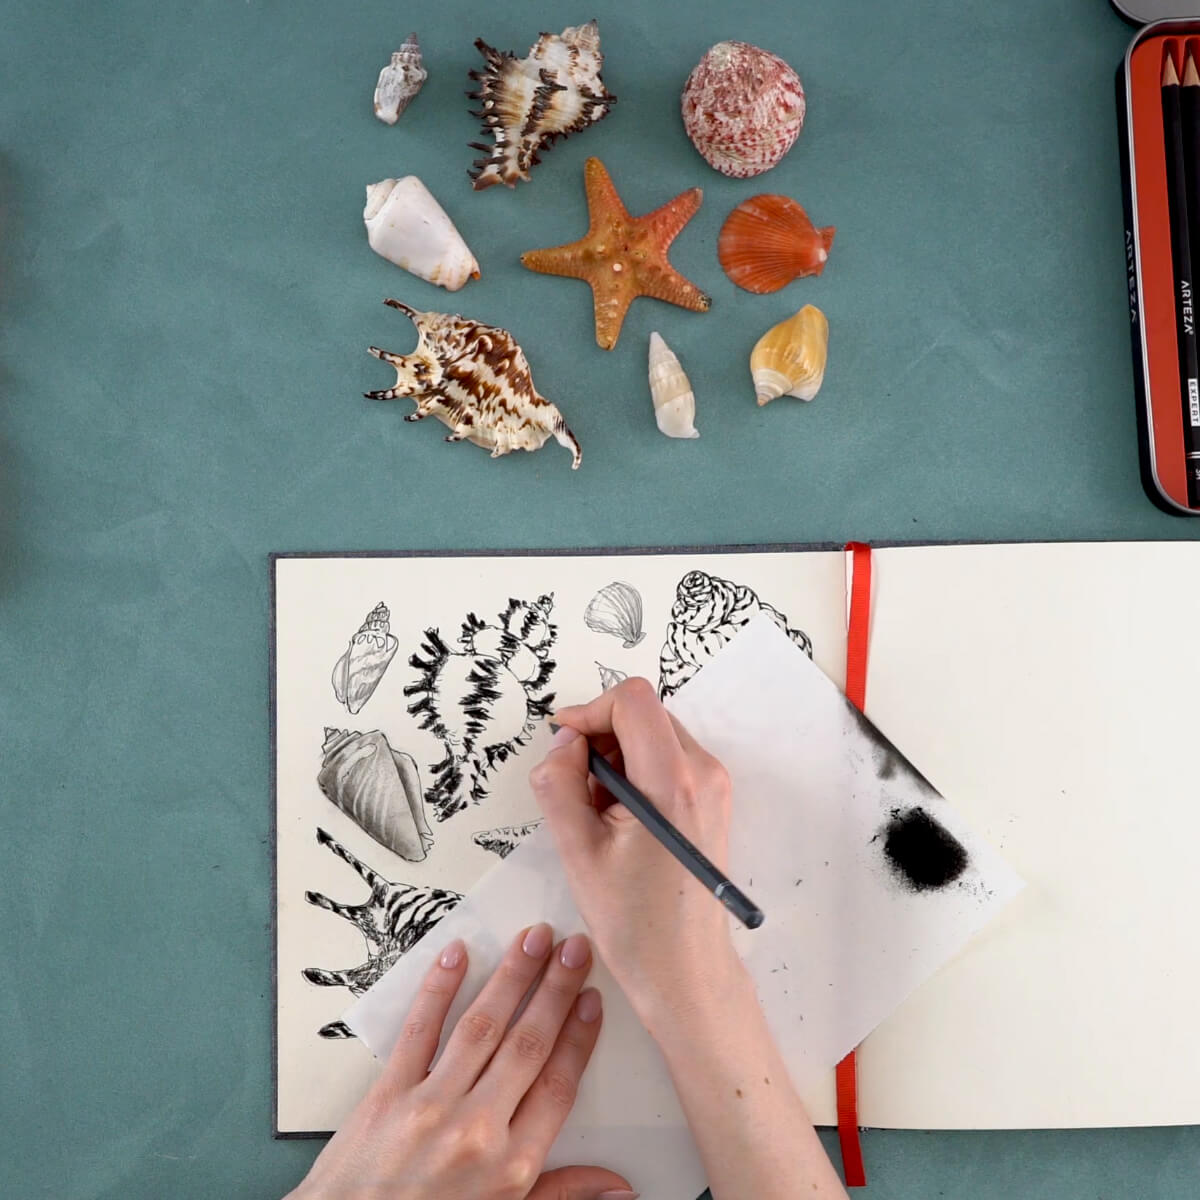
Step 5. Create Patterns
I like to start with my charcoal pencil when I create patterns on the shells. For the largest shell, I place these patterns over the top and sides of it, being careful to follow the natural curve.
Step 6. Spiral Shell
I use the same technique with the charcoal on the large spiral shell at the top as I did for the largest shell. I darken the lines that indicate how the shell spirals, as well as add peculiarities in the shell’s surface.

Step 7. Starfish
Now, it’s time to work on the starfish. I pay special attention to its structure, adding the bumps and irregularities that it has. I can give each leg a three-dimensional appearance by lightly shading the same side of each one.
Step 8. Spiked Shell
I darken all the spikes along the back and sides of the shell at the top left. This makes them look real and gives the shell’s body volume.
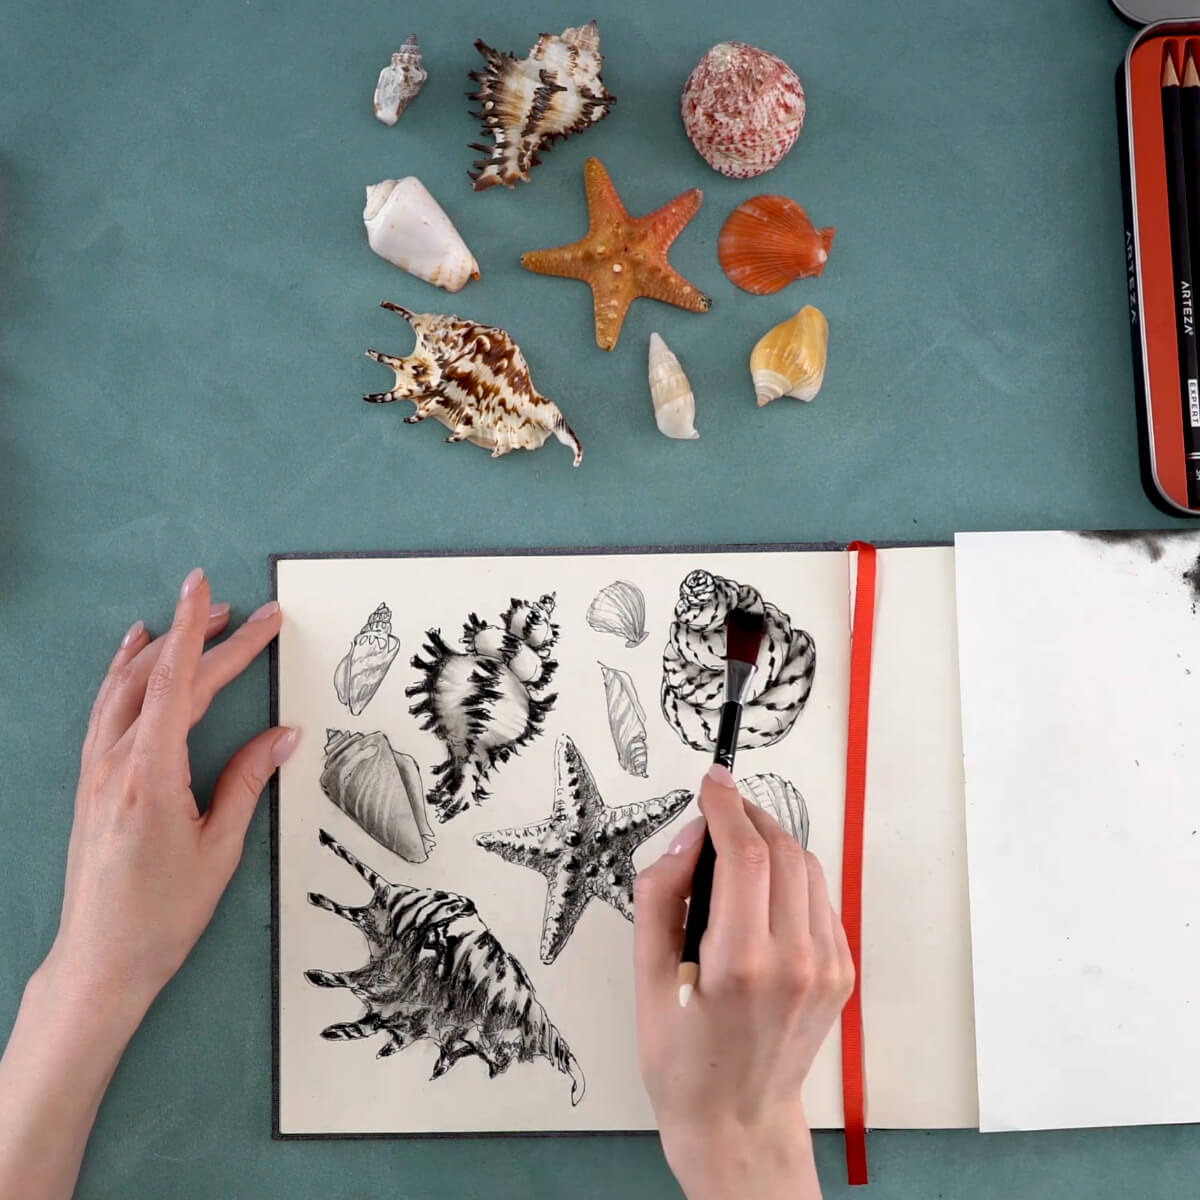
Step 9. Blending
I take my brush and blend the charcoal on all the shells. This subtle blending creates the transitions between the tones of black to gray to light gray that will make the shells look as if they are actually sitting on the page. Using the brush prevents any lines.
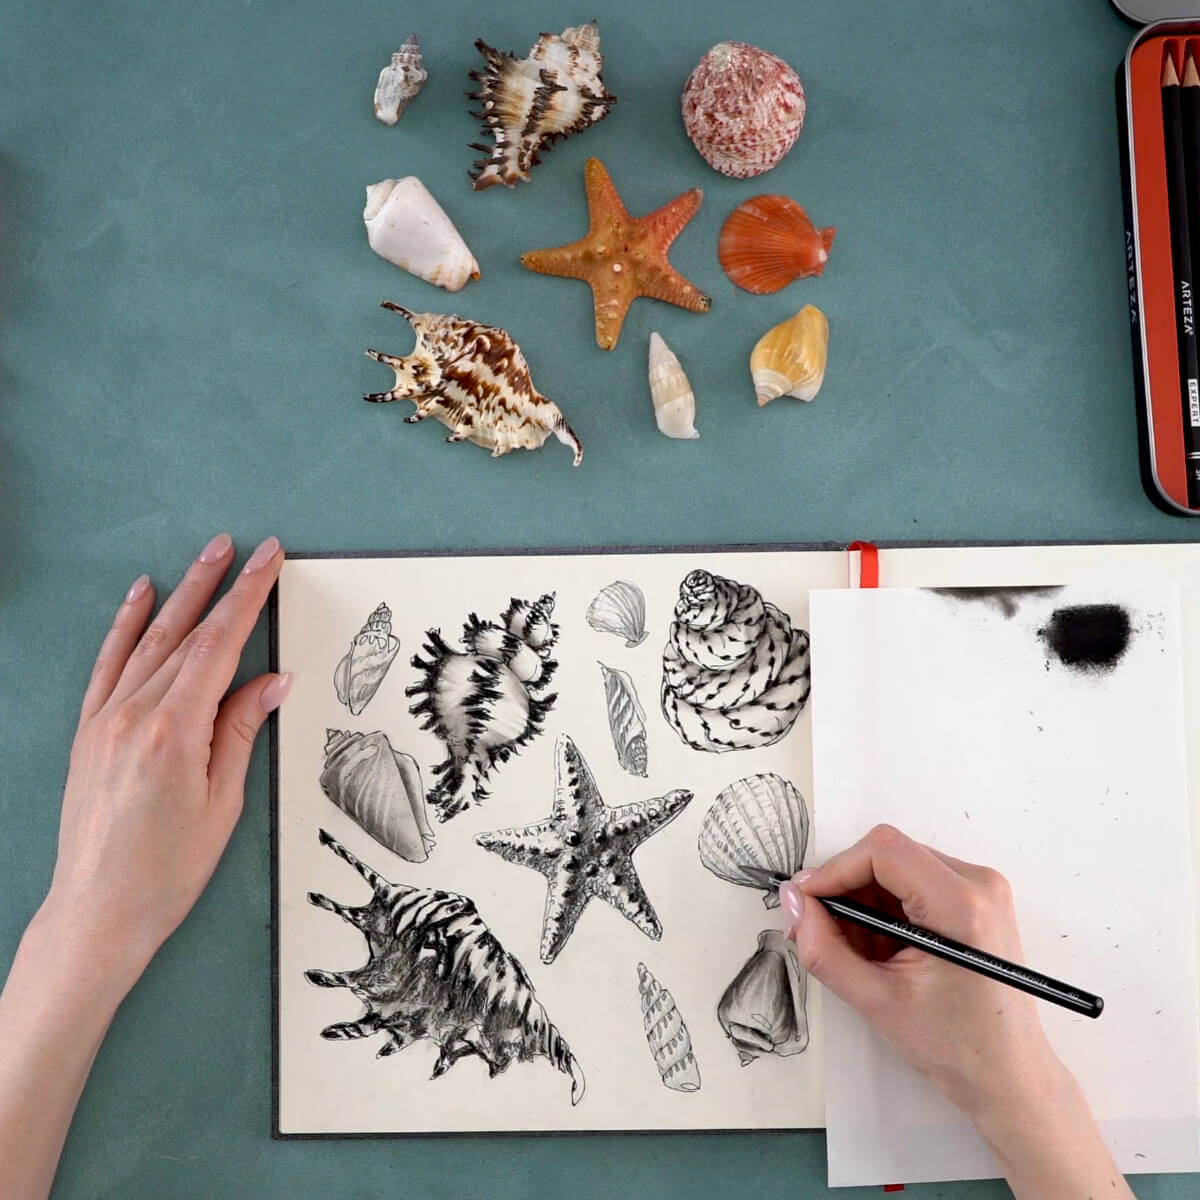
Step 10. Add Finishing Details
To complete my drawing, I use a woodless 4B pencil. I go over each shell, adding any tiny details I can see.
There you go! You’ve drawn some beautiful seashells I’m sure will bring back memorable summers at the beach.
Recommendations
- Your lines don’t all have to be the same width and length. Try to vary their thickness or use interrupted lines to create interesting variations. This will make your drawings livelier and more natural.
- To keep from smudging your paper, put a separate sheet of paper under your drawing hand.
- To preserve your drawing, I recommend spraying it with hairspray. This will hold the graphite in place and prevent any smudging.
The only thing more meditative than picking up seashells next to breaking waves is settling in for a quiet drawing session with shells as your subject. As you focus on each one, sketching its details, giving it texture and grounding it with shadows, you’ll find yourself becoming more and more relaxed. It’s the perfect at-home activity to help reduce stress. I hope you’ll feel that way, too! For more fun activities, stay tuned for the tutorials in our summer art camp and check out the blogs from our instructors. Stay safe and happy drawing!
Watch how I draw seashells using professional drawing pencils!


