Table of Contents:
- The Basics of Line Drawing
- Here’s How Hatching Works
- Wavy Lines for Interesting Surfaces
- Use Osculant Lines
- Try Stippling
- Give Scumbling a Go
- Create Some Surfaces
- Recommendations
The Basics of Line Drawing
From architects to illustrators, graphic novelists to urban sketchers, Inkonic Fineliner Pens are the tool of choice for drawings that have the most detail and contrast. When you ask yourself, what is an Inkonic Fineliner and how is it different from other pens, the answer is all in the pen’s tip. Inkonic Fineliner Pens have a fiber or plastic tip instead of a ball tip like the rollerball or ballpoint pens we use most often. This type of tip allows for a more precise placement of lines. By combining these lines in different ways, you can add texture, give the impression of volume, and create shadows.
When learning how to draw with Inkonic Fineliners, it’s important to use premium ones. The techniques you will find here have been created using Arteza Inkonic Fineliner Pens. I recommend them because the pens are vibrant, they dry quickly, and they won’t bleed or smudge your paper, desk, or hands.
Here’s How Hatching Works
The basis for all drawings is the line. Straight, curved, diagonal, vertical, horizontal—there are as many ways to draw lines as there are artists to draw them. The first two techniques are the simplest form of drawing texture and shadows. These techniques are known as hatching.
Hatching is the process of drawing parallel lines close together. You can do hatching in various directions and it is a good technique to practice as it will become a baseline for adding the other techniques. Here are a few things to remember when using hatching in your drawings:
- Draw every hatch in one line.
- Don’t use short, feathered lines. Use one bold, clean mark to create the line.
- Don’t use short, feathered lines. Use one bold, clean mark to create the line.
- Base your hatching on the shape of the object you are drawing.
Let’s look at some examples of hatching:
Directional Hatching

Hatching can be done in any direction—horizontal, vertical, diagonal—but whichever direction you chose, the lines must all be going in the same direction. This type of simple hatching is used to represent flat, smooth surfaces.
Cross Hatching

When hatching is done in two or more directions it is called crosshatching. I use these intersecting lines to create dark areas in my drawings as well as rough textures. This technique may be used to draw shadows, dark interiors, the bark on trees, fabric, etc.
Create Volume

Hatching is a good way to create volume in drawings. You can control how dark or light an area is by how close you put your lines together. Placing the lines closer makes an area appear darker, the farther apart the lines are the lighter the area will appear. This rule works regardless of whether the line is straight or curved.
Another way to add volume is by the thickness of the line. Thick lines make an area appear darker; thin lines make it appear lighter.
Make Gradients: One Color to Another

Just as in the one-color gradient, hatching can be used to go from one color to another. In this example, I used colors from one side of the color wheel—yellow, orange, pink, red, violet, purple—to go from yellow to purple. I started in the center with the yellow—drawing the lines very close together—and continued with Inkonic Fineliners in all the varying shades until I ended with the darkest purple.
Make Gradients: Dark-to-Light

I like to use hatching to make a gradient in one color by going from light to dark. Here I used Inkonic Fineliners in various shades of blue and started on one side of the paper with the lighter shades and began making lines. As I progressed across the page, I simply picked up the next shade and drew lines in that color until I used all the pens in that color spectrum.
Wavy Lines for Interesting Surfaces
Use wavy lines the same way you use straight lines to create specific textures and/or movement. Wavy lines are most often used to show a repetitive pattern, such as those typical on wood, feathers, foliage, and water.
Wood
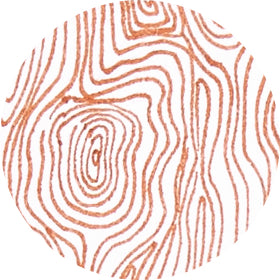
Inkonic Fineliners are the best pens for letting you make very small details such as the center of the wood grain pattern you see here. By using wavy lines that go in the same direction yet vary in distances apart and in widths, you can see the “knots” in the wood.
Feathers

The distance between the lines—some very close together, some far apart—allow the white of the paper to show through. That along with the varying thicknesses of the lines make this a realistic-looking feather.
Foliage

Use Inkonic Fineliners to create the veins on leaves for life-like foliage. By using a darker, wider line of the same shade, I created the center rib of each leaf to make it look like the leaves are overlapping.
Water

Get the motion of water by alternating the thickness of the wavy lines as well as the spacing in between, while keeping all the curves going in the same direction.
Use Osculant Lines
With this technique, I drew lines of varying lengths and in different directions to create the look and feel of grass and fur.
Grass

By using vertical lines in differing directions and lengths, I get the look of grass. Also, I put the lines very close together at the bottom and less so on the side to show the decreasing density of the grass.
Fur

When drawing fur, each line represents a separate hair. Whether the fur is straight or curly, I use differing lengths in similar but not the exact same direction. It’s important not to draw these lines in orderly rows, but vary where the line starts and stops.
Try Stippling
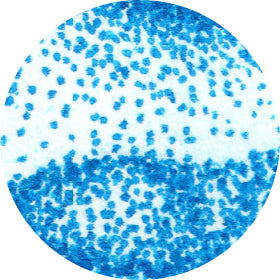
Fineliner also refers to the fine point at the end of the pen as well as the fine line it creates. This fine point can be used to create tiny dots for a technique called stippling. Just as I used the lines to create contrast and texture, stippling can do the same thing.
To create stippling, hold the Inkonic Fineliner pen perpendicular to the paper. Rapidly touch just the tip of the pen to the paper, pulling it up straight. Do not drag it sideways or you’ll get a line instead of a dot. Just as with hatching, the closer you put the dots together, the darker the area will be; and, the farther apart they are, the lighter the area.
Stippling is used to draw and shade objects as well as make splashes of water, clouds, and sand.
Give Scumbling a Go

Scumbling is a scribbling technique, where tangled lines make an object look dense and energetic. Often used for quick sketches, scumbling in rounded whorls such as in this example is often used when drawing hair and foliage.
Create Some Surfaces
As soon as you master the basic techniques, you can start to imitate different surfaces. Using the same simple lines, but in repeating patterns, you can create the effect of texture and shape for wood, brick, rock, paving stone, scale, tile, etc.
These techniques may be used in exterior and interior architectural drawings, furniture detailing, interior decor, floors, walls, etc.
Parquet

Use horizontal and vertical lines to create the look of parquet wood flooring. Using the same number of lines in equal lengths to create a “square” then alternate the direction of the squares.
Bricks

Create bricks by drawing rectangles in a repeating pattern while staggering the pattern in alternating rows.
Cobblestone

To make natural-looking cobblestones, draw irregular oblong and curve shapes in rows. Use thin and thick lines to show the shadows and crevices between the rocks.
Scales

There are many ways to create the look of scales. They can be made by drawing fan shapes in a repeated diagonal pattern, adding small ovals in rows, or making lines in irregular patterns.
Tiles

To create tiles as they appear on roofs, draw a U-shaped line alternating the placement of the tiles on each row so they appear to overlap.
Bubbles

Circles in random sizes that are clustered together will give the impression of bubbles.
Dandelion Effect

Draw small, short lines that are close together around a central circular area. As they radiate out from that center, use fewer lines and begin spacing them farther apart, until there are a few light lines scattered around the perimeter.
Fibers

To get the feeling of flowing fibers, make curved lines in sections. Carefully draw all the lines with the same curves. When the lines are placed close together they appear darker and look more solid.
Now that you’ve learned some of the basic ways to draw with an Inkonic Fineliner Pen, it’s time to combine them to create unique art. Watch this video and see how I created a portrait of a girl.
Recommendations
As you watch the video, here are a few things you should know:
- Fineliners work especially well on smooth, thick paper, such as the white paper I chose for this drawing. I do not recommend using rough paper as it’s difficult to get straight lines because the ink clings to the dips in textured paper.
- For this drawing, I used a pencil and drew 2x2” squares on an A4 format (8.27 × 11.69 inches/210 × 297 millimeters).
- I used the following Arteza Inkonic Fineliners in these colors: these shades of blue A108, A131, A103, purple A136, turquoise A138, these shades of orange A105, A12, and yellow A156.
- For the face, I used these hatching techniques: points, circles, small lines in different directions, tiles, waves, and discontinuing waves.
- Alternating the hatch density as the portrait progresses is really important. It is how I create volume.
- For the hair I use mostly smooth, rounded lines—circles, whorls, wavy lines, rounded patterns, scales, scribbles—to create the curly hair.
- I mix smooth and straight lines with different patterns and circles for the background and clothes.
So there you have it. Look at all the ways you can use Inkonic Fineliner Pens! Now, it’s your turn to give these wonderful drawing tools a try.


