
Table of Contents:
- How to Start Drawing with Alcohol Markers
- Alcohol Markers Explained
- How They Work
- What Kind of Paper to Use
- Take a Closer Look
- It’s All In the Nib
- Blending with EverBlend
- Recommendations
How to Start Drawing with Alcohol Markers
I’m always looking for new ways to create art. A turning point in my artmaking happened when I discovered markers. I was mostly used to sketching and drawing with pencils and fine liners, but once I picked up an art marker, I knew this was an amazing tool that would elevate my work and enhance my style.
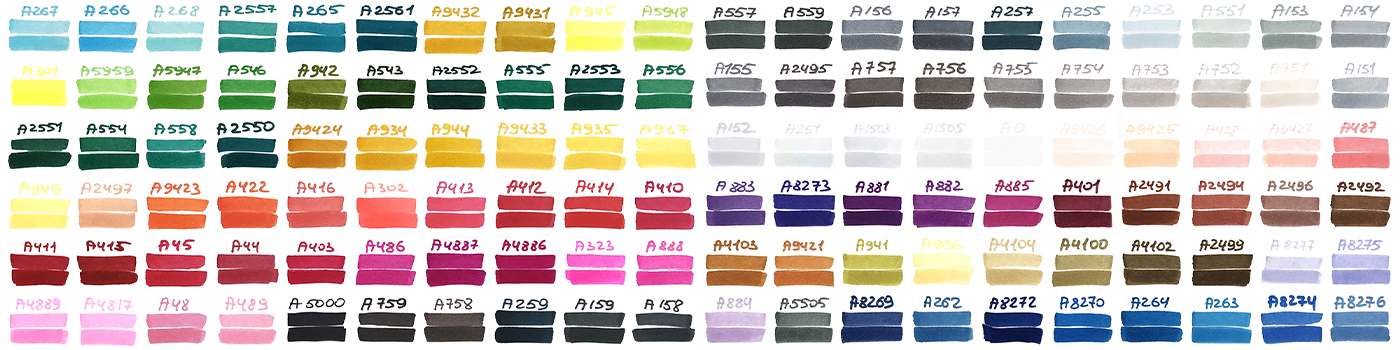
Now I want to spread the news about how wonderful it is to use markers. I’ve gathered some information to explain why I think they’re so special. I will say that my favorites are the Arteza EverBlend-Set of 120 because I get every shade under the sun, plus they all come in an easy-to-carry case, so I can take them to the studio, to classes, or any other places I happen to be going to draw. The colors are especially bold and each pen has a fine point on one end and a chisel tip on the other. If you’ve never drawn with a marker before, these are the ones to start with.
Alcohol Markers Explained
The first markers used a wool tip and ink combined with toxic solvents like xylene or tuluol. They were primarily used for labeling and illustrating signs or posters. Solvent markers are still around but they are noxious to use and I sometimes get a headache when I draw with them. Around 1993, manufacturers exchanged those smelly solvents with alcohol to produce markers that are safe while creating incredibly vibrant results. Today, alcohol-based markers are my tool of choice and that of graphic designers, manga artists, illustrators, and fine artists around the world.
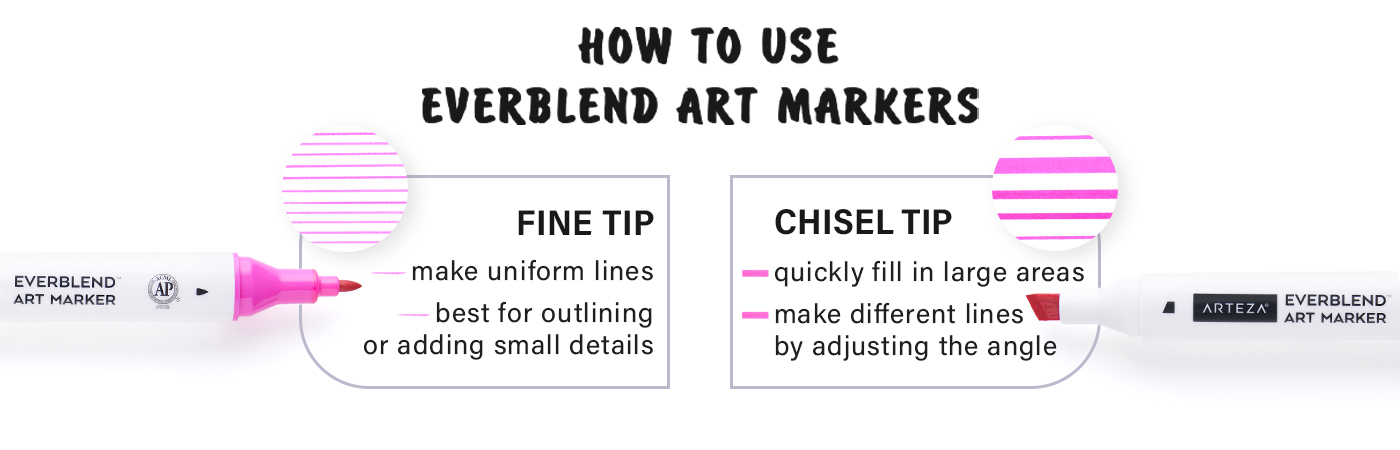
I especially like EverBlend’s sturdy plastic barrel which is triangular shaped for a really comfortable grip. They have tips in two different sizes made of fine fibers on either end. One is a 0.11” fine tip for detailing and sketching, the other end is a 0.24” chisel tip for coloring in large areas. I also love that both tips are replaceable.
How They Work
A marker is one of the easiest tools to use and there is not much to do to start drawing with them. Just grab a sheet of thick-grade paper and one of these pens and simply start sketching. As pressure is applied, the ink flows smoothly onto the page. The more pressure applied, the more ink and darker the mark. Since alcohol evaporates fast, a drawing dries in seconds.
Illustrators have been using markers for years to create cartoons, fashion designs, architectural renderings, graphic novels, and more. Their fluid nature allows all sorts of techniques for enhancing my artwork or making realistic 3-D drawings. They work well for hatching, blending, or filling in large areas. I draw all my favorite subjects including portraits, landscapes, and still life drawings with them.
You can see them in action by checking out this amazing blog, with tons of techniques and tips.
What Kind of Paper to Use
When choosing paper to use with alcohol-based markers, there are a couple of things to keep in mind. One is the paper’s weight. The best weight to use is anything above 90lb (243 gsm). This paper is thicker paper, which allows me to rub for blending or lifting without the paper tearing or getting grainy.
I also consider the paper’s texture, as a smoother surface lets the ink glide onto each page, without feathering or puddling. Smooth surfaces also seem to highlight the brilliance of a hue better than rougher ones.
Take a Closer Look
The best way to see how a marker will look on paper is to make a swatch with each color in the set. It does take some time, but it’s well worth it, I promise. I either draw a grid and start coloring in the boxes with each hue or I apply strokes in equal lengths to create square swatches. Once I have these paint swatches made, I’m able to see all the hues at a glance and know instantly which one to use. I keep my swatch chart above my drawing table.
It’s All In the Nib
The tip of the marker is referred to as the nib. As I mentioned earlier, EverBlends have two sized nibs. Here’s why:
- Fine Point Nib - This nib is the best all-around size. I create fine details and get into smaller areas, but I have discovered that it is best for small to medium marks, such as those I use for making initial drawings, shading, or taking notes.
- Chisel Tip - This nib has a slanted design, coming up to a point. It offers the ability to make both wide and thin lines. This end is ideal for doing calligraphy or when I need to cover a large space.
Blending with EverBlend
The fluid nature of these pens makes them well suited for blending. Just mix and blend the colors on the page as long as the ink stays wet, which means I have to work quickly if I want to get the effect right. I start with broad strokes in one shade and then gradually build it up by adding additional layers until I get the shade I want. It’s fun to play around with all the effects I can get this way, such as one- and two-tone gradients, new hues, and deep shadowing.
This blog shows you just how well they blend, I recommend giving it a read.
Recommendations
- I recommend starting with general areas of a drawing before moving to more detailed ones. This way those essential little elements that add realism to the work don’t get lost.
- It’s best to work from light to dark, applying lighter colors first and then layering as a way to darken them.
If you want to lighten an area you’ve already filled in or correct a mistake, I suggest using the blender or number 0 that comes in the EverBlend set. - Save darkest colors for adding contrast. Once I’ve completed my drawing, I take a step back and see where there are areas I can darken even more. This always brings a dramatic effect to my work as well as enhances the depth and dimension of the subject.
Now that I’ve given a little insight into the magical world of using alcohol markers, I hope you’ll give them a try. There’s no limit to the number of colors there are and the ways to use them. Don’t worry if you’re a first-timer; be bold, have fun—creating art is the most important thing! Tell me how you’re doing with your marker art in the comments below, I’d love to hear!


5 comments
If I have markers that seem to be out of ink, will replacing the nibs fix that?
Hi Joan,
Yes, the Everblend alcohol markers are permanent and nontoxic, suitable for both beginners and professional artists. :
-Arteza Team
Is the Ink permanent, once dry?
Hi there Janet!
To clean your clear blender nibs of previous work, simply take a separate sheet of paper, dab the clear blender and doodle around that sheet of paper until clear. Hope this helps!
Warm Colors,
Arteza TeamHow can I clean the blender tip as it retains the colour and then that rubs onto the next colour I wish to use it on. E.g I first used it on pink and now pink comes onto every colour☹️