Table of Contents:
- Create Watercolor Skin Tones for Realistic Portraits
- List of Supplies
- What You Need to Know
- How to Paint Skin Tutorial
- Congratulations
Create Watercolor Skin Tones for Realistic Portraits
One of the most important parts of painting the human face is to get the color of the skin correct. This can feel like a daunting task since skin tones run the gamut from creamy whites, rosy pinks, and warm yellows, to mellow mochas and the deepest chocolate browns.
We’ve created this article to share with you a few tried and true formulas that will help you begin to achieve realistic skin tones. We hope this will take the guesswork out of painting skin tones. Once you have these basics, you’ll be better prepared to experiment and get the exact shade every time!
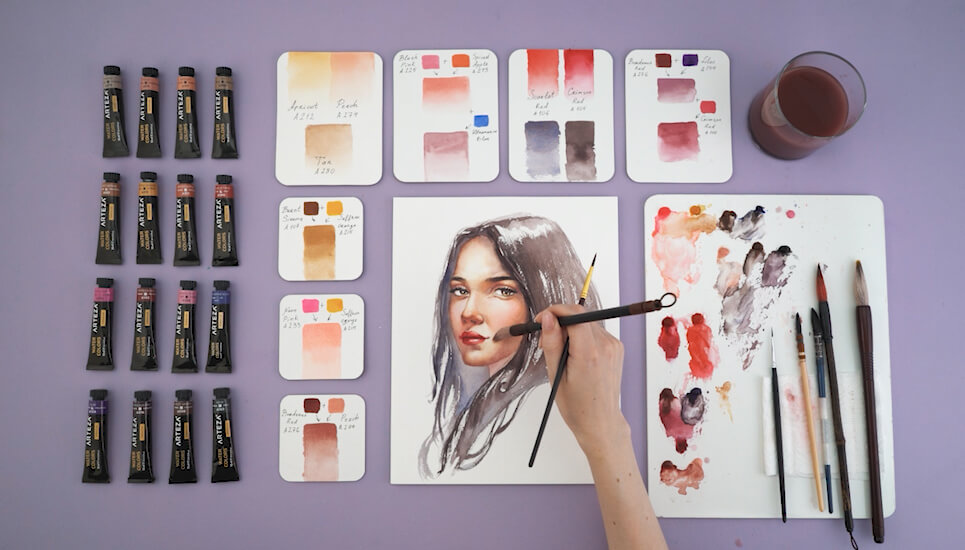
We’ll show color swatches of the colors the artist is using and how she mixed them together to create harmonious combinations. Then, we’ll apply those colors in a portrait. We recommend reading the steps and watching the entire video first, before giving it a try. Then, grab some supplies and follow along!
List of Supplies
- Arteza Watercolor Premium Artist Paint, 12ml Tubes - Set of 60-A212, A274, A280, A225, A213, A100, A107, A215, A233, A106, A105, A276, A134, A163
- Expert Watercolor Pad, 100% Cotton, 9"x12", 14 Sheets, or any watercolor paper.
- Black Roller Ball Pens, 0.5mm Needle Point - Pack of 20
What You Need to Know
The best paper to use for a watercolor portrait is heavyweight paper made with cotton. This paper has extra absorbency and a slight texture. It is especially well-suited for creating soft color transitions that will make the skin look smooth and natural.
Also, when mixing watercolors, note that the wet colors on your palette are brighter and more saturated than how the colors will appear once dry on the paper. Watercolors become slightly lighter after drying.
How to Paint Skin Tutorial
Step 1
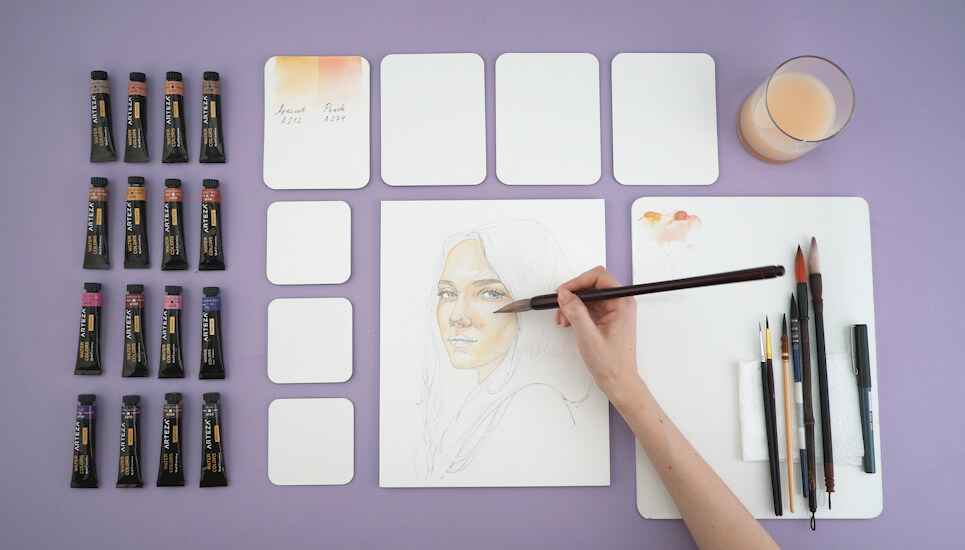
For the first skin tone, we’ll be using a base color of A212 Apricot. Mix it with a little water to make it more transparent.
Step 2
Paint the face, leaving out the areas where there will be highlights, such as on the nose, lips, and above the eyebrows.
Step 3
Next, use A274 Peach to add some shading. Paint the area around the eyes, nose, cheekbones, and forehead with A274. Keep layering this color to get the desired contrast. Notice how it helps to saturate the color of the skin.
Step 4
Continue using this color by adding it on the shadowed side of the face on the left side.
Step 5
Now, apply A280 Tan to add depth to specific parts of the face. This shade is reminiscent of a cappuccino and is perfect for giving dimension to our portrait. Paint the lower eyelids and the shadow under the eyebrows.
Step 6
Use this same color to fill in the underside of the nose and the area between the eyebrows. Use it to create a shadow along the side of the nose and under the lower lip. Also, add some shading on the chin and a shadow along with the hair on the face. We’re gradually building values in our composition.
TIP: A color’s tonality is a characteristic that refers to its saturation and lightness.
 Step 7
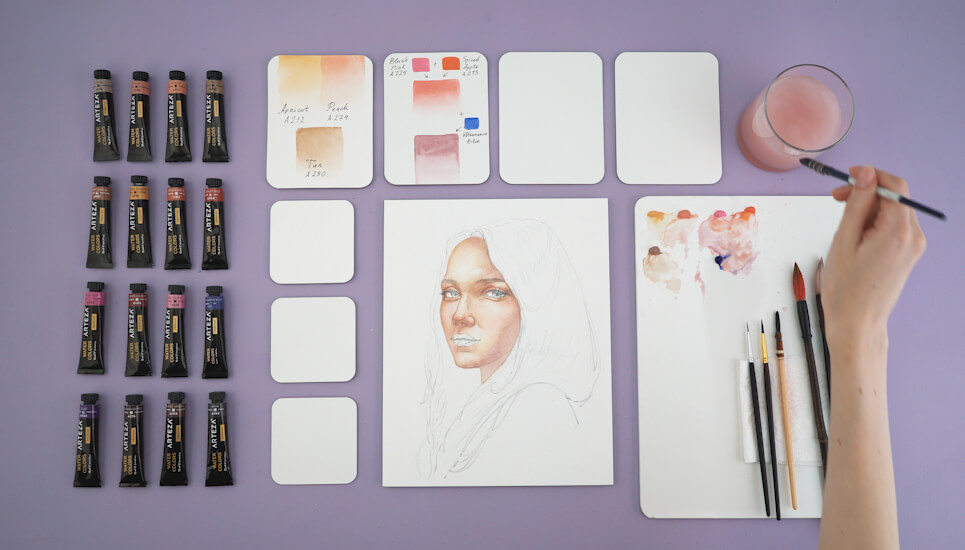
Add A225 Blush Pink and A213 Spiced Apple onto your swatch paper.
Step 8
Pull down a bit of each and mix them together to create a lovely warm skin tone.
Step 9
Now, it’s time to give our face some rosy color. Start by applying some water to the cheeks, beginning from the cheekbones to the tip of the nose. Next, add a glaze of this new color to this area and use the same shade for the nose’s tip and around the eyes.
TIP: Glazing is a technique of layering thin coats of paint of one color over another color. These transparent layers create new colors and shades. When layering colors, use the tip of your brush to soften any harsh lines before they dry. This will make the surface of the face look smoother and you’ll get beautiful transitions.
Step 10
Mix A225, A213, and A110 to form a new color and to get a gradient of these colors.
Step 11
With the resulting color, you can enhance the shadows created earlier. This will help emphasize the folds of the upper and lower eyelids, as well as the side of the nose.
HINT: A gradient is an area of color that smoothly transitions from one shade to another.
Step 12
Make a color swatch of the colors A107 Burnt Sienna and A215 Saffron Orange.
Step 13
Mix A107 and A215 together for a new gradient.
Step 14
With this new color, paint the area around the eyes and the brow ridges. This adds even more depth and helps to add more definition. Next, apply it to the end of the nose, on the cheekbones, chin, and the shadow under the lip.
TIP: We’re using the wet-on-wet technique to fill in the large areas. We do this by dampening the area with a little water before adding more color to it. This allows the color to spread. It’s best to soften any harsh shapes or lines that may be created before they dry. You can do this by using a separate brush.
Step 15
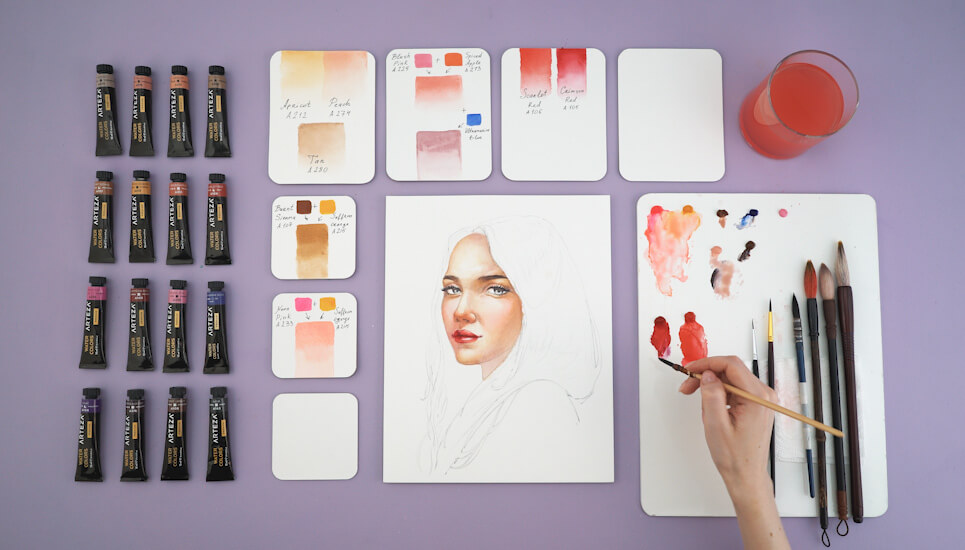
Place A233 Neon Pink and A215 Saffron Orange on your swatch paper.
Step 16
Mix A233 and A215 to create a gradient in this new color from its darkest to lightest shade.
Step 17
To achieve a blush on the cheeks and other parts of the face, wet a soft brush with clean water and apply the mixture of A233 and A215 to this area. Use a smaller brush to gently soften the edges of each spot of this color. Next, cover the lip area with a lighter tone, leaving unpainted areas for highlights.
Step 18
Mix a small amount of A110 to A107 and apply it to the eyebrows and eyelashes. Then use it to paint the nostrils and deepen the corners of the lips.
Step 19
Next, we’re going to paint with A106 Scarlet Red and A105 Crimson Red.
Step 20
Paint the lip area with a light shade of A106, leaving an area unpainted for the highlight. Paint the shadows and corners of the lips with A105.
Step 21
Define the shadows of the nose with A105, A110, and A225.
Step 22
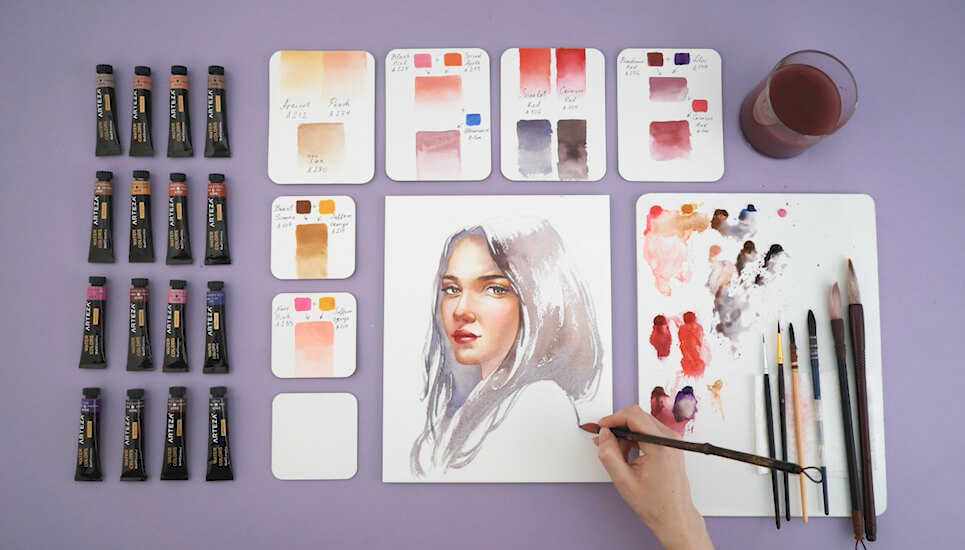
Swatch colors A276 Bordeaux Red and A134 Lilac.
Step 23
Create a gradient with these two shades, going from dark to light.
Step 24
Next, apply water to the shaded area from the chin to the cheekbone. With the resulting color, go over the shadows from the chin to the cheekbone. Add a shadow under the nose and lips and darken the folds of the upper eyelids.
Step 25
Make a swatch with A105 Crimson Red. Then, mix it with A276 and A134. Make a swatch of this color to help you see what it looks like. Use it to paint over the shadows on the lips.
Step 26
Mix together A110 and A107 and practice painting a gradient of that color. Notice the change in saturation as you paint get lighter and lighter down the swatch.
Step 27
It’s time to start painting the hair. Use a mixture of A163 Noir, A110 Ultramarine Blue, and A107 Burnt Sienna. First, use light glazing then gradually darken the strands until you reach the foreground. The foreground refers to the areas that are located closest to us.
Step 28
Mix together A163, A110, and A134. Make a swatch. This will be the middle tones of the hair.
Step 29
Paint the middle tones in the hair, gradually thickening the shadows of individual curls as they come to the front of the picture. Use light strokes to create texture.
TIP: To properly convey the texture of the hair, add a little Ultramarine to the shadowed parts. Keep adding heavy and light strokes to increase the contrast on the curls in the foreground. It helps to go from a small brush to a larger one for this.
 Step 30
Now it’s time to add the tiny details. Using a very thin or liner brush, draw the eyelashes, and paint around the darkest parts of the eyes to gain more saturated color in the shadows.
Step 31
Make a color swatch with A276 Bordeaux Red and A274 Peach. Mix these colors together.
Step 32
As with the others, use the resulting color to form a gradient, paying special attention to the change in saturation.
Step 33
Now, paint over the shadowed areas on the face with that color to enhance the face’s volume. By using a thin brush, you can inject touches of color and add crisp contours. Use a large soft brush for feathering.
Step 34
To create strands of hair, use both a thin brush and a medium brush. Do this by mixing A163, A110, and A107.
TIP: Contrast is one of the best ways to highlight the most important part of your composition.
Step 35
The final touch is to add some thin strands and curls. Paint over specific sections of the hair to darken them. Use a smaller brush to make some additional strands in the foreground. Lastly, darken the eyelashes and the pupils then soften them for a subtle transition.
Congratulations
Congratulations! You’ve learned some valuable color combinations for creating skin tones and used them for a stunning portrait! Remember, it takes time and lots of practice to master the art of portraiture, and skin tones are just the beginning. Have patience and keep trying. We hope these tips will help you and that this tutorial has inspired you!
Let us know what you think by leaving a comment in the section below. Until next time, happy painting!


1 comment
You have changed some of the numbers of the colours. Do you have a chart which shows the old numbers to the new colour numbers .