Table of Contents:
Drawing Hair Made Easy
A person’s hair is their most unique feature. That’s why you need to get it right when you’re drawing a portrait of an actual person or a character in your graphic novel. I’ve created this tutorial to give you the basics of drawing hair using a few popular hairstyles as examples.
To enhance the drawings, I used Arteza Colored Pencils for each style. With these pencils, I was able to capture the hair’s density, while also creating layers of color for a more realistic look and feel. I’ve added the color numbers of the pencils I used, but you can choose your own colors from the wide range of shades Arteza offers in their sets of 48, 72 and 120 colored pencils.
List of Supplies
- Arteza Colored Pencils - Set of 120 : A012, A048, A004, A064, A036, A027, A118, A064
- HB Pencil
- Spiral-Bound Hardcover Sketchbooks
How to Draw Short Hair?
Step 1

First, I draw the head. The head should be an oval shape, not a circle. Place the tops of the ears at the head’s center. Add the neck.
Step 2
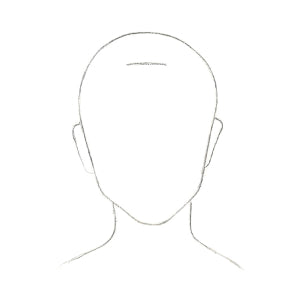
Next, mark the hairline. Notice how I place this mark a short distance from the top of the head. This is because we only see a small amount of hair when looking straight at a person. Also, the facial height is determined by the distance between this mark and the bottom of the chin, and you will need to leave room for the facial features.
Step 3

I always start with where the part in the hair will be and then draw the side and front sections. I don’t add any details, as this should only be an outline to show the hair’s width and length.
Step 4

Now I begin to draw in some strands of hair by using continuous lines beginning at the top where the roots are and going down to the tips, always following the outline’s shape. At the face, I use extra lines to show the hair’s volume as it sweeps away from the part.
Step 5

Then I erase any initial lines used to construct the head. Now the hair is ready for some shading. You can use your own erase, or our Eraser Pencil Kit.
Step 6

To give the hair depth, I darken the areas around the roots and the face where there would be little or no light shining on it. I do this by using hatching, a technique that involves using horizontal, vertical, or diagonal lines placed close together or intersecting. By varying the lines’ spacing and thickness, I can control how light or dark an area will be. Notice how I make the hatching in the direction of the hairline. You can either use a regular graphite-lead pencil or colored pencil in Noir A012 for this.
Step 7

Next, I add the hair’s color. I do this by hatching the entire hair area with Sienna Brown A048, pressing very gently on the pencil to make the shade light.
Step 8

To add stronger shadowing and more volume to the hair, I place another layer of that color. This time I apply more pressure to the pencil to make the color darker, especially in the lower area of hair, where the shadows are the darkest. It’s important not to go overboard with this second layer. You want to leave some areas lighter to indicate the hair’s natural highlights where the light hits it. As with the previous steps, your hatching in this layer should also follow the established direction of the hair.
Step 9

As the final step, I use the Noir A012 pencil once again to create more contrast. I add a layer of this color to darken everything located in the shadow area. Afterward, I put in some single hairs for a realistic detail.
How to Draw Hair with Bangs
Step 1
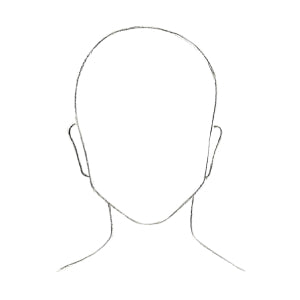
First, I draw the head. The head should be an oval shape, not a circle. Place the tops of the ears at the head’s midsection. Add the neck.
Step 2

Next, I mark where the edge of the bangs will be. Since bangs usually end just above the eyes, this mark should be placed slightly above the top of the ears.
Step 3

Again, I start with where the part in the hair will be and add a curved line across the head to indicate where the bangs begin. Next, I draw an outline of all of the hair sections to designate the hair’s volume and length.
Step 4

Bangs are rarely completely straight, so I make their edge uneven. Although I draw all the separate strands of hair in the same direction, I add in some stray hairs going in a different direction to make them look more realistic.
Step 5

It’s time to erase the construction lines.
Step 6

I start adding color by lightly hatching in the entire hair area with Lemon A004 pencil.
Step 7

To add in the shadows, I use Yellow Ochre A064 over the previous color in the areas that would receive the least amount of light and, therefore, be darker. Remember, hatches should always be in the direction of the established outline of each section.
I wanted this girl to have shiny hair, so to get a glossy effect I leave some areas of Lemon color showing.
TIP: Using a well-sharpened pencil will help you make the most well-defined lines.
Step 8

To add more contrast to the hair, I use a layer of Cocoa A036 to darken the shadows. To represent individual hairs, I use very thin lines in this color as well.
How to Draw Curly Hair?
Step 1

First, I draw the head. The head should be an oval shape, not a circle. Since the hair will be covering the ears, there’s no need to add them. Add the neck.
Step 2

The hair in this drawing is represented by two large shapes surrounding the face. Since there’s no visible part, I just draw in these shapes, keeping in mind where the hair would part if I could see it. Also, curly hair has lots of volume, so I make the outline higher and wider than I did in the last two examples.
Step 3

Next, I draw in the side bangs’ strands by making long and pointed sections. I place these sections in the direction they would naturally be growing in.
Step 4

Now, I do the same for the entire hairstyle. These sections will be where we place our waves and curls. These long strand sections should be drawn downward from the roots to the tips.
Step 5

It’s time to add the curls. I do this by drawing a wavy line inside of each strand section I previously drew. These curving lines will set the curls’ direction, so make them unique from one another and vary their spacing and direction.
Step 6

Do the same to every single section.
Step 7

To add thickness to the curls, I place a second wavy line next to the ones I previously drew. I vary the width of these to make them look more natural.
Step 8

Before I can start adding shadows and colors, I erase all the construction lines.
Step 9

Once again, I begin by hatching the entire hair area by using light pressure and the Cinnamon A027 pencil.
Step 10

I continue to use the A027 pencil to gradually add shadows under the curls and near the face and roots by coloring over the previous layer. This is a good time to add some small separate curls.
TIP: As you darken the areas in the hair where there would be the least amount of light shining on it, keep in mind the parts of the curls that would be receiving a lot of light. Don’t color over these areas, but leave the lighter shade showing through for realistic highlights.
Step 11

Having a lot of contrast in your drawing is what makes the hair appear real. I do this by using the Chocolate Brown A118 pencil. I also reinforce the curves of some of the more unruly curls with it. By continuing to use hatching and following the established direction of the curls, I can make the hair appear thicker.
Step 12

In this example, I use some additional colors to add some playfulness to the hairstyle by using the Yellow Ochre A064 pencil.
Step 13

The final step is to use fine lines to create more details and add the feeling of fluffiness to the hair.
Recommendations
- Complete the first steps using an HB Pencil. This pencil has hard lead and will make the lightest lines, allowing you to erase the auxiliary lines without damaging the paper.
- To create the hair’s volume, use a few shades in the same color. Use the darker shades around the hair’s roots and around the face.
- Do all pencil hatches according to the way the hair grows and along the hairline. Start from light colors, then gradually move to darker shades. At the final stage, add some individual hairs to make it look more realistic.
- Although colored pencils work well for color mixing and adding subtle gradients of color through layering, it is only possible to apply two or three layers.
- To get the most vibrant colors, use light layers of colors when mixing.
These three hairstyles are just the beginning. With these basic steps, you can go on to add any hairstyle you want for the most authentic-looking portraits, characters, or people in your drawings and paintings. Don’t stop here; pay careful attention to the people around you as well as on television and in magazines for more great hair drawing ideas!


3 comments
Thank you this helps a lot.
Hey Jordynn,
We’re so glad you enjoyed this blog! :)
these are good hairstyles