
Table of Contents:
- Add These Human Poses to Your Drawings
- Steps for Drawing Human Poses
- Person Stretching
- Fighter’s Stance
- Leaning Against a Wall
Add These Human Poses to Your Drawings
The human form has been the subject of countless artworks throughout the ages. Getting it anatomically and proportionately correct can be a challenge, but with practice and a keen eye, it can be achieved. In this article, I’ll share with you how I create a body drawing that’s easy and straightforward. Before you know it, you’ll be adding these dynamic poses to the people in your paintings or characters in your graphic novels.
To create these three drawings, I used the Arteza Professional Pencil Drawing Set. It has pencils that range in lead hardness from 6B-4H. This gives me both hard and soft leads to make light and dark lines and everything in between. It is the ability to slightly change values that will give your drawing the most realism and this set of pencils helps me achieve that—which is why I love them so much!
Fun & Easy Poses to Draw
Person Stretching
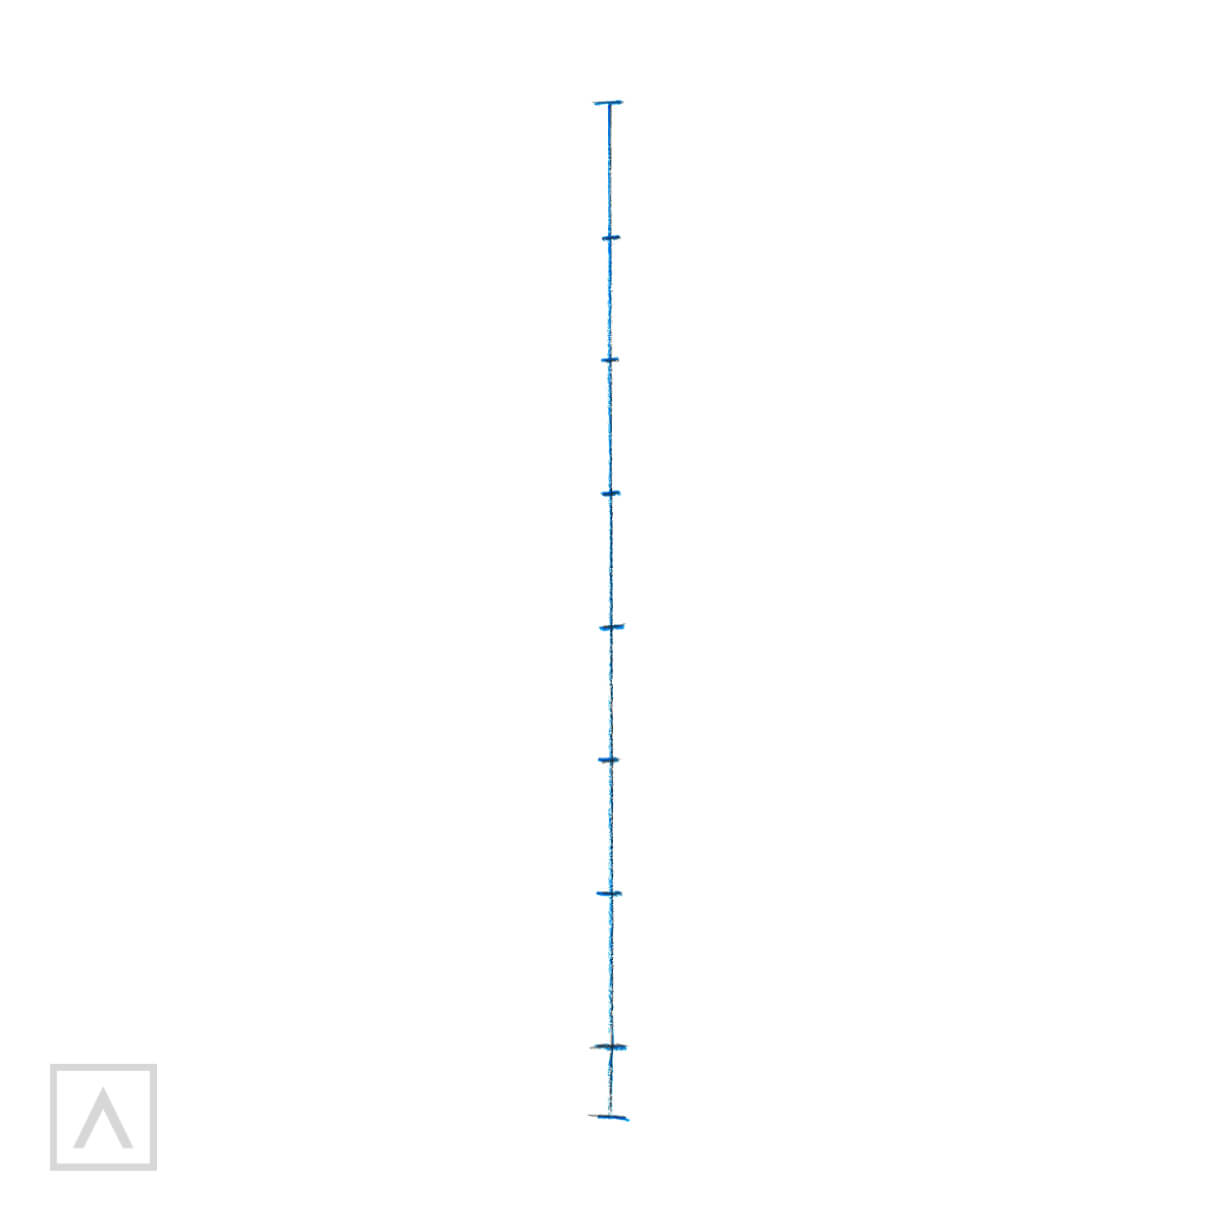
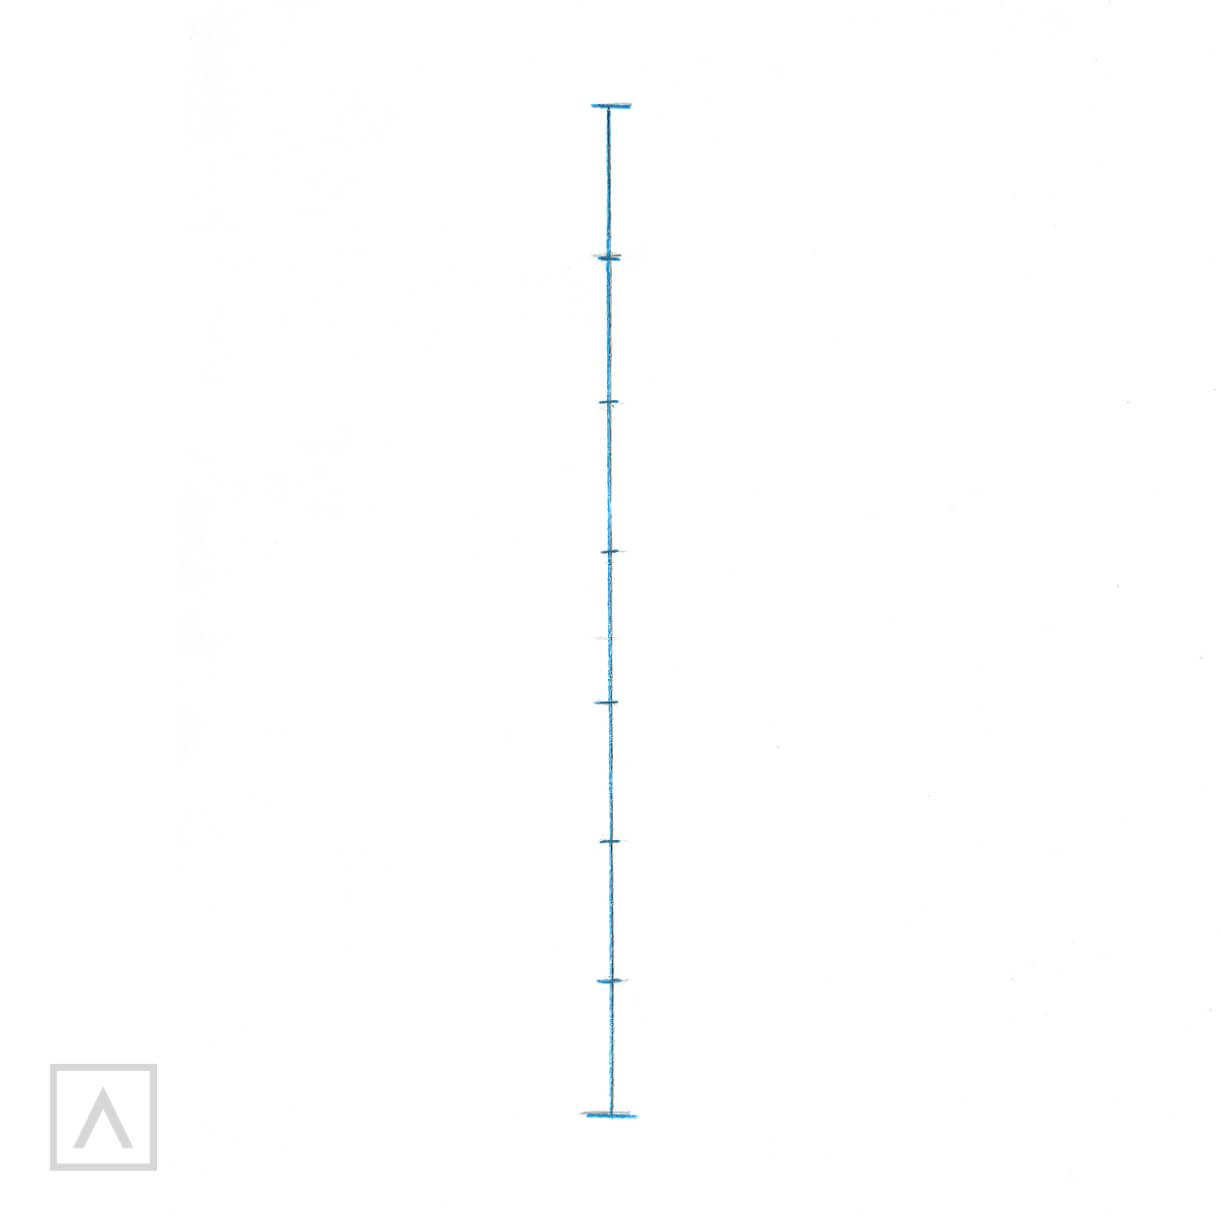
Step 1
I draw a vertical line and divide it into 7 ½ equal sections. Each segment is equal to one head length. An average man is generally eight heads tall, where a woman is drawn at 7 ½ heads tall.
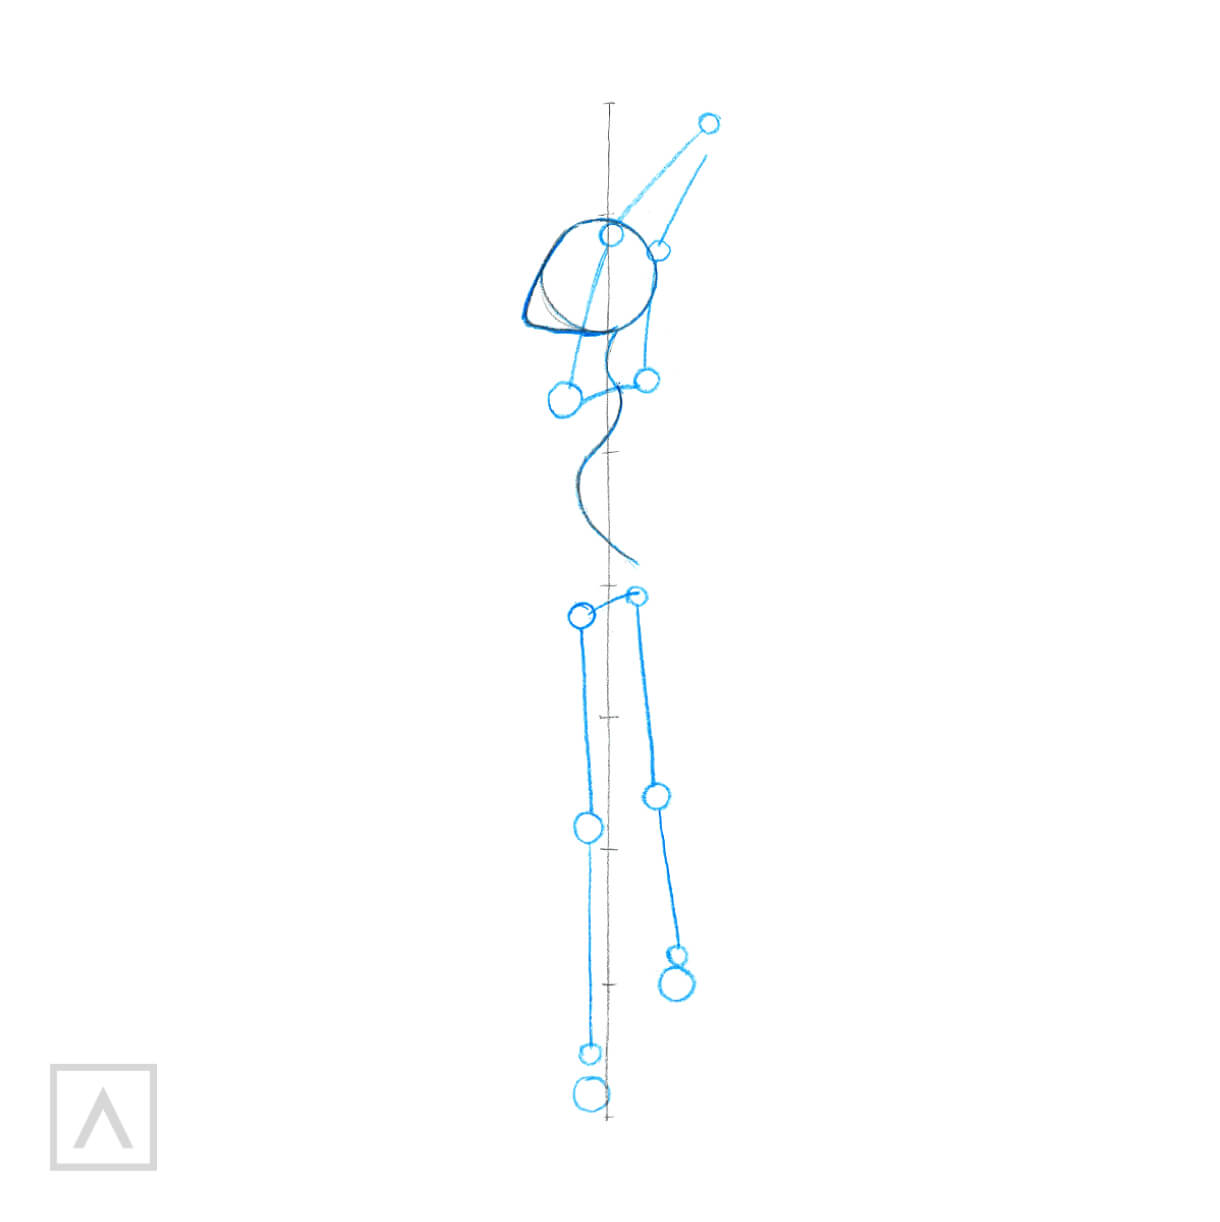
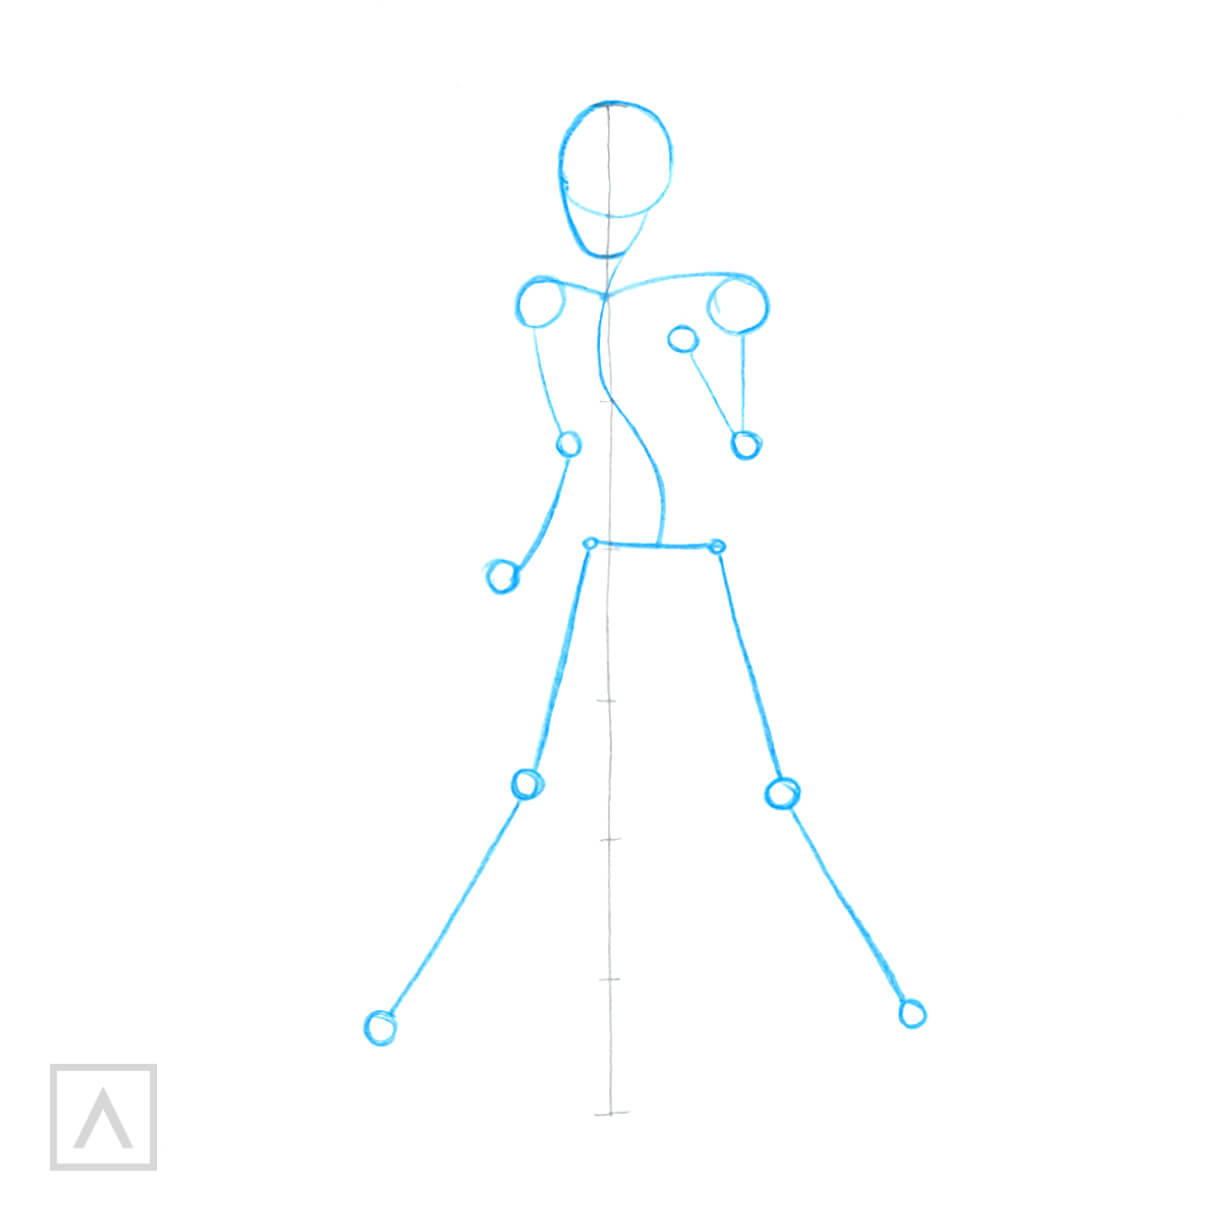
Step 2
It’s time to sketch a simplified skeleton. I outline the head by drawing a circle that is slightly elongated at the chin area. I indicate the width of the shoulders and pelvis with a horizontal line. I represent the joints with a circle. The knees are located exactly in the middle of the legs—elbows in the middle of the arms. As the human spinal column is S-shaped, and the person I am drawing is stretching with arms overhead, I exaggerate the bend in the spine.

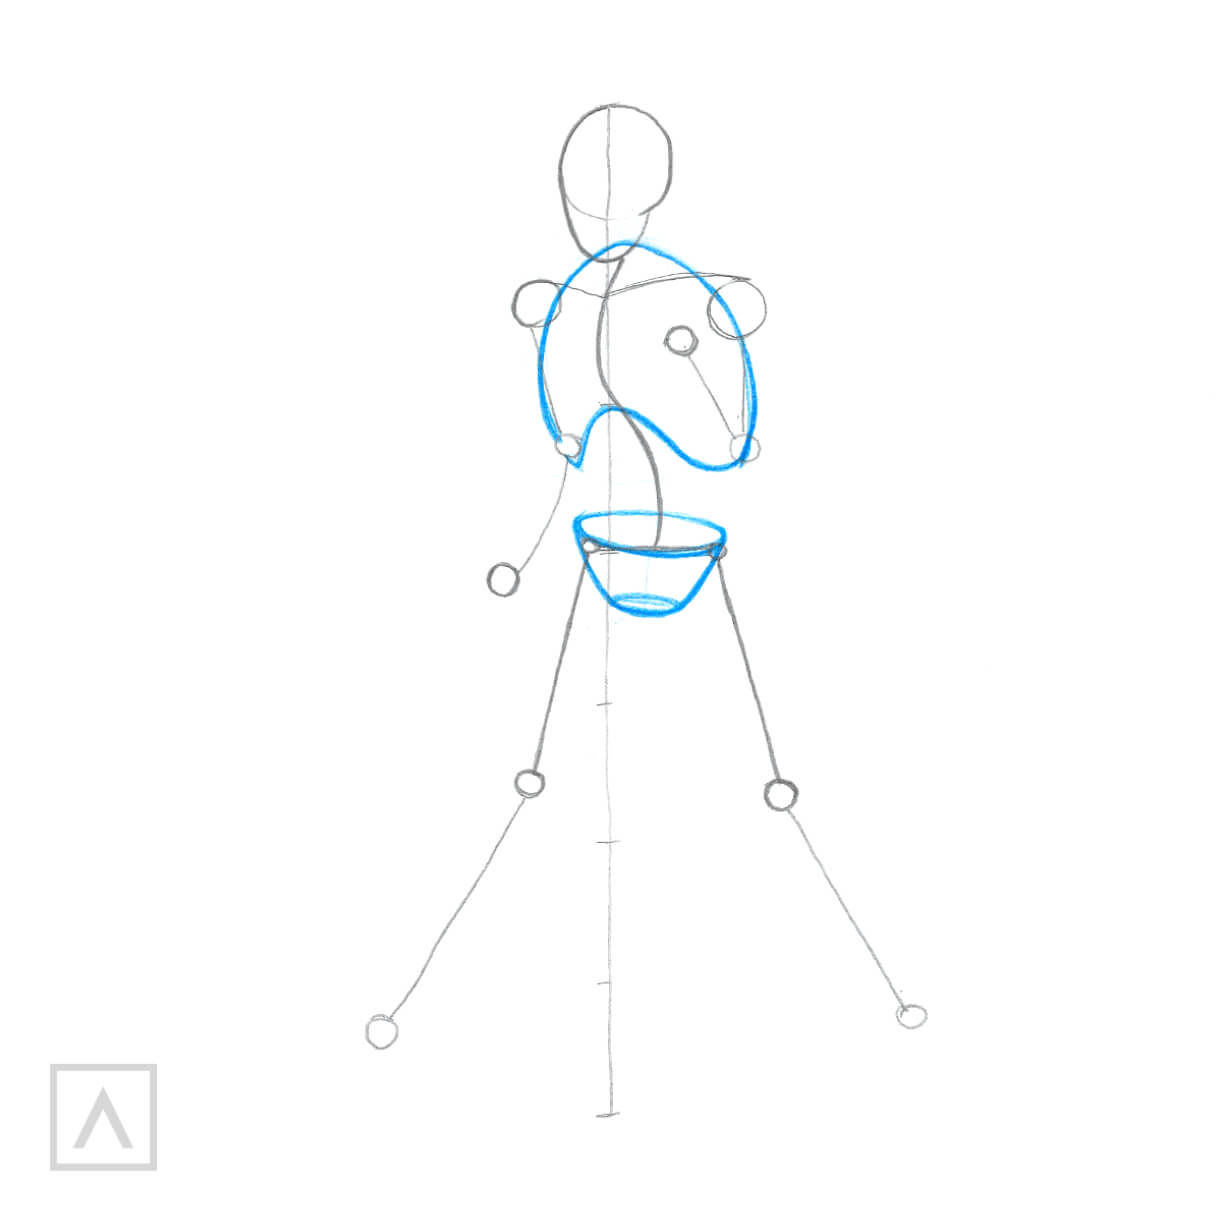
Step 3
I use ovals to indicate the chest and pelvis. I tilt them to try to convey the direction of these body parts. I make the ovals egg-shaped and don’t overlap them.
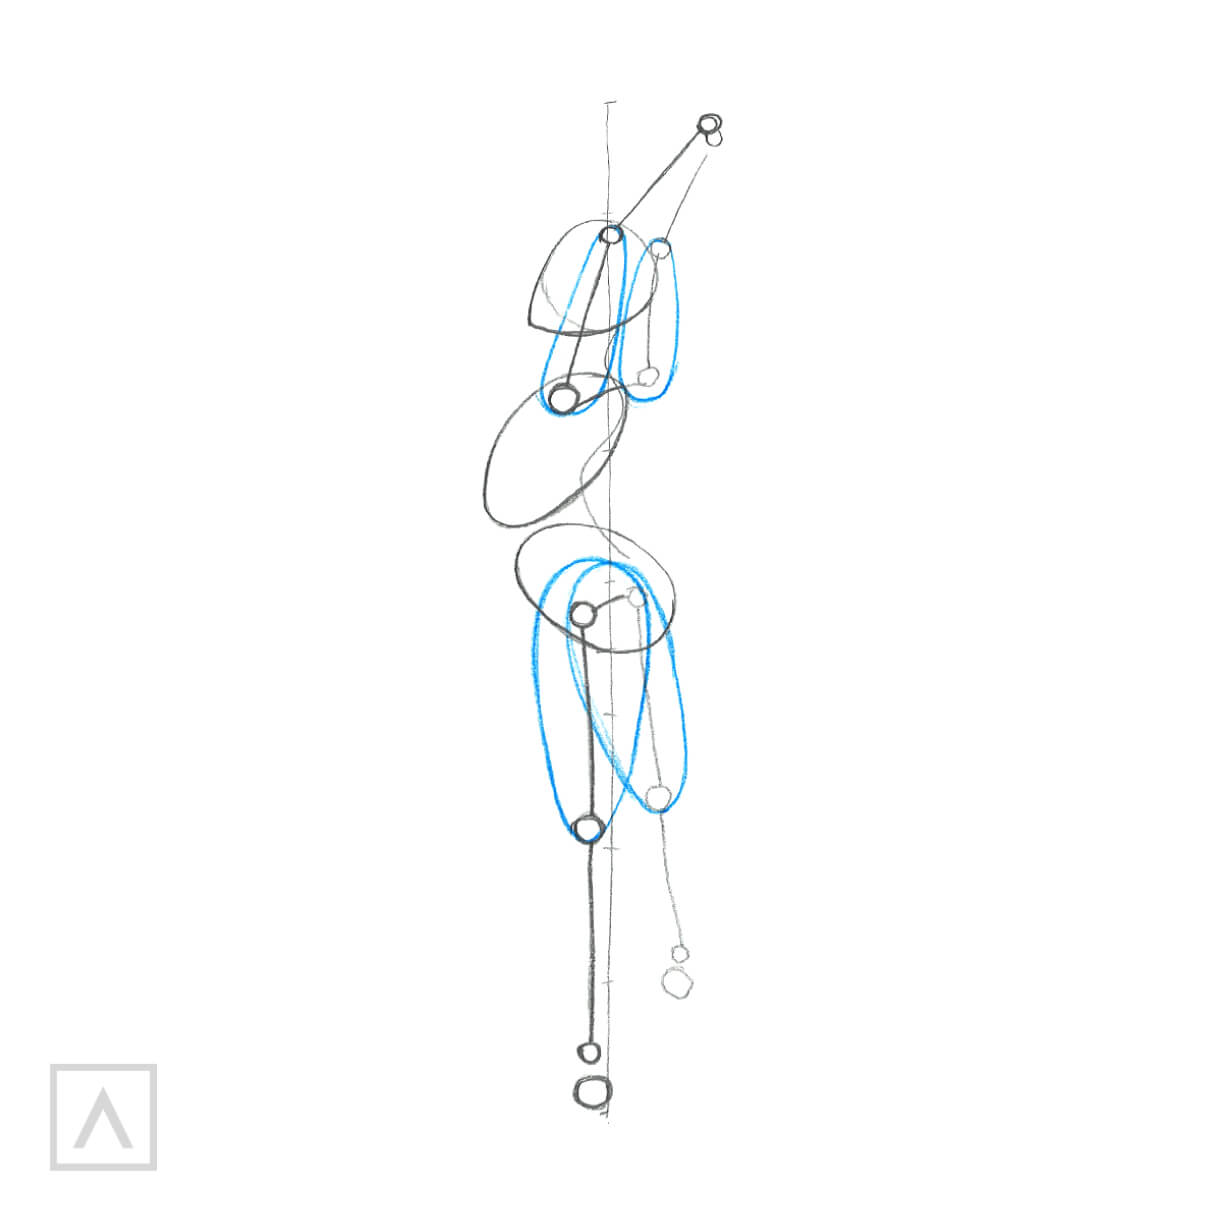
Step 4
Next, I add the shoulders and hips using elongated ovals. Using the circles indicating the joints as a guide, I connect the shoulder with the elbow and the upper thigh with the knee, keeping the line representing the bone approximately in the oval’s center.

Step 5
I do the same thing with the forearm and calves using long ovals. When I draw the calves, I don’t connect them to the lower joints.
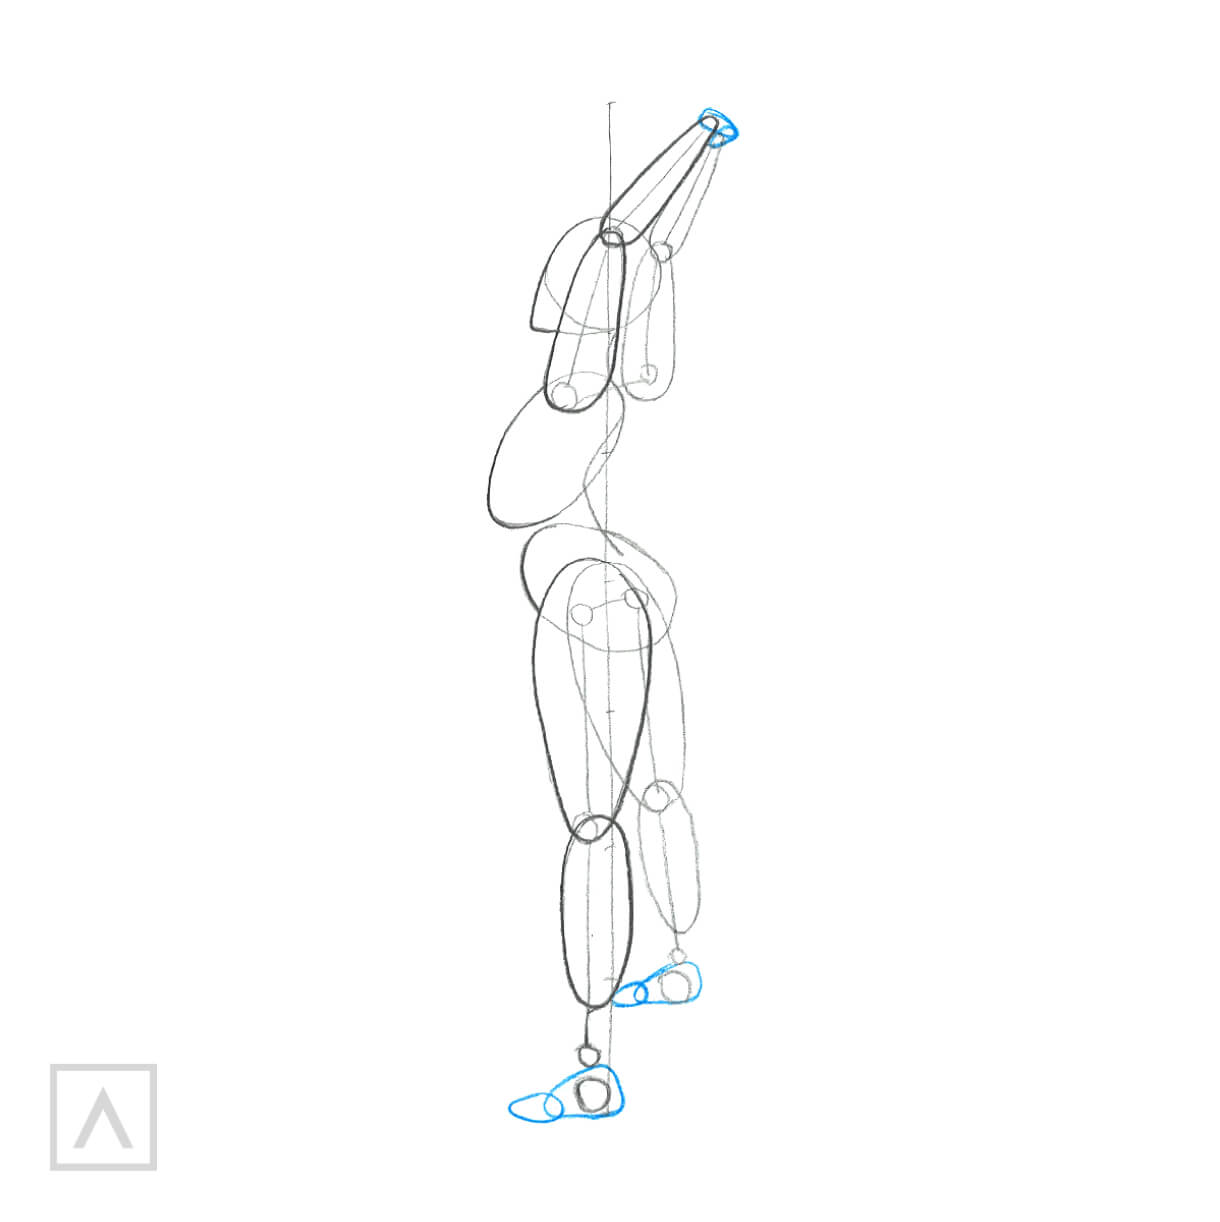
Step 6
Let's work on the feet. You’ll notice that each foot consists of two simple forms. The foot farthest away should be smaller according to the rule of perspective. Also, because the person is standing with hands hidden, I simply outline where they meet.
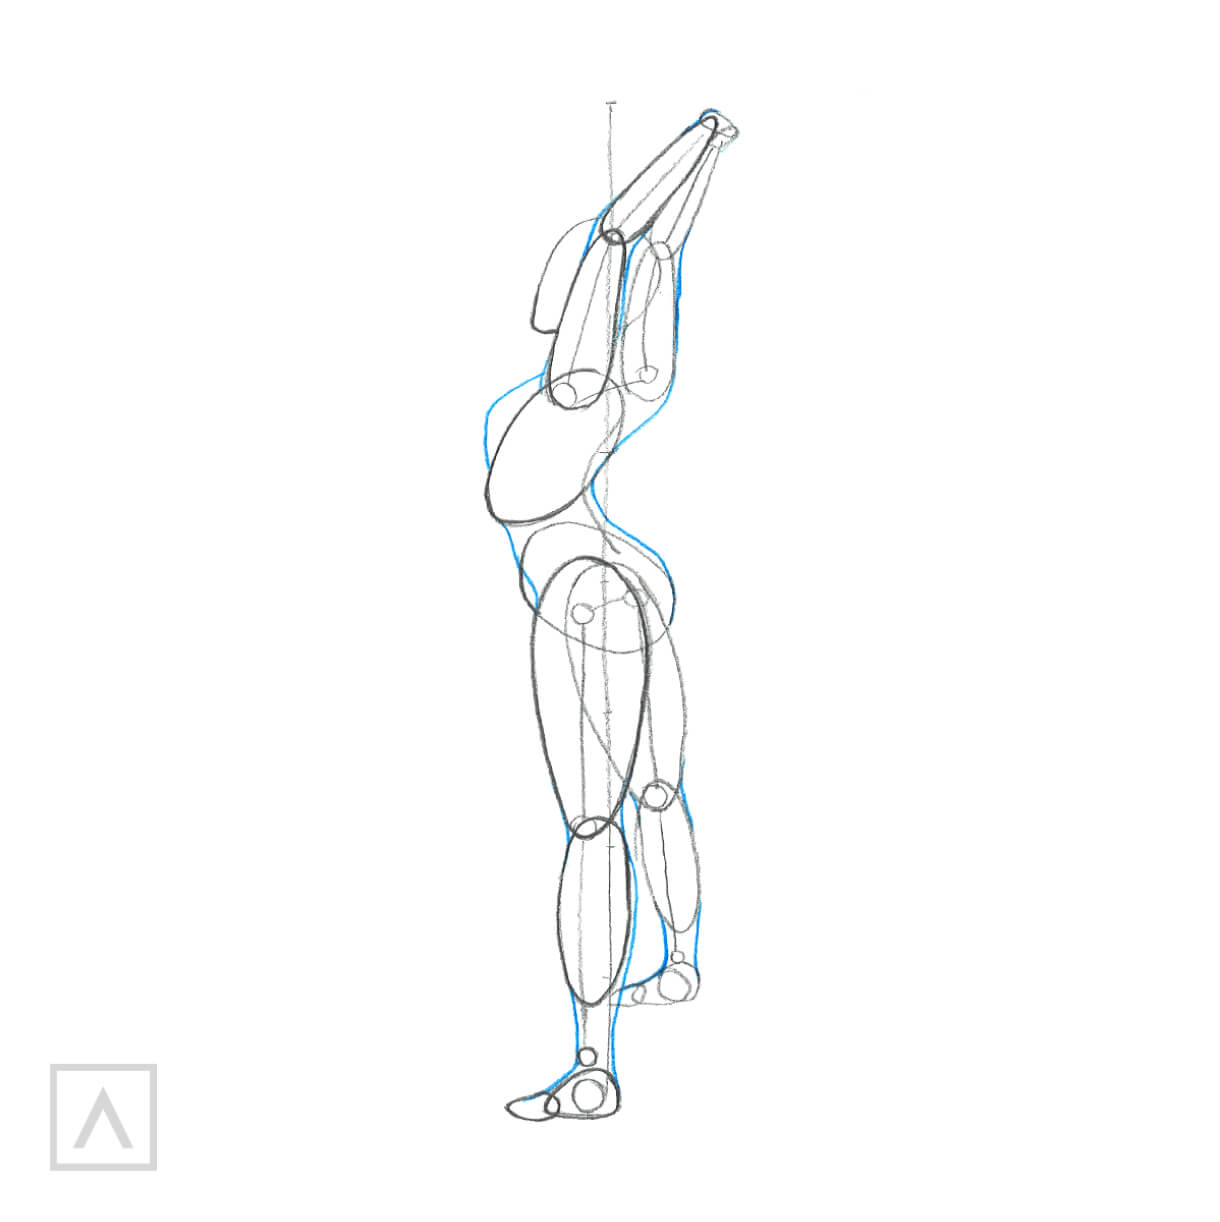
Step 7
In this step, I combine all the shapes. I make my lines smooth and avoid sharp corners. After all, there are no sharp edges on our bodies, right? Next, I erase all the construction lines to get the drawing ready to be colored in.

Step 8
I start hatching according to the body shape to show its volume. As I make these strokes, I imagine how the skin contours around the body and make my marks in that direction. I make some overlapping strokes very close together to show the shadows and creases, while using fewer strokes for a lighter value on the front where the light is shining on this person.
Hint: Hatching is placing similar small pencil strokes very close together.
Fighter’s Stance
Step 1
As I said in the last drawing, an average man is generally eight heads tall; but in this picture, his legs are spread apart so I divided his height line into only 7 parts.
Step 2
First, I draw his head with a circle that I narrow on the bottom for the jaw. Then I give him a slightly distorted spine to show that he is leaning in. To show where his shoulders and hips will be, I draw two horizontal lines. The classic male shoulders are wider than the hips. His are bent in this pose, so I use small circles to indicate the bend at the elbow, which is in the middle of each arm between the shoulder and forearm. The outstretched arm reaches the middle of the thigh. The knees are in each leg’s center between the thigh and calves. Once again, all joints are marked by circles.
Step 3
I want to give him a full chest. To do this, I create a form that mimics the shape of the rib cage, with a recognizable arc in the lower edge’s center. I draw the pelvis as a cylindrical shape, which begins to give volume to the body. The bottom of this cylinder should be narrower than the top.
Step 4
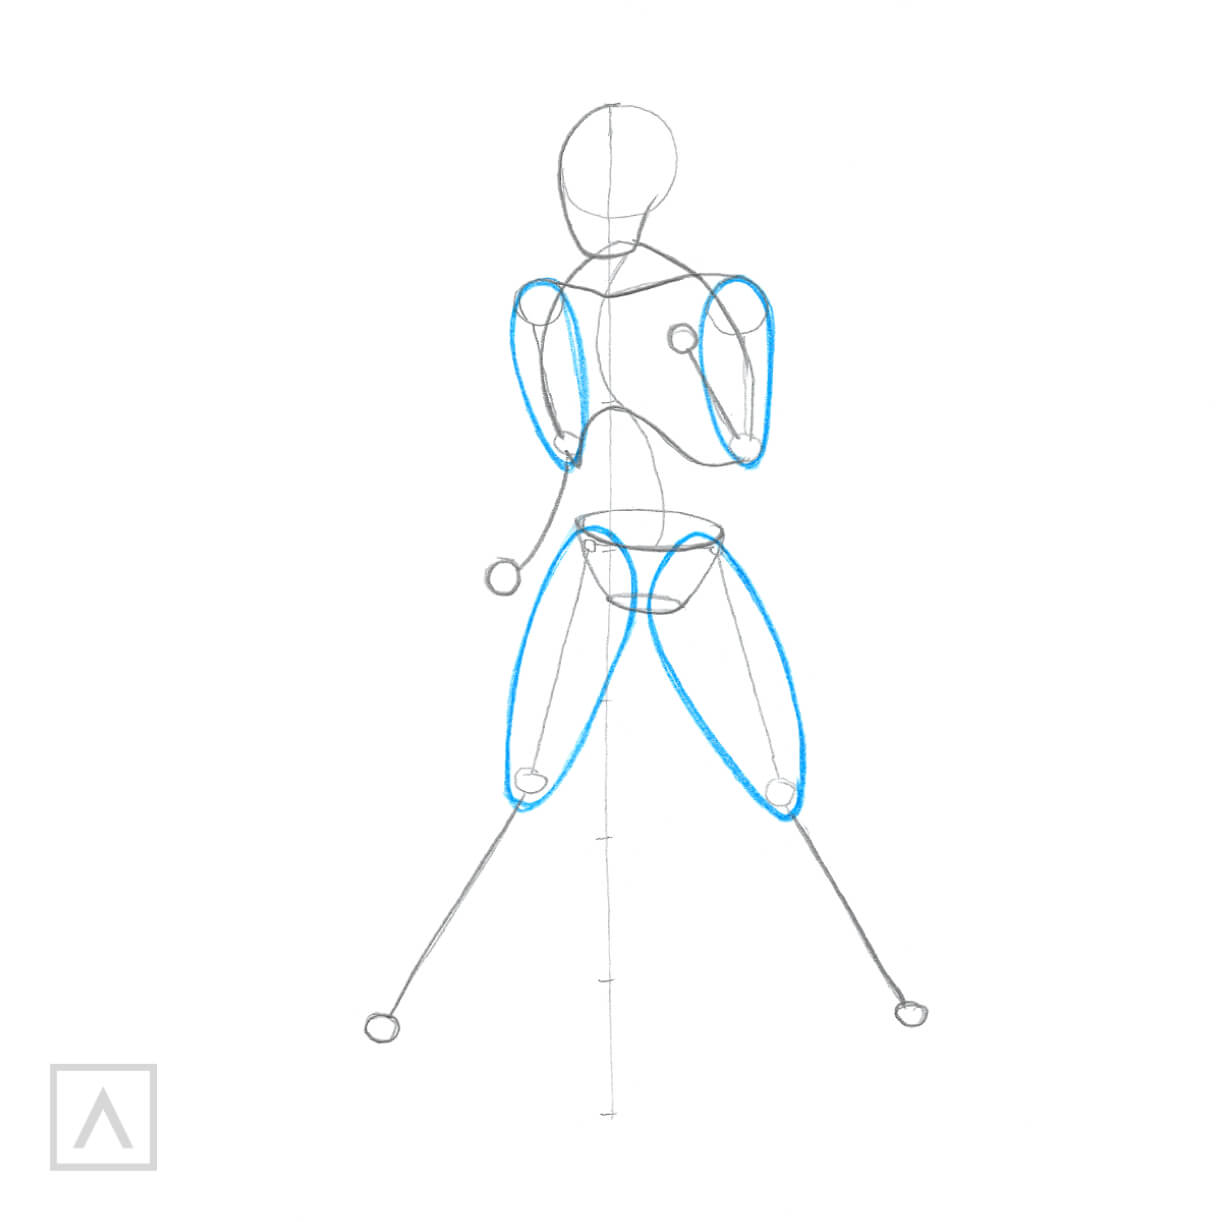
It’s time to give this guy some muscles, so I use the elongated ovals starting at the joints and cover the vertical lines that show the bones, ending where they connect to the body at the shoulders and hips.

Step 5
I do the same for the forearms and calves, leaving space at the ankle and foot joints.
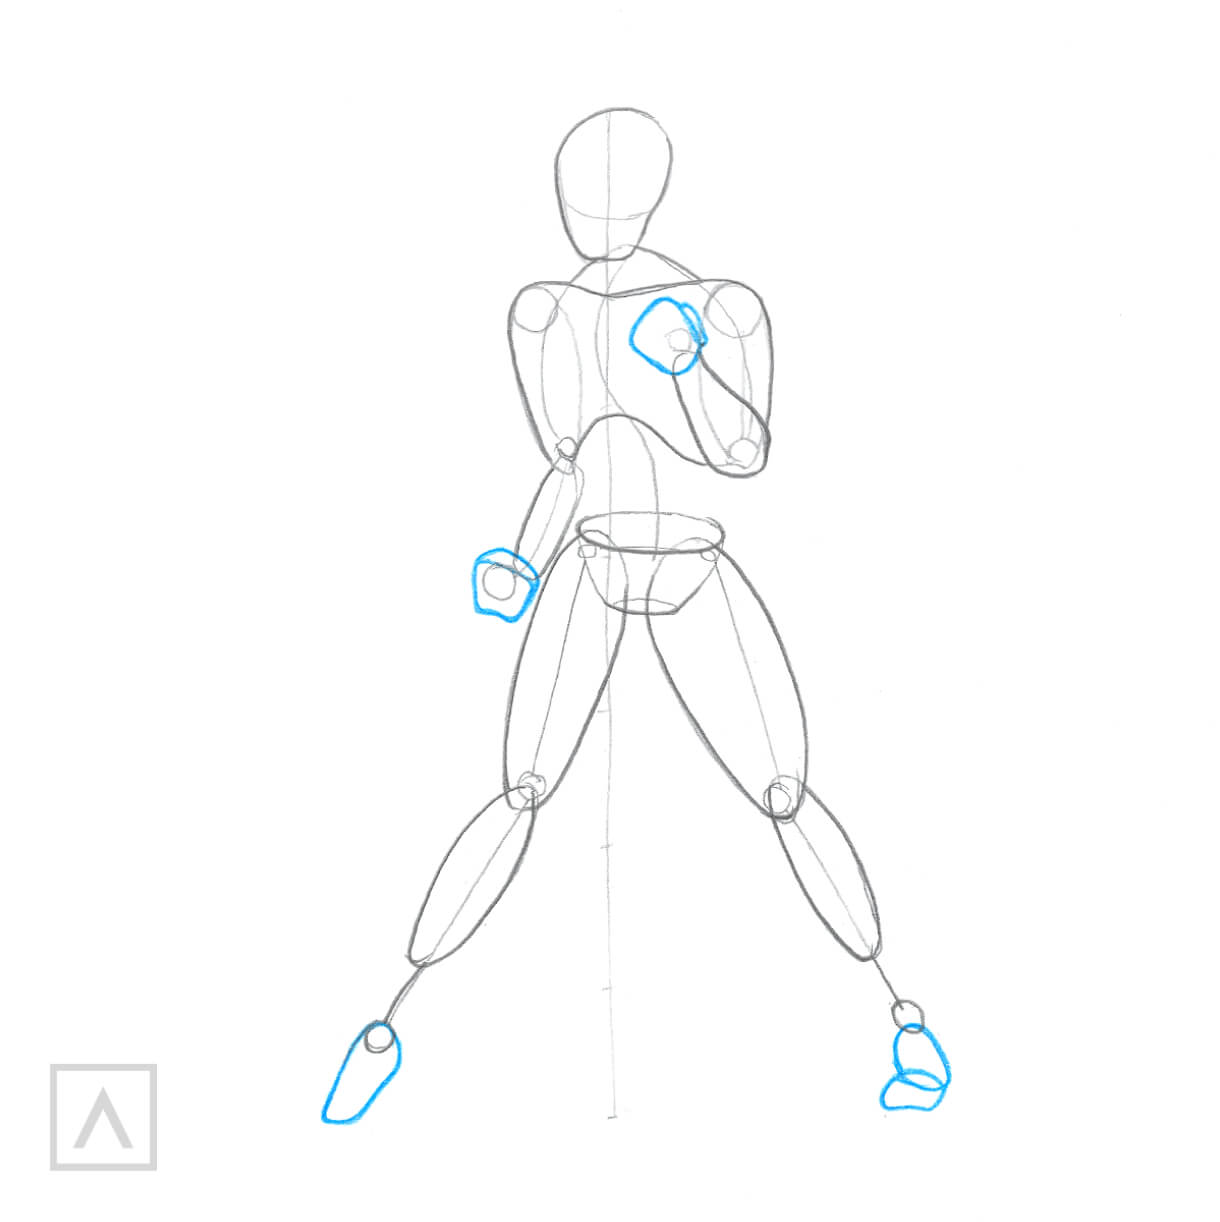
Step 6
This guy’s hands are clenched into fists. By looking at my own fist, I can get the right shape and add it to the end of each arm. To make the feet, I use simple geometric forms.
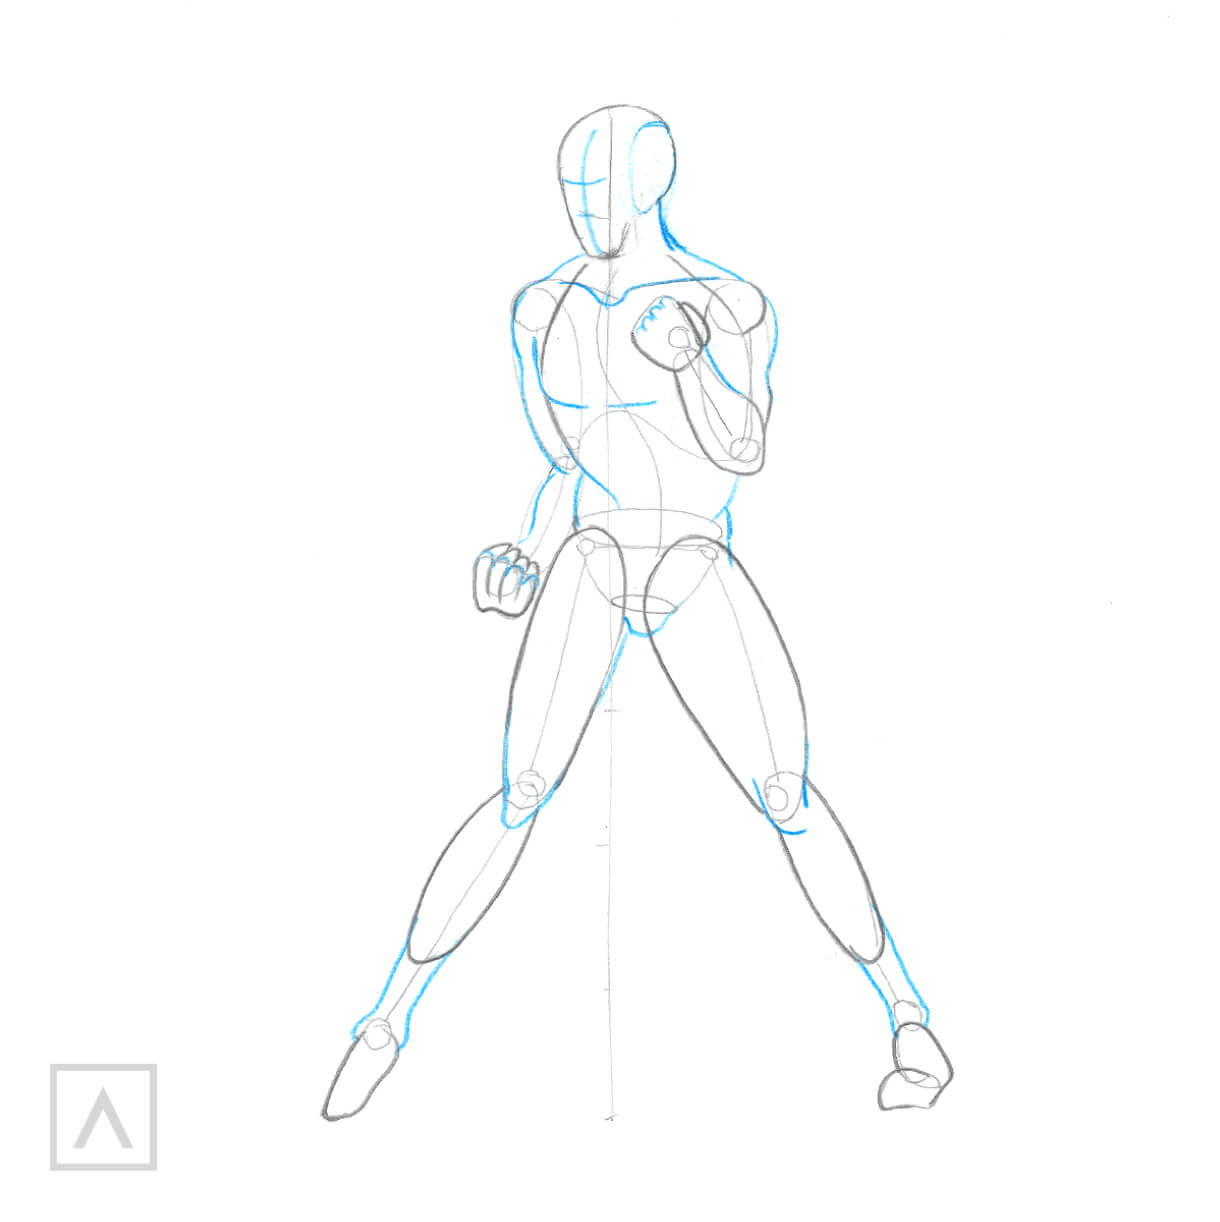
Step 7
I combine all the shapes. I make my lines smooth and avoid sharp corners. Now, he's ready for me to erase all the preliminary lines and start filling him in.
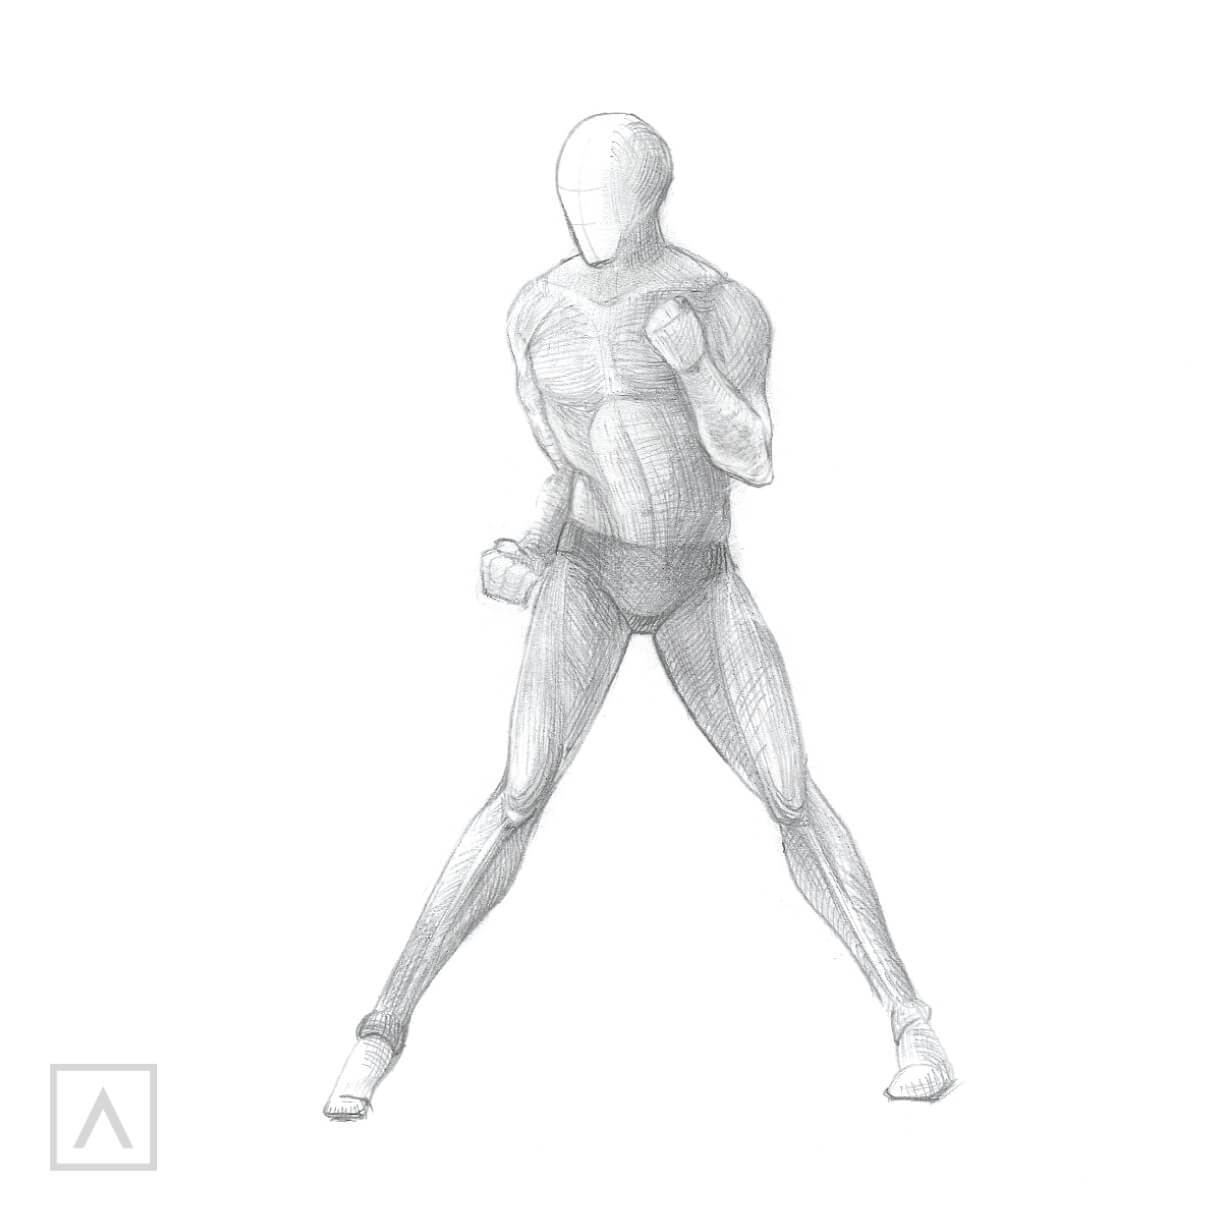
Step 8
I start hatching according to his body’s frame building layers of light, medium, and dark values to give him volume and depth.
Leaning Against a Wall
Step 1
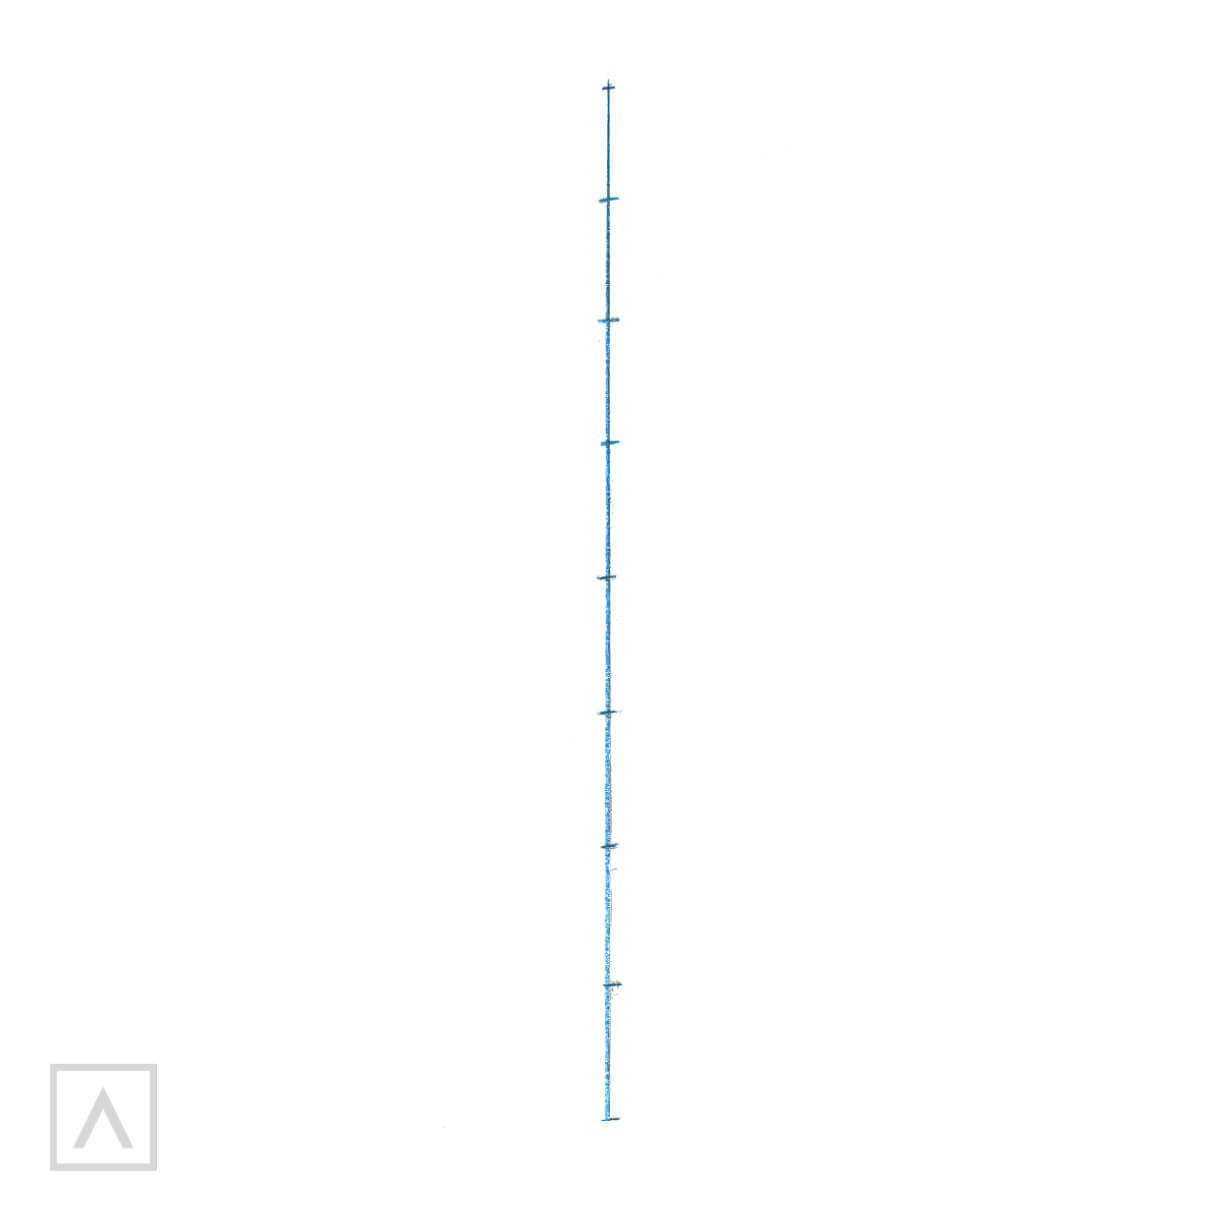
I want this person to be a woman, so I would normally adhere to the rule that women are usually 7 ½ head heights tall. But, since the model for this drawing was standing on her toes, making her appear taller, I divided the axis line into 8 equal parts using tiny marks.

Step 2
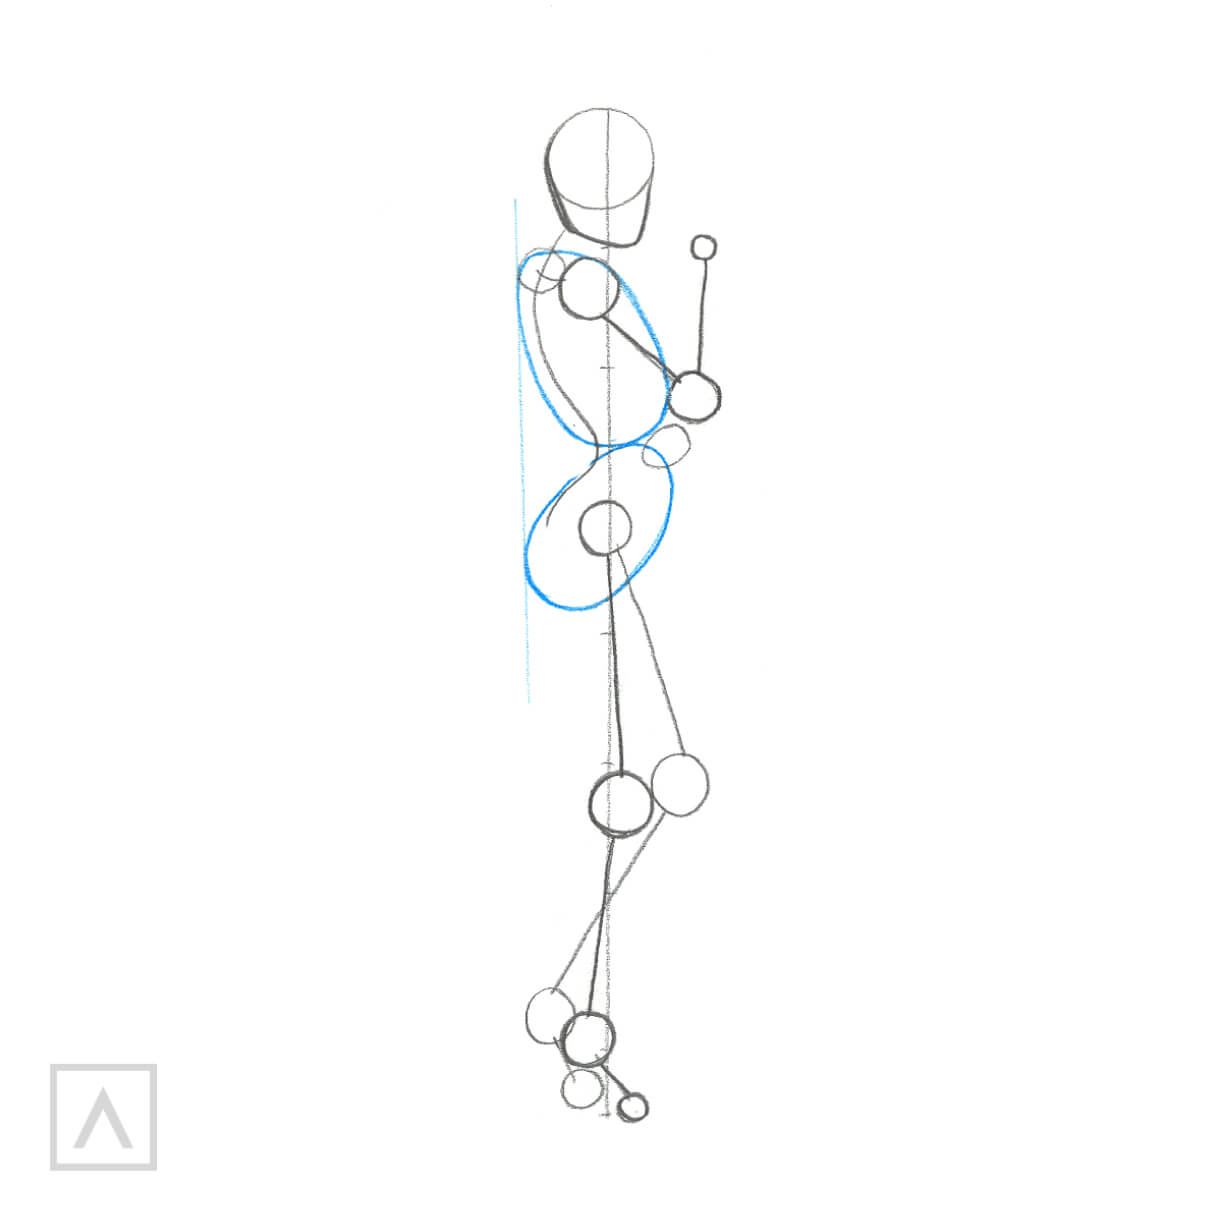
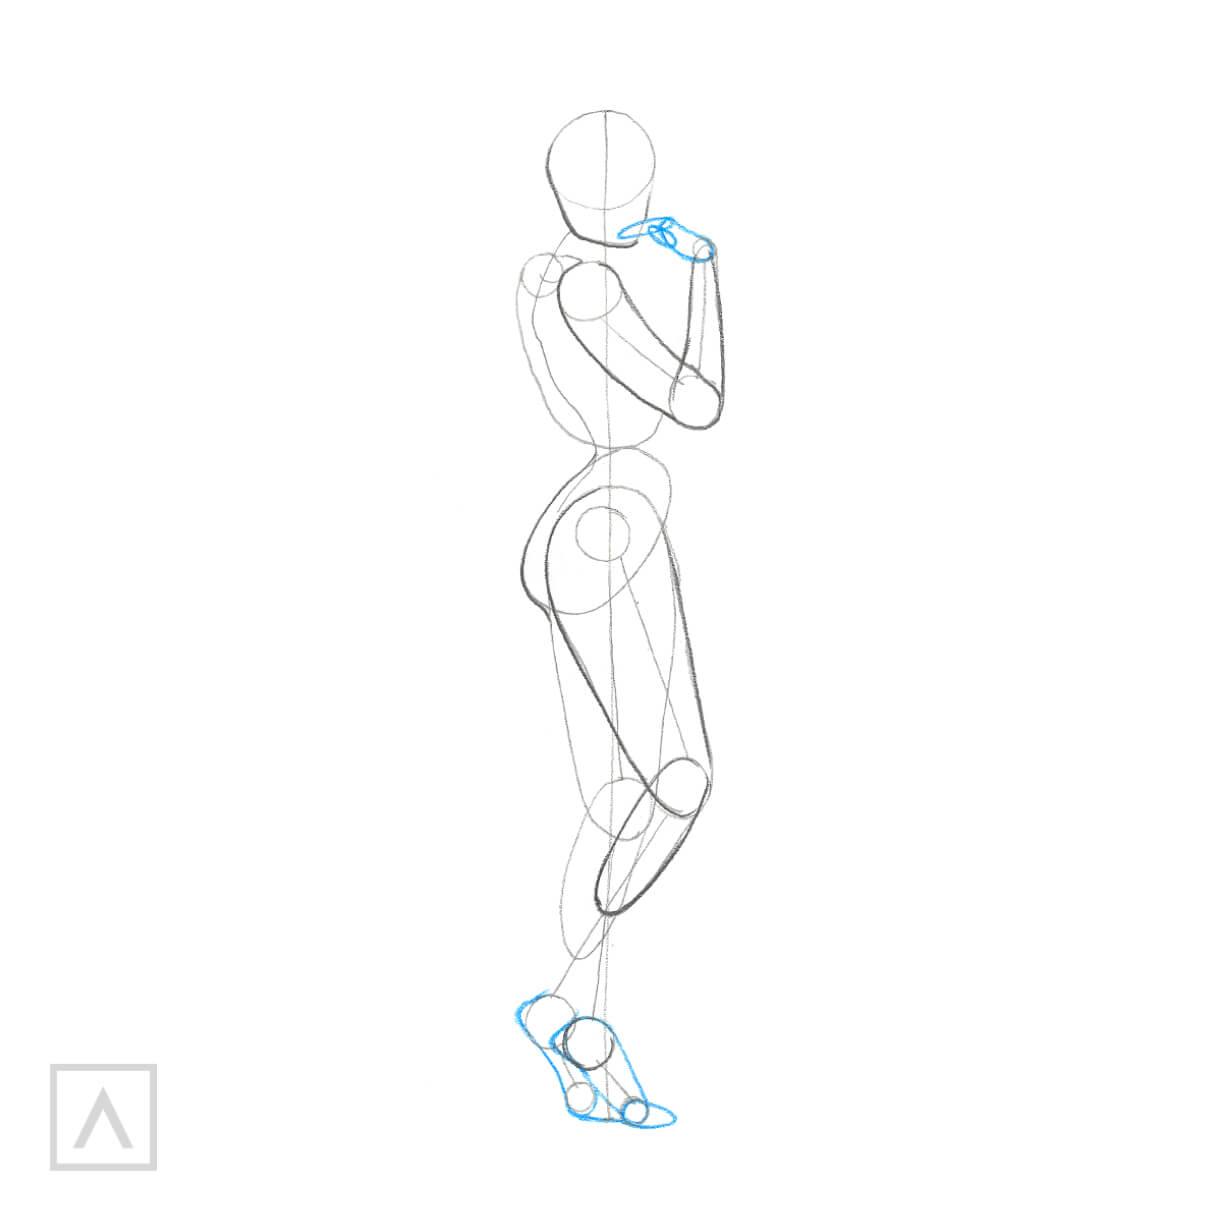
By now, you’re probably getting a pretty good idea of what comes next. I use a circle for the skull with an extended oval for the chin. The view of the woman is from her side, so I add the S-shaped spine along one side of the axis starting from the skull’s base. I put a little circle to show the pelvis joint above the 4th mark while adding ones for the shoulders between the 2nd and 3rd mark. I place a circle for the elbow in the middle of her arm between the shoulder and forearm, and the ones for the knees in the middle of the leg between the thigh and calves. The length of her outstretched arm reaches the middle of the thigh. The tiniest circle is for the wrist, where I will place a hand that is bent towards her face.
Step 3
By using shapes that remind me of beans, I add her chest and hips—being mindful to sketch them at an angle, as this is how the body balances itself against a wall when leaning.
Step 4
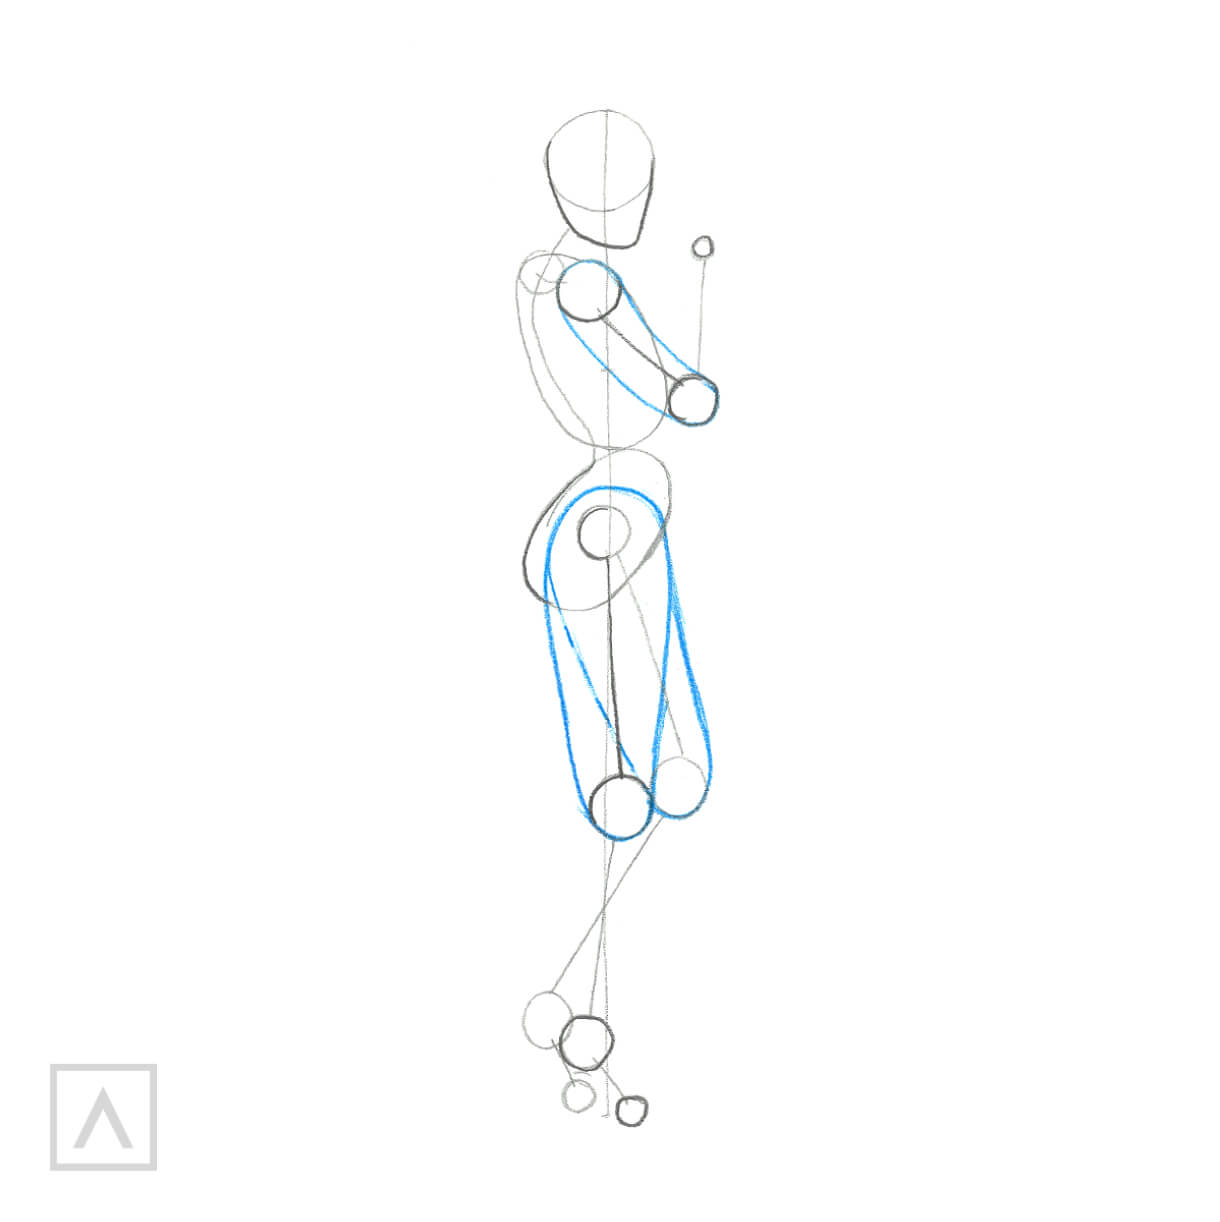
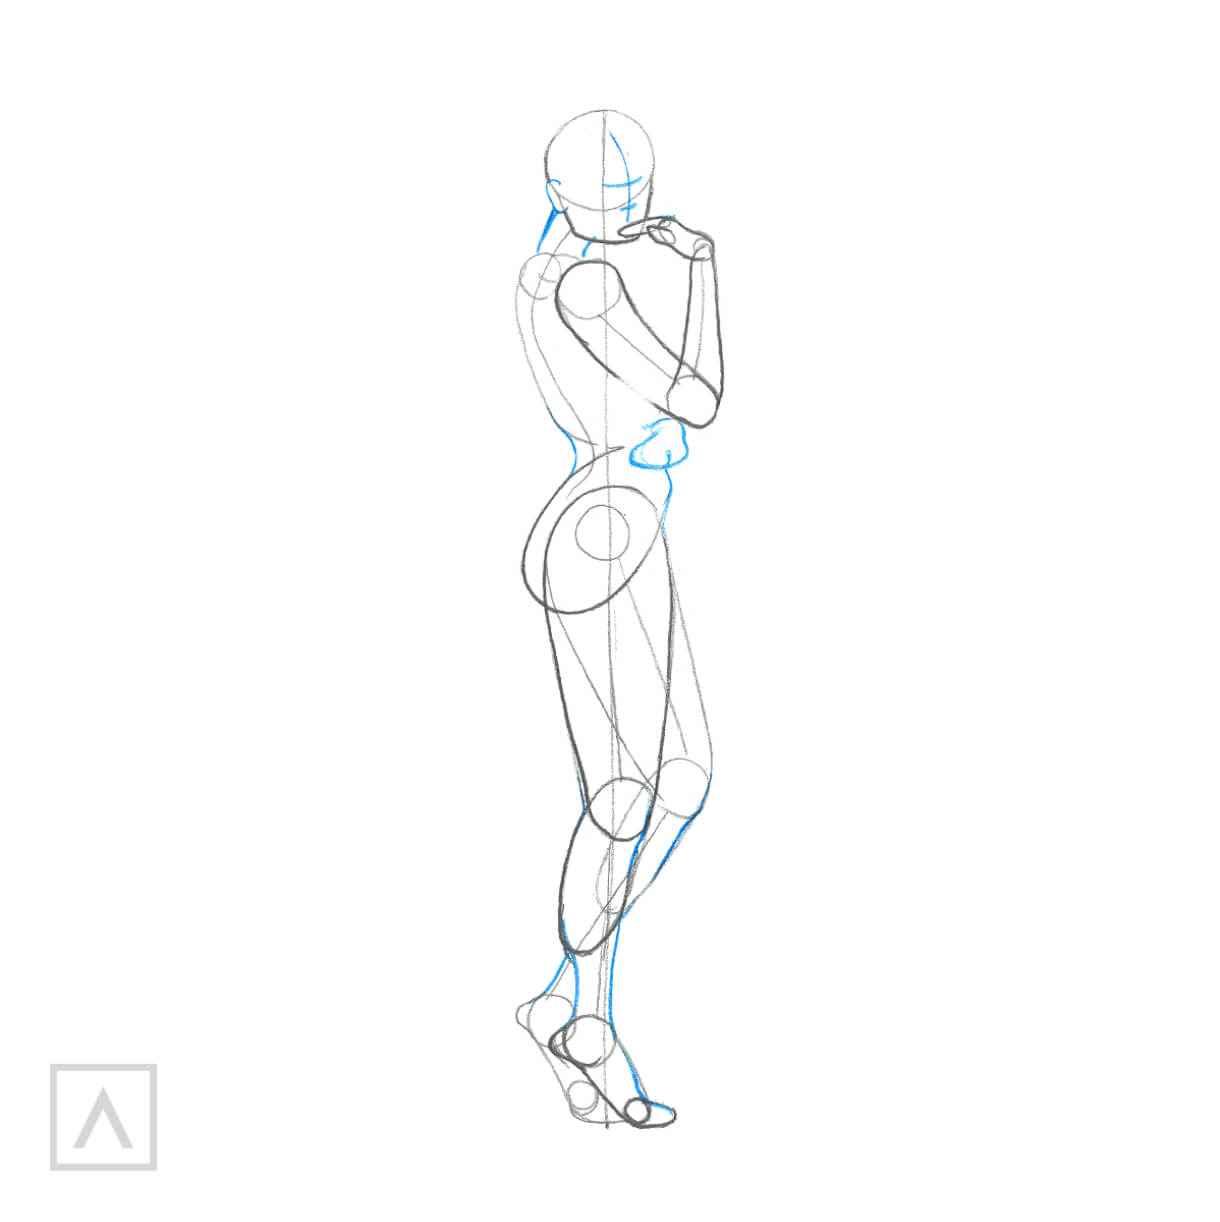
Now it’s time to shape the whole body by connecting the ovals with the joints, and to outline the width of her shoulders and hips. This woman’s left hand is not visible, so I don’t draw it.
Step 5
I outline the forearms and calves in the same way, drawing calves separate from the lower joints.
Step 6
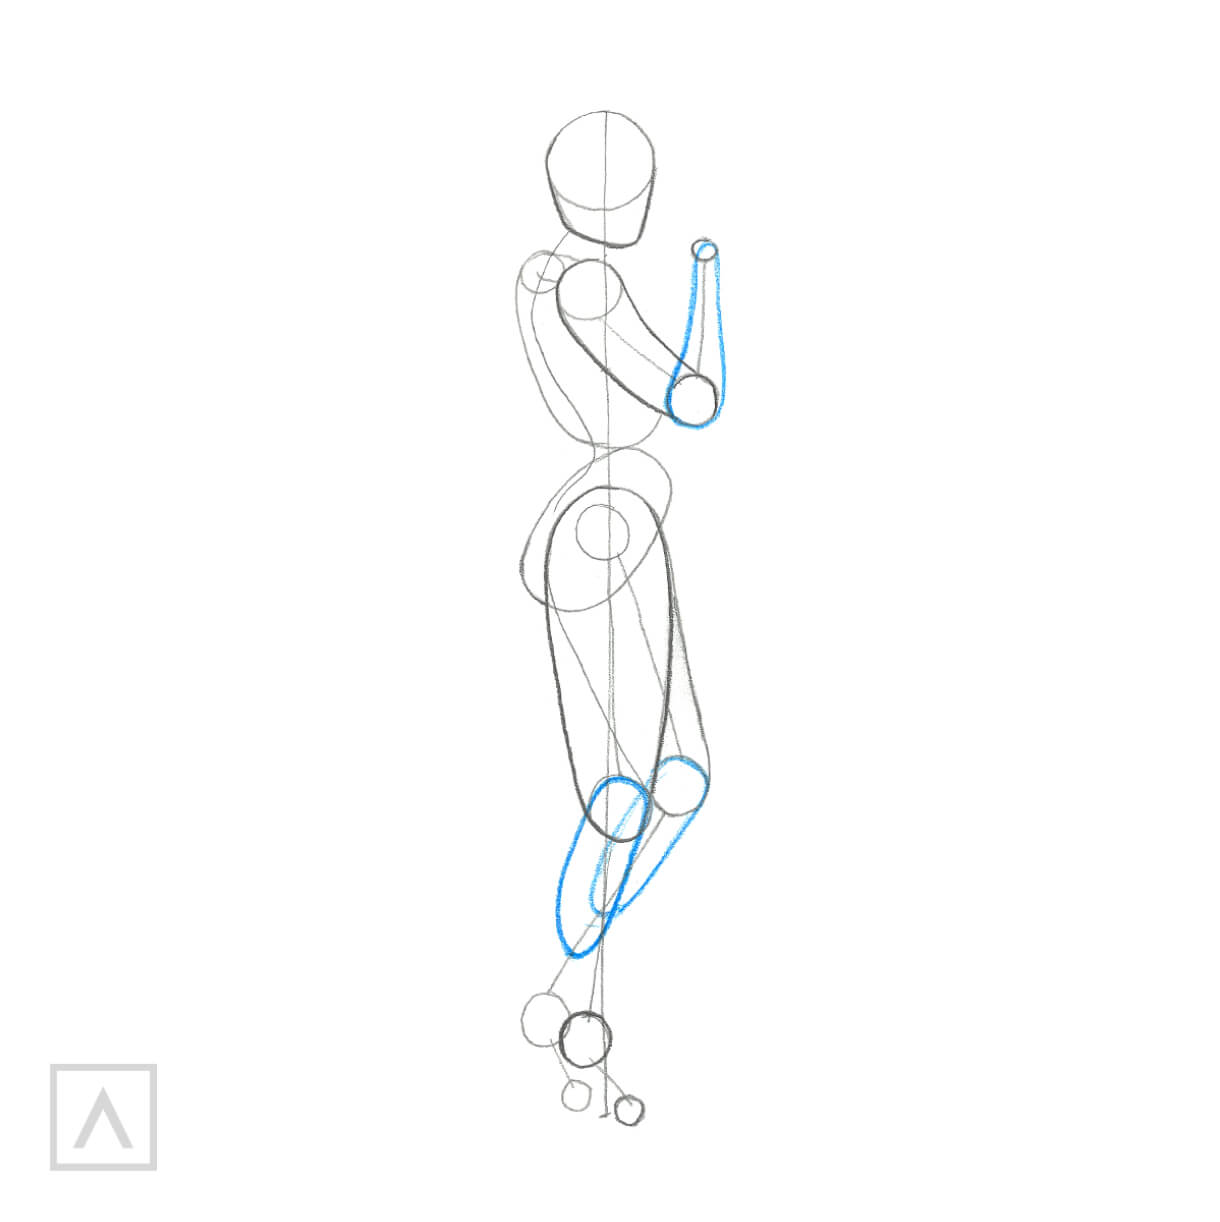
Since women have curvy bodies, I use lots of oval shapes to depict the limbs, wrists, and feet.
Step 7
Now for some details. I combine simple shapes with a nice, smooth line. I draw the neck and parts of her face. Before coloring, I get rid of all the preliminary lines.
Step 8
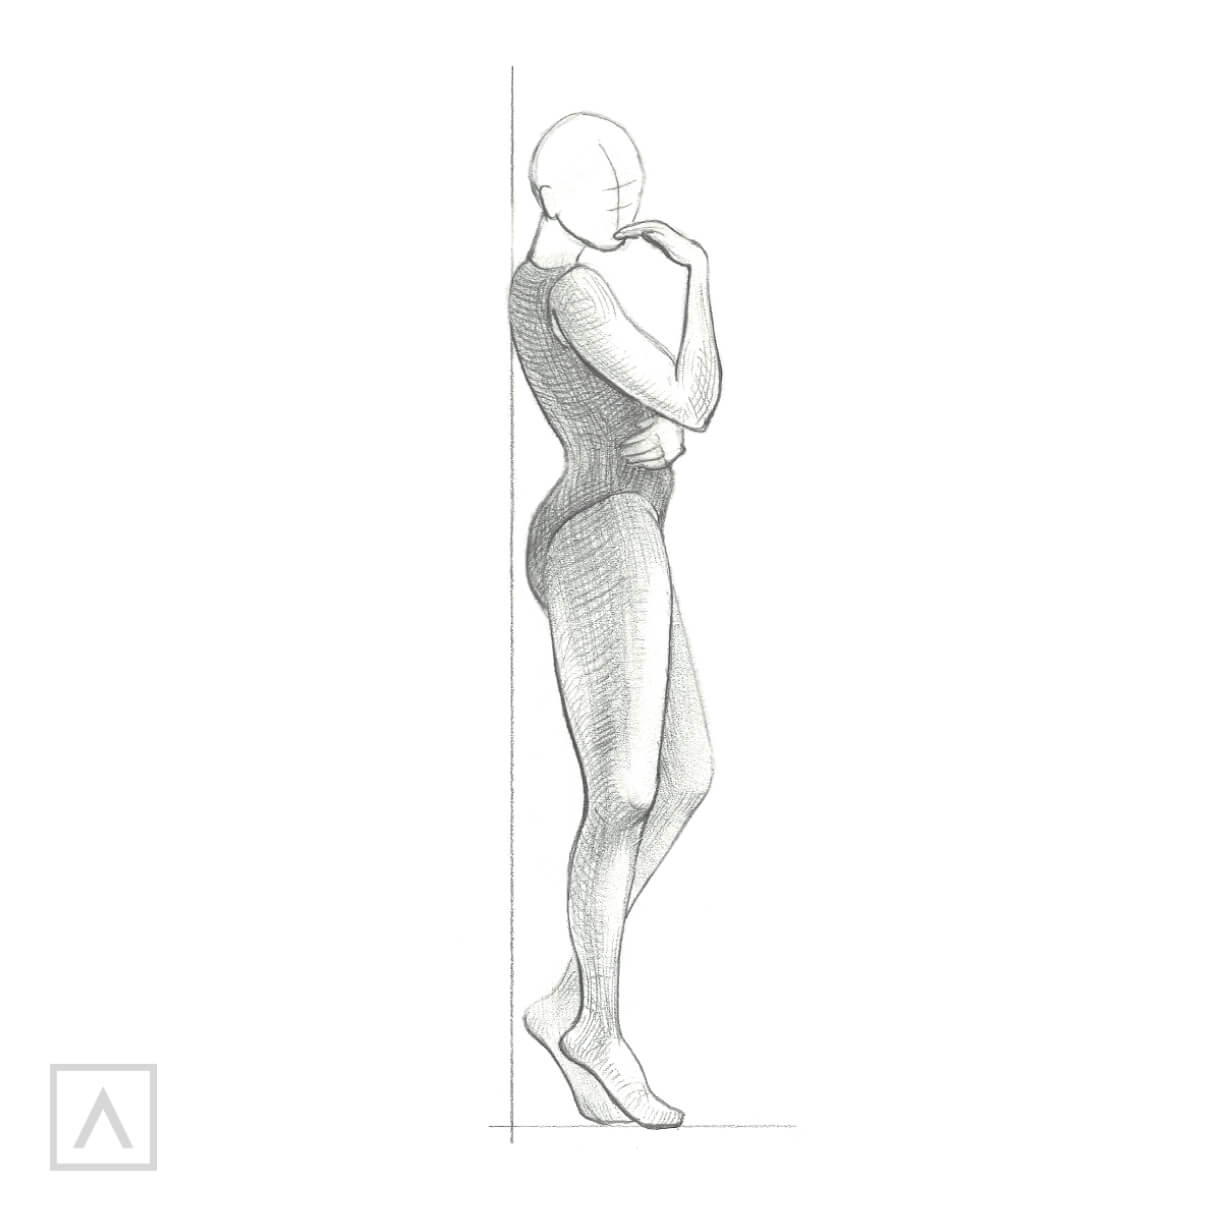
I draw a vertical line to show the wall on which she is resting. I know that the light isn’t hitting any of the surface behind my model, so I place my darkest hatching there and work toward lighter shades as I move to the front of her body, always following the contours of her shape.
I love drawing people. They are so interesting to look at and are never in the same pose twice. I urge you to practice drawing the human form whether it’s while you’re sitting in the park with your sketchbook, participating in a life drawing class, or from pictures in magazines or on the internet. Here at Arteza, we’ve made lots of guides and videos on how to draw a person, a face, different hairstyles — even braids — that you can visit at any time. I promise, the more you practice, the better you’ll get!
I’d really like to hear how you feel about drawing people, so please leave me a message below!


5 comments
This is a great way of showing how to draw the human body in different stances and so much easier when you know where to start. Thankyou so much.
We know how challenging it can be to draw sometimes, so we’re always happy to help where we can!
The human figure is such a fun and complex subject to get into, as there are so many different routes that you can take! The possibilities are endless! We’re glad we could share this tutorial, and we hope it helps simplify those proportions for you. We can’t wait to see what amazing new creations you have in store for us!
Thank you for this instruction. Very well done.
I have been a fabric artist for over 35 years… and took up painting last spring and have moved to drawing the human figure…. totally obsessed with it!! I have done a few portraits from photos…which came out extremely well!
I still struggle getting all proportions correct….when I do bodies and also when a face ,is slightly turned…
But at 74 years old, I am having a ball!!!